Saltar al contenido principal

Toshiba Satellite S55t-C5225 Screen Assembly Replacement

Qué necesitas

  1. Toshiba Satellite S55t-C5225 Screen Assembly Replacement, Battery: paso 1, imagen 1 de 1
    • Shut down the computer and disconnect all cables

    • Flip the computer over so the bottom is facing up.

  2. Toshiba Satellite S55t-C5225 Screen Assembly Replacement: paso 2, imagen 1 de 2 Toshiba Satellite S55t-C5225 Screen Assembly Replacement: paso 2, imagen 2 de 2
    • Remove the two 7.0 mm Phillips #0 screws that hold the battery in place.

  3. Toshiba Satellite S55t-C5225 Screen Assembly Replacement: paso 3, imagen 1 de 2 Toshiba Satellite S55t-C5225 Screen Assembly Replacement: paso 3, imagen 2 de 2
    • Carefully remove the battery by wedging a plastic opening tool in-between the battery and back cover.

  4. Toshiba Satellite S55t-C5225 Screen Assembly Replacement, Back Panel: paso 4, imagen 1 de 2 Toshiba Satellite S55t-C5225 Screen Assembly Replacement, Back Panel: paso 4, imagen 2 de 2
    • Remove the eleven 7.0 mm Phillips #0 screws that secure the back cover.

  5. Toshiba Satellite S55t-C5225 Screen Assembly Replacement: paso 5, imagen 1 de 2 Toshiba Satellite S55t-C5225 Screen Assembly Replacement: paso 5, imagen 2 de 2
    • Wedge the tip of a plastic opening tool between the back cover and metal frame.

    • Twist the plastic tool, while wedged, to release the retaining tabs from the frame.

    • Repeat these steps around the laptop to release all retaining tabs.

  6. Toshiba Satellite S55t-C5225 Screen Assembly Replacement: paso 6, imagen 1 de 2 Toshiba Satellite S55t-C5225 Screen Assembly Replacement: paso 6, imagen 2 de 2
    • Once all retaining tabs are released, pull up on the cover to remove.

  7. Toshiba Satellite S55t-C5225 Screen Assembly Replacement, Speakers: paso 7, imagen 1 de 1
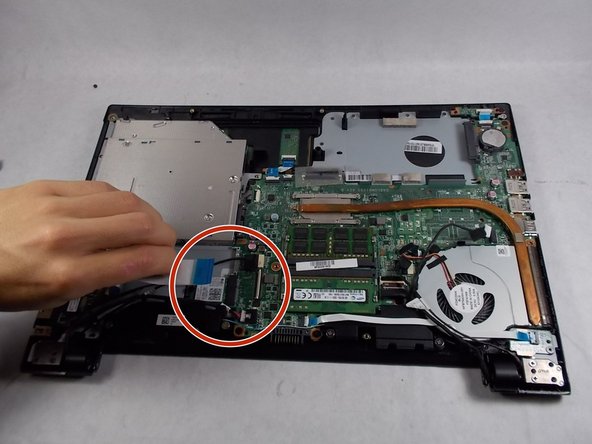
    • Disconnect the power button strip by flipping up the white plastic clamp that connects it to the motherboard.

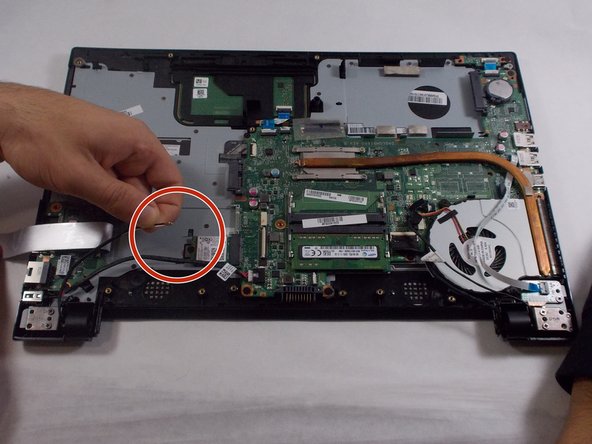
    • Pull the ribbon wire out from plastic clamp.

  8. Toshiba Satellite S55t-C5225 Screen Assembly Replacement: paso 8, imagen 1 de 2 Toshiba Satellite S55t-C5225 Screen Assembly Replacement: paso 8, imagen 2 de 2
    • Remove the four 10.0 mm Phillips #0 screws that hold the speakers in place.

  9. Toshiba Satellite S55t-C5225 Screen Assembly Replacement: paso 9, imagen 1 de 2 Toshiba Satellite S55t-C5225 Screen Assembly Replacement: paso 9, imagen 2 de 2
    • Follow the black wire that connects the speakers to the motherboard.

    • Pull the wire out from its socket to disconnect the speakers from the motherboard.

  10. Toshiba Satellite S55t-C5225 Screen Assembly Replacement: paso 10, imagen 1 de 2 Toshiba Satellite S55t-C5225 Screen Assembly Replacement: paso 10, imagen 2 de 2
    • Lift speakers up from their mounted position to remove.

  11. Toshiba Satellite S55t-C5225 Screen Assembly Replacement, Screen Assembly: paso 11, imagen 1 de 2 Toshiba Satellite S55t-C5225 Screen Assembly Replacement, Screen Assembly: paso 11, imagen 2 de 2
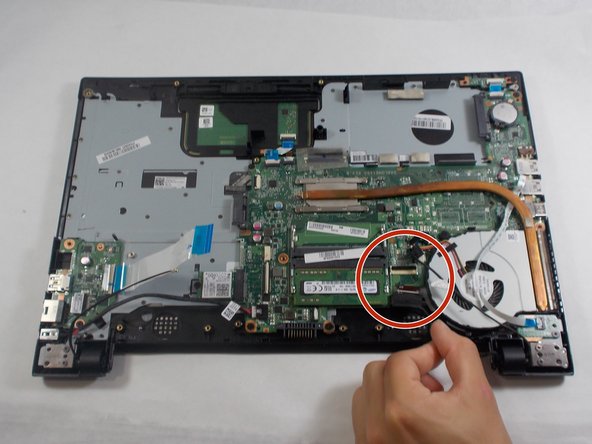
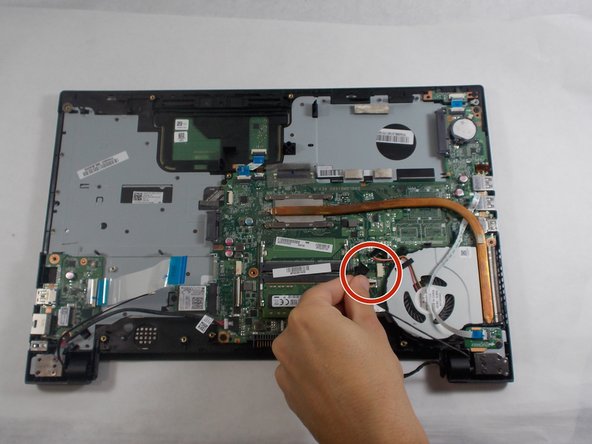
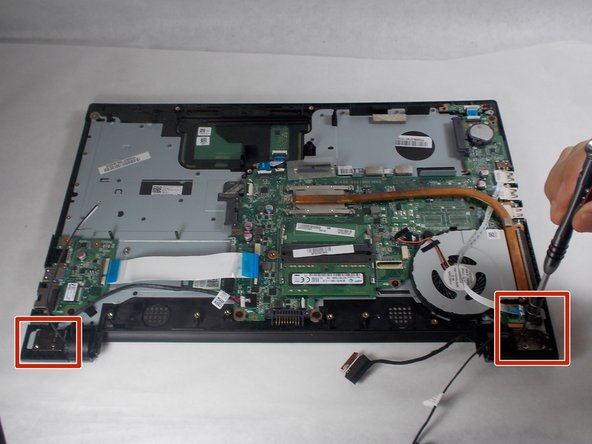
    • Disconnect LAN from the motherboard power wire. Pop up the white clamp that holds it in place, then pull the wire out.

  12. Toshiba Satellite S55t-C5225 Screen Assembly Replacement: paso 12, imagen 1 de 2 Toshiba Satellite S55t-C5225 Screen Assembly Replacement: paso 12, imagen 2 de 2
    • Disconnect the two cables connecting the screen assembly to the WIFI card.

  13. Toshiba Satellite S55t-C5225 Screen Assembly Replacement: paso 13, imagen 1 de 3 Toshiba Satellite S55t-C5225 Screen Assembly Replacement: paso 13, imagen 2 de 3 Toshiba Satellite S55t-C5225 Screen Assembly Replacement: paso 13, imagen 3 de 3
    • Disconnect all remaining cables that connect the screen assembly to the motherboard.

  14. Toshiba Satellite S55t-C5225 Screen Assembly Replacement: paso 14, imagen 1 de 1
    • Disconnect all remaining cables that connect the screen assembly to the motherboard.

  15. Toshiba Satellite S55t-C5225 Screen Assembly Replacement: paso 15, imagen 1 de 2 Toshiba Satellite S55t-C5225 Screen Assembly Replacement: paso 15, imagen 2 de 2
    • Remove the four 7.0 mm Phillips #0 screws on both ends of the laptop that attach the screen assembly to the laptop.

  16. Toshiba Satellite S55t-C5225 Screen Assembly Replacement: paso 16, imagen 1 de 3 Toshiba Satellite S55t-C5225 Screen Assembly Replacement: paso 16, imagen 2 de 3 Toshiba Satellite S55t-C5225 Screen Assembly Replacement: paso 16, imagen 3 de 3
    • Slowly open laptop while the bottom is facing up. Begin to separate the bottom of laptop from the screen assembly brackets.

    • Remove the screen assembly.

Conclusión

To reassemble your device, follow these instructions in reverse order.

Una persona más ha completado esta guía.

Javien Delgado

Miembro Desde 10/21/19

220 Reputación

2 Guías creadas

Equipo

UMass Dartmouth, Team S1-G5, Botvin Fall 2019 Miembro de UMass Dartmouth, Team S1-G5, Botvin Fall 2019

UMASSD-BOTVIN-F19S1G5

3 Miembros

15 Guías creadas

0 comentarios

Agregar Comentario

Ver Estadísticas:

Ultimas 24 horas: 2

Ultimos 7 días: 2

Ultimos 30 días: 11

Todo El Tiempo: 784