Saltar al contenido principal

Toshiba Satellite P55W-C5316 RAM Replacement

Qué necesitas

  1. Toshiba Satellite P55W-C5316 RAM Replacement, Back Panel: paso 1, imagen 1 de 2 Toshiba Satellite P55W-C5316 RAM Replacement, Back Panel: paso 1, imagen 2 de 2
    • To prevent injury, ensure the laptop is powered off before starting your work.

    • Unscrew the .3mm Phillips head screws on the back panel using the PH1 screwdriver.

  2. Toshiba Satellite P55W-C5316 RAM Replacement: paso 2, imagen 1 de 3 Toshiba Satellite P55W-C5316 RAM Replacement: paso 2, imagen 2 de 3 Toshiba Satellite P55W-C5316 RAM Replacement: paso 2, imagen 3 de 3
    • Be careful to not crack the panel where the USB and power cord ports are.

    • Insert the opening tool in between the back panel and the laptop to pry it open.

    • The back panel is magnetically attached at the front of the laptop so you may have to move the opening tool along the length of the panel.

    • Lift the panel from the front off of the laptop.

  3. Toshiba Satellite P55W-C5316 RAM Replacement, Battery: paso 3, imagen 1 de 3 Toshiba Satellite P55W-C5316 RAM Replacement, Battery: paso 3, imagen 2 de 3 Toshiba Satellite P55W-C5316 RAM Replacement, Battery: paso 3, imagen 3 de 3
    • The battery is located in the bottom right corner of the laptop.

    • Remove the four .5mm Phillips head screws on the battery using the PH1 screwdriver.

  4. Toshiba Satellite P55W-C5316 RAM Replacement: paso 4, imagen 1 de 2 Toshiba Satellite P55W-C5316 RAM Replacement: paso 4, imagen 2 de 2
    • Do not tug on the cord or battery. Instead, pull evenly on the connector.

    • Lift the battery and gently pull out the bundled cable connector.

  5. Toshiba Satellite P55W-C5316 RAM Replacement, RAM: paso 5, imagen 1 de 3 Toshiba Satellite P55W-C5316 RAM Replacement, RAM: paso 5, imagen 2 de 3 Toshiba Satellite P55W-C5316 RAM Replacement, RAM: paso 5, imagen 3 de 3
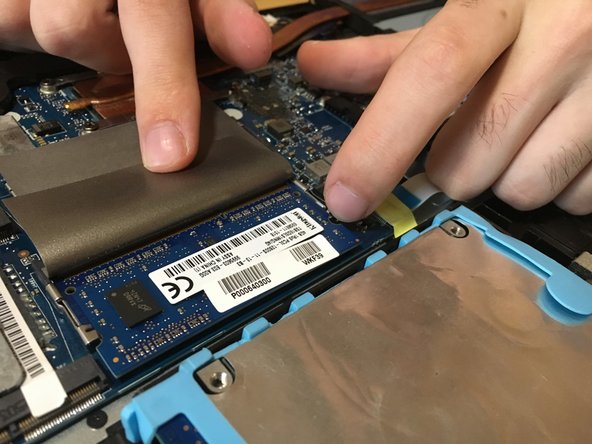
    • Lift up the flap to expose the RAM chip.

    • Un-clip the RAM by pulling the metal clips away from the chip on both sides.

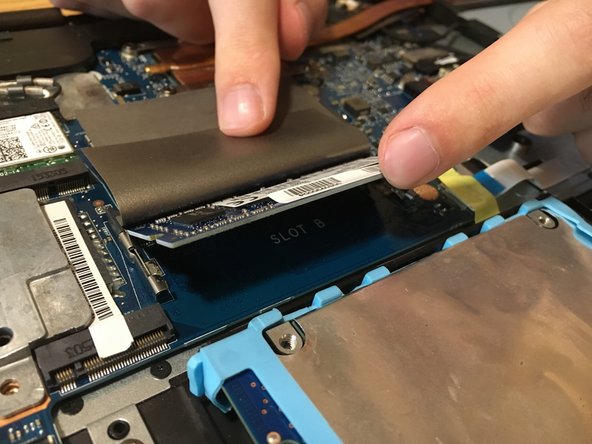
    • Lift the RAM up from the laptop and pull it away from the connector.

Conclusión

To reassemble your device, follow these instructions in reverse order.

Alec Bonnell

Miembro Desde 10/18/17

497 Reputación

4 Guías creadas

Equipo

0 comentarios

Agregar Comentario

Ver Estadísticas:

Ultimas 24 horas: 0

Ultimos 7 días: 0

Ultimos 30 días: 2

Todo El Tiempo: 596