Saltar al contenido principal

Toshiba Satellite CL15t-B1204X Screen Display Assembly Replacement

Qué necesitas

  1. Toshiba Satellite CL15t-B1204X Screen Display Assembly Replacement, Battery: paso 1, imagen 1 de 1
    • Flip the laptop over so the bottom of the device is facing upward.

  2. Toshiba Satellite CL15t-B1204X Screen Display Assembly Replacement: paso 2, imagen 1 de 1
    • Unscrew the 10 5mm Phillips screws, located on the bottom side of the notebook using the PH1 bit and the Magnetic Driver.

  3. Toshiba Satellite CL15t-B1204X Screen Display Assembly Replacement: paso 3, imagen 1 de 1
    • Pry open the bottom cover of the notebook with the plastic spudger tools. Slide a thin tool along the edges without ports to pop open the latches.

    • Be careful not to bend or crack the plastic back cover.

  4. Toshiba Satellite CL15t-B1204X Screen Display Assembly Replacement: paso 4, imagen 1 de 1
    • Remove the 1" yellow tape on top of the battery. This piece of tape is holding down the battery connection cable.

  5. Toshiba Satellite CL15t-B1204X Screen Display Assembly Replacement: paso 5, imagen 1 de 1
    • Lightly grip the battery on the two longest sides. Gently pull up until the adhesive on the notebook is separated from the battery.

  6. Toshiba Satellite CL15t-B1204X Screen Display Assembly Replacement: paso 6, imagen 1 de 1
    • Carefully unplug the battery from the device motherboard.

  7. Toshiba Satellite CL15t-B1204X Screen Display Assembly Replacement, Screen Display Assembly: paso 7, imagen 1 de 3 Toshiba Satellite CL15t-B1204X Screen Display Assembly Replacement, Screen Display Assembly: paso 7, imagen 2 de 3 Toshiba Satellite CL15t-B1204X Screen Display Assembly Replacement, Screen Display Assembly: paso 7, imagen 3 de 3
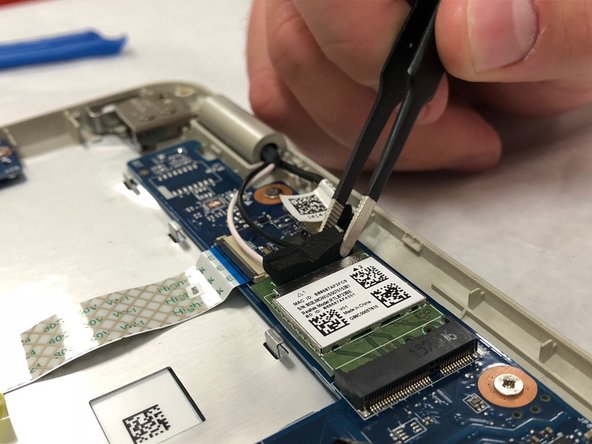
    • Unplug the power connector by pulling back the tape and sliding the connector away using the blue opening tool.

  8. Toshiba Satellite CL15t-B1204X Screen Display Assembly Replacement: paso 8, imagen 1 de 3 Toshiba Satellite CL15t-B1204X Screen Display Assembly Replacement: paso 8, imagen 2 de 3 Toshiba Satellite CL15t-B1204X Screen Display Assembly Replacement: paso 8, imagen 3 de 3
    • Remove the foam and unplug the black and white coaxial cables to the network card by pulling upward using the black tweezers.

  9. Toshiba Satellite CL15t-B1204X Screen Display Assembly Replacement: paso 9, imagen 1 de 2 Toshiba Satellite CL15t-B1204X Screen Display Assembly Replacement: paso 9, imagen 2 de 2
    • Remove the black webcam connector by pulling backwards with the tweezers.

  10. Toshiba Satellite CL15t-B1204X Screen Display Assembly Replacement: paso 10, imagen 1 de 1
    • Using a Phillips #1 screwdriver, remove four 5.00 mm screws from both corner hinges of the display assembly.

  11. Toshiba Satellite CL15t-B1204X Screen Display Assembly Replacement: paso 11, imagen 1 de 3 Toshiba Satellite CL15t-B1204X Screen Display Assembly Replacement: paso 11, imagen 2 de 3 Toshiba Satellite CL15t-B1204X Screen Display Assembly Replacement: paso 11, imagen 3 de 3
    • Open the laptop and remove the display assembly from the keyboard assembly.

Conclusión

To reassemble your device, follow these instructions in reverse order.

Una persona más ha completado esta guía.

Matthew Hook

Miembro Desde 03/25/19

439 Reputación

4 Guías creadas

Equipo

IUPUI, Team S1-G6, Hovde Fall 2019 Miembro de IUPUI, Team S1-G6, Hovde Fall 2019

IUPUI-HOVDE-F19S1G6

4 Miembros

6 Guías creadas

0 comentarios

Agregar Comentario

Ver Estadísticas:

Ultimas 24 horas: 0

Ultimos 7 días: 0

Ultimos 30 días: 4

Todo El Tiempo: 280