Saltar al contenido principal

Toshiba Satellite C55-A5302 ODD Replacement

Qué necesitas

  1. Toshiba Satellite C55-A5302 ODD Replacement, Battery: paso 1, imagen 1 de 1
    • Power down the laptop and remove all power cords. After this is done, turn the laptop over.

  2. Toshiba Satellite C55-A5302 ODD Replacement: paso 2, imagen 1 de 1
    • Slide the battery latches outwards away from the center of the device.

    • The right latch will slide to the right, and left latch to the left.

  3. Toshiba Satellite C55-A5302 ODD Replacement: paso 3, imagen 1 de 1
    • Lift and remove the battery from the device.

  4. Toshiba Satellite C55-A5302 ODD Replacement, Hard Drive: paso 4, imagen 1 de 1
    • Use the Phillips #1 screwdriver to unscrew the thirteen screws on the back of your device.

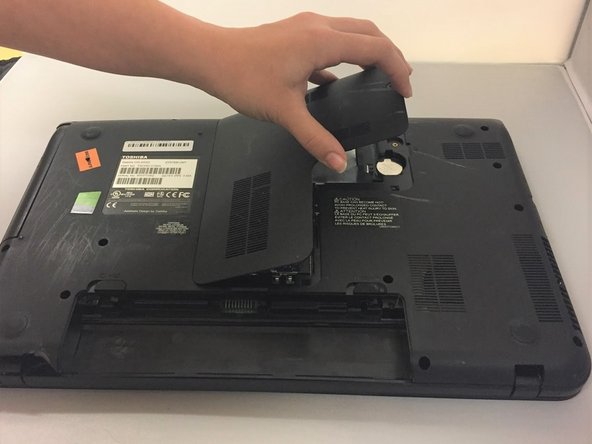
  5. Toshiba Satellite C55-A5302 ODD Replacement: paso 5, imagen 1 de 1
    • Remove the middle plastic cover to expose the hard drive.

  6. Toshiba Satellite C55-A5302 ODD Replacement: paso 6, imagen 1 de 1
    • Using the Phillips #1 screwdriver, remove the two screws holding the hard drive in place.

  7. Toshiba Satellite C55-A5302 ODD Replacement: paso 7, imagen 1 de 1
    • Remove the three screws using the Phillips #1 screwdriver.

    • Insert you fingers into the rubber ends and gently pull the hard drive out of the device.

  8. Toshiba Satellite C55-A5302 ODD Replacement, Optical Disk Drive: paso 8, imagen 1 de 1
    • Use the Phillips #1 screwdriver to remove the two screws under the hard drive.

  9. Toshiba Satellite C55-A5302 ODD Replacement: paso 9, imagen 1 de 1
    • Use a metal spudger and run it along the edges of the computer to take off the plastic back cover. (Starting near a port usually allows more space for the spudger to be inserted)

  10. Toshiba Satellite C55-A5302 ODD Replacement: paso 10, imagen 1 de 1
    • Slowly work from one end to the other to lift the back cover off.

  11. Toshiba Satellite C55-A5302 ODD Replacement: paso 11, imagen 1 de 2 Toshiba Satellite C55-A5302 ODD Replacement: paso 11, imagen 2 de 2
    • Grab hold of the optical drive and elevate it slightly and remove it from the computer.

Conclusión

To reassemble your device, follow these instructions in reverse order.

0 comentarios

Agregar Comentario

Ver Estadísticas:

Ultimas 24 horas: 0

Ultimos 7 días: 2

Ultimos 30 días: 4

Todo El Tiempo: 405