Saltar al contenido principal

Toshiba Satellite A65-S126 Internal Fan Replacement

Qué necesitas

  1. Toshiba Satellite A65-S126 Internal Fan Replacement, Battery: paso 1, imagen 1 de 1
    • Flip the laptop over so the bottom is facing up.

    • Slide each of the three tabs on the bottom half of the assembly into the unlocked position.

  2. Toshiba Satellite A65-S126 Internal Fan Replacement: paso 2, imagen 1 de 1
    • Gently lift the battery out of the computer.

  3. Toshiba Satellite A65-S126 Internal Fan Replacement, Upper Assembly: paso 3, imagen 1 de 1
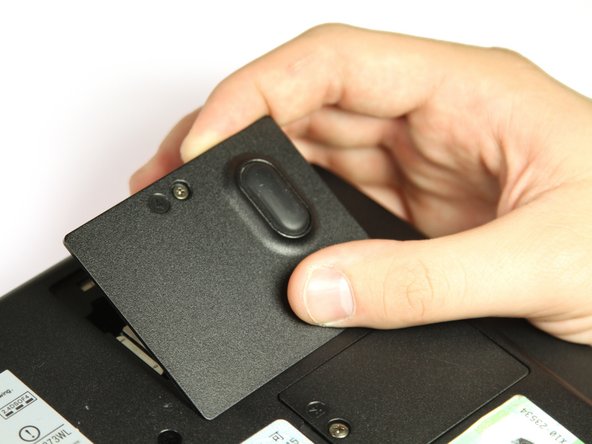
    • Remove the single 3mm Phillips #00 screw that secures the wireless card cover.

  4. Toshiba Satellite A65-S126 Internal Fan Replacement: paso 4, imagen 1 de 1
    • Remove the WIFI module cover. It will pull right off.

  5. Toshiba Satellite A65-S126 Internal Fan Replacement: paso 5, imagen 1 de 2 Toshiba Satellite A65-S126 Internal Fan Replacement: paso 5, imagen 2 de 2
    • Unplug the white and black wires from the WiFi module.

  6. Toshiba Satellite A65-S126 Internal Fan Replacement: paso 6, imagen 1 de 1
    • Remove the twelve 8mm button head Phillips #00 B8 screws.

    • Remove the two 14 mm button head Phillips #00 B14 screws.

    • Remove the two 10 mm Phillips #00 battery compartment screws.

    • Remove the two 8 mm Phillips #00 screws.

  7. Toshiba Satellite A65-S126 Internal Fan Replacement: paso 7, imagen 1 de 1
    • Remove the seven 4mm flat Phillips #00 screws.

    • Remove the seven 20mm button head Phillips #00 screws.

  8. Toshiba Satellite A65-S126 Internal Fan Replacement: paso 8, imagen 1 de 1
    • Use the plastic opening tool to pry the two halves apart.

  9. Toshiba Satellite A65-S126 Internal Fan Replacement, Internal Fan: paso 9, imagen 1 de 1
    • Remove the three 2 mm Phillips #00 screws that secure the fan to the motherboard.

  10. Toshiba Satellite A65-S126 Internal Fan Replacement: paso 10, imagen 1 de 1
    • Remove the small plug connecting the fan power cable to the motherboard.

    • Carefully lift the fan out of the computer.

Conclusión

To reassemble your device, follow these instructions in reverse order.

Una persona más ha completado esta guía.

Cole Uhland

Miembro Desde 09/30/13

216 Reputación

2 Guías creadas

Equipo

Cal Poly, Team 14-8, Forte Fall 2013 Miembro de Cal Poly, Team 14-8, Forte Fall 2013

CPSU-FORTE-F13S14G8

4 Miembros

8 Guías creadas

0 comentarios

Agregar Comentario

Ver Estadísticas:

Ultimas 24 horas: 0

Ultimos 7 días: 1

Ultimos 30 días: 2

Todo El Tiempo: 1,007