Saltar al contenido principal

TI-36X Pro Solar Panel Replacement

Qué necesitas

  1. TI-36X Pro Solar Panel Replacement, Back Cover: paso 1, imagen 1 de 2 TI-36X Pro Solar Panel Replacement, Back Cover: paso 1, imagen 2 de 2
    • Remove the calculator's protective cover.

    • Place the calculator face down.

  2. TI-36X Pro Solar Panel Replacement: paso 2, imagen 1 de 2 TI-36X Pro Solar Panel Replacement: paso 2, imagen 2 de 2
    • Using a Phillips #1 screwdriver, remove the six 6mm screws from the back of the case and place them to the side.

    • Start from the notches on the top edge and use your fingers or a prying tool to carefully pry the back cover from the calculator.

  3. TI-36X Pro Solar Panel Replacement, Battery: paso 3, imagen 1 de 2 TI-36X Pro Solar Panel Replacement, Battery: paso 3, imagen 2 de 2
    • Use a Phillips #00 screwdriver to remove the two 7.5 mm screws holding the battery cover to the case.

    • Remove the battery cover without disconnecting either end of the blue wire.

    • Use your finger to move the battery cover to the side.

  4. TI-36X Pro Solar Panel Replacement: paso 4, imagen 1 de 1
    • Use the flat side of a spudger to remove the battery by lifting the bottom edge.

    • When inserting a new battery, check the polarity (+ or -) and insert the new battery with the + side on top.

  5. TI-36X Pro Solar Panel Replacement, Solar Panel: paso 5, imagen 1 de 2 TI-36X Pro Solar Panel Replacement, Solar Panel: paso 5, imagen 2 de 2
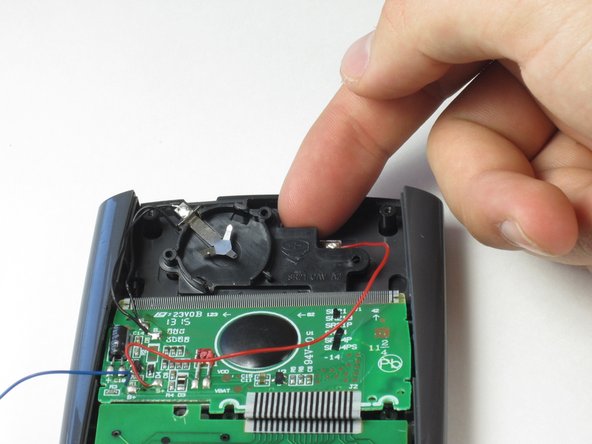
    • Be careful not to disconnect any wires when removing parts from the calculator.

    • To detach the solar panel, use a Phillips #00 screwdriver to remove the 4.5mm screw that connects the solar panel to the calculator.

    • Once the screw has been removed, you may lift the top of the black solar panel cover with your finger and gently pull away from the green circuit board.

  6. TI-36X Pro Solar Panel Replacement: paso 6, imagen 1 de 2 TI-36X Pro Solar Panel Replacement: paso 6, imagen 2 de 2
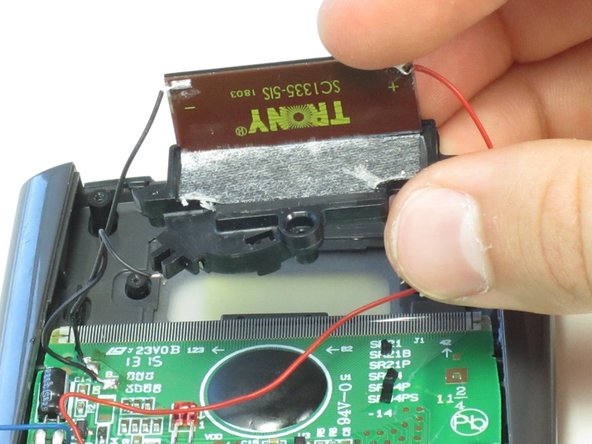
    • Turn the black cover so the solar panel is facing you.

    • Do not use a prying motion when removing the solar panel as this might break it.

    • Insert the flat end of the spudger between the solar panel and the black cover at the corner where the red wire connects.

    • Carefully slide the spudger all the way underneath the solar panel until it detaches from the tape.

    • If the solar panel does not completely disconnect once you have fully inserted the spudger, you can gently pull or pry it the rest of the way off.

  7. TI-36X Pro Solar Panel Replacement: paso 7, imagen 1 de 1
    • De-solder and disconnect the red and black wires from the solar panel.

    • You may irreperably damage your calculator if you connect the black and red wires to the wrong sides. Red connects with the "+" and black with the "-" sign.

Conclusión

To reassemble your device, follow these instructions in reverse order.

3 personas más completaron esta guía.

James Roslund

Miembro Desde 04/22/14

188 Reputación

1 Guía escrita

Equipo

Cal Poly, Team 11-52, Amido Spring 2014 Miembro de Cal Poly, Team 11-52, Amido Spring 2014

CPSU-AMIDO-S14S11G52

4 Miembros

10 Guías creadas

0 comentarios

Agregar Comentario

Ver Estadísticas:

Ultimas 24 horas: 3

Ultimos 7 días: 10

Ultimos 30 días: 32

Todo El Tiempo: 4,566