Introducción
Sustituye el conjunto del láser de tu unidad de disco óptica. Sustituir el láser requiere que tengas o compres un láser nuevo.
Qué necesitas
-
-
Utiliza la parte plana de una espátula metálica para hacer palanca y quitar las patas de goma que ocultan los tornillos.
-
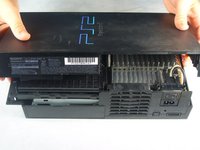
Quita los siguientes ocho tornillos que aseguran la carcasa superior con la inferior.
-
Cuatro tornillos Phillips de 55.4 mm.
-
Cuatro tornillos Phillips de 18.0 mm.
-
-
-
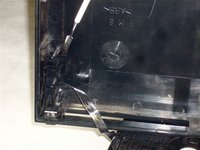
Algunos modelos tienen un número diferentes de tornillos y patas de goma. Quita todos los que veas en la carcasa inferior.
-
El modelo que tiene 10 tornillos, tiene 6 en la parte inferior y 4 en la bandeja superior de la parte inferior. Échale un vistazo a la foto para que te quede más claro.
-
-
-
-
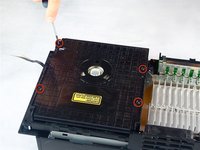
Quita los cuatro tornillos Phillips de 6.4 mm que sujetan la tapa superior de la unidad de disco óptico.
-
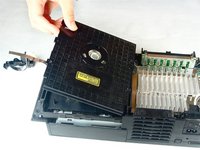
Levanta y quita la tapa de la unidad de disco óptico.
-


Para volver a montar tu PlayStation 2 sigue la guía en orden inverso, desde el final hacia arriba.
Para volver a montar tu PlayStation 2 sigue la guía en orden inverso, desde el final hacia arriba.
Cancelar: No complete esta guía.
34 personas más completaron esta guía.
Un agradecimiento especial a estos traductores:
100%

¡ MemoryOverflow nos está ayudando a reparar el mundo! ¿Quieres contribuir?
Empezar a traducir ›

Equipo

Cal Poly, Team 19-1, Maness Fall 2009 Miembro de Cal Poly, Team 19-1, Maness Fall 2009
CPSU-MANESS-F09S19G1
4 Miembros
35 Guías creadas
8 comentarios
just did the laser replacement, however the playstation still identifies "no data" when game is inserted. it says "reading disk" for a few seconds then nothing else happens. thought?
Have you removed the security solder blob? All new Lenses have this somewhere in the circuitry.
I noticed that many times when you replace a lens it throws of the rotary motor. Some ps2 consoles have only 1 hex adjustment yet others have 2. If you have the covers off and just replaced the lenses you should always plug it back in w/ the top off still and adjust it until you see the disc spinning rapidly and laser is moving back and forth. Another way for calibrating is to remove said disc and if lens and ribbon move all the way forward and all the way back 3 or more times then you are almost done. At that point plug in tv chord and place in a disc if the PlayStation 2 logo comes on and disappears in less than 3 seconds carefully replace all parts and your good to go.
Could you please add the parts you would need to replace this to the parts portion.
Nice guide by the way.