Introducción
Esta guía te ayudará a reemplazar el cable del botón de volumen/encendido. Advertencia: esta guía requiere soldadura.
Qué necesitas
-
-
Con la pistola de calor configurada en "baja", comienza a calentar la parte inferior del Touch cerca del botón de inicio.
-
-
-
Inserta el borde de una herramienta de apertura de iPod entre el panel de vidrio frontal y el marco de plástico cerca del botón de inicio.
-
Haz palanca en el borde inferior del panel frontal hacia arriba, teniendo cuidado de no doblar el vidrio en exceso.
There should be (in general) better notes about the reassembly process. Getting the thing glued back in is WAY harder than just "reverse this step." Getting it to sit flush with any kind of adhesion is pretty difficult. No real advice other than make sure the edges of the metal thing at the top of the back of the digitizer are in the right slots and use judiciously placed pieces of 3M 300LSE adhesive.
I actually just figured it out. I had the ribbon cable for the digitizer running under the LCD and that wasn't allowing the LCD to sit down far enough. By re-folding the digitizer cable so it was triple-folded (when you do it you'll see what I mean) and only under the glass where there is no LCD, you'll get the glass to sit right.
I'm havin' problems with mine... hum, the front panel broke and i don't know where can i buy a new one. Can you help me?! Detail, the Touch screen still working... the external screen is broken, but the internal is ok...
EBay mate sells plenty
Greg W -
Glue is under the black part of the glass, not under the clear part of the glass.
The Glue is mostly around the top and bottom about 1/2 inch in or so, around both left and right edges the strip of glue is very thin about 1/8 inch or so.
I had success with heat and sliding the tool or pick up and down the side where there is less glue until it started separating being careful that I was between front glass panel and the black plastic bezel.
Take a look at the post What parts to move from the broken screen?
That will give you some advice as to what to move over from the broken screen, metal bracket, home button and small sponge spacer on the tip of the digitizer connector. Also how important it is to use new adhesive. If after assembling the screen bulges on one side (top or bottom) take the time to dissasemble and check that everything is in place (flat) and like jonathan writes, the digitizer cable is folded.
-
-
-
Retira con cuidado la parte superior del conjunto del panel frontal del adhesivo que lo sujeta al Touch, teniendo cuidado con el cable digitalizador corto que conecta los dos componentes.
The LCD cable which attaches to the logic board, is, indeed, very short. When reassembling the iPod, you may only be able to leave a small crack between the glass and the body to allow for enough space to reattach this cable. A plastic opening tool works well, but be warned: it takes quite a bit of patience.
Indeed the LCD cable which attaches to the logic board is short and I spent a good 30 minutes trying to get it to seat. When I finally did I realized I broke the right side and that is why my display is not working now. When they say difficult, they mean difficult - I have experience with electronics and I recommend you first practice on an older unit if you can.
Before i do this repair, does my screen have to be all together. Because my iPod got cracked a while ago, so do i have to buy a new screen so i can put the jack in? Also what goes first in the process when doing both of those things ?
Reconnecting the data cable is actually pretty easy. Just hold your screen at a 90 degree angle and put it on your underlying surface (and not on the back part of your ipod). Then just use the opening tool to reconnect the cable. The cable is long enough. If you connected it properly try pushing the home button on the back part (not the actual button). If done properly, your screen should light up. (if not try again to connect the cable) Then just fold the screen onto the back part without lifting it. The cable disconnects very easily.
-
-
-
Retira los siguientes ocho tornillos Phillips #00:
-
Un tornillo Phillips de 3,5 mm
-
Dos tornillos Phillips de 3,0 mm
-
Un tornillo Phillips de 2,3 mm
-
Un tornillo Phillips de 2,4 mm
-
Tres tornillos Phillips de 2,0 mm
The antenna cable will almost always stick to the digitzer and often the glass is broken there. You can use a knife to pick out broken glass around the edges elsewhere but use ONLY PLASTIC tool to separate the antenna cable from the old digitzer. This cable is very thin and a metal tool can easily cut the cable which you cannot then repair but must buy a replacement.
If you are removing broken glass be sure to recover the steel plate glued to the top of glass as well as the home button at the bottom of the assembly.
This steel plate or bracket has been discussed many times here. My best experience is to NOT move it to a new screen. Without the bracket and using enough adhesive in fact brings the new screen closer to the chassis and a snugger fit. Read more here: What parts to move from the broken screen?
asle -
Notice, in the image the switch for the home button has a tiny sub-1mm dot in the center of it. When I reassembled the home button did not work. That tiny cylinder of material had been knocked off the switch. A rounded probe could still activate the switch, but the flat metal plate on the home button could not. Fortunately, I was working on a white cloth, and a careful search turned up the tiny cylinder. I was able to reattach it and repair the home button.
I would like to add that the tiny cylinder is 0.65mm in diameter and 0.20mm high. I was able to successfully reattach it using a thick cyanoacrylate. You must be careful not to foul the switch's membrane with too much glue. I would suggest using fine point tweezers and a metal probe to apply the tiny dot of glue. You need a steady hand for this.
ciradrak -
-
-
-
Usa el borde de una herramienta de apertura de iPod para levantar la delgada cubierta de acero de la cámara trasera.
-
Retira la cubierta de acero del iPod.
Be sure to get the tool down deep when removing the rear camera. If not, you can accidentally snag the mid-section of the camera and it will come apart -- and you'll end up buying a replacement.
I have snagged that part of the camera several times. Easy to fix with super-glue along the edges of the cover. Works great. Sometimes no matter how carefully you pry up it falls apart.
asle -
This metal plate fits under plastic near RHS edge, and other side drops between the camera and a circuit board - to refit, you may need to loosen a nearby screw to allow you to move the circuit board a little to let this metal plate clip onto the side of the camera.
I had to press down hard with a plastic tool to get this metal plate to clip on.
Don't forget to re-tighten it later (I forgot).
A strip metallic cover, glued to display isn't mentioned in this guide.
Note that most new front panels are going without this part and you would need to remount it.
what exactly is the copper tape for that sits over the backplate that covers the rear camera? it gives me trouble every time.
The copper is important for heat dispensing. It has nothing to do with grounding or signal. In worst case if it is torn the Touch could get hotter but should work. If it is torn I usually just lift up one part and move it so it is in contact with the other copper part.
asle -
I just replaced the screen and rear cam on my 4th gen. The camera does not work??? Any ideas????????
Maybe the rear camera connection got loose when you lifted up the logic board in top to replace the digitizer. I would open it again and check the connection to the rear camera. Hope you fix it!
asle -
-
-
-
Inserta el borde de una herramienta de apertura debajo de la placa intermedia de acero cerca de la esquina inferior izquierda del Touch.
-
Haz palanca lentamente hacia arriba para separar la placa del adhesivo que la sujeta a la carcasa interior de plástico.
-
Si la placa aún está unida a la placa lógica, vuelve a calentar el área para aflojar el adhesivo y, luego, separa lentamente la placa de la placa lógica con la herramienta de apertura.
-
Hay un cable plano delgado y frágil debajo de la placa. Al levantar la placa, ten mucho cuidado de no rasgar el cable.
I couldn't get a spudger in-between this space, so I went to the side where the three screws were on the left hand side and worked my way towards the bottom to separate the glue...
The power and volume wire on the logic board were covered with adhesive. Be careful! While trying to remove the steel mid plane I found that the adhesive will rip the ribbon!
Here is where you take it easy. Two things can be broken here.
-Use time to carefully separate the bottom left part of the midplane. It sticks to the speaker which you tear the speaker leads if you are to hasty to lift it up. And remember the mid plane must not be bended up here since it needs to be 100% aligned so the new digitizer does not bulge here when in place.
- The second picture. The black visible adhesive sticks to the volume cable. Use time to carefully separate the mid plane here so the cable is not ripped when you lift up the midplane. Pry a plastic tool like the picture or/and a spudger slowly in until you see/feel the midplane loosening. A broken volume cable is no fun.
That small ribbon cable ripped, be sure to really watch this - look at the second picture in this step and try to make sure you understand where it is on the board under it.
This was difficult during both disassembly and reassembly. I used a thin guitar pick to separate the ribbon cable by the volume buttons from the steel midplane. Reassembly was tough because I didn't have the ipod dock connector seated correctly, AND more importantly, the speaker has a part that needs to be inserted into a black part on TOP of the dock connector-- it looks almost like a tiny air duct that has a foam gasket around it.
I was able to replace the home button ribbon cable without having to fully remove the steel mid plane. It lifted up enough from the iPod's body that I was able to slip the ribbon in around the support it sticks to and hold it in place until the adhesive set.
Much simpler, and didn't cause any problems -- the mid plane didn't deform, and snapped right back into place.
Thanks for the guide.
Unfortunately there was so much glue on the tiny power/volume button ribbon cable that any attempt at removing the steel cover plate would eventually rip that cable at the 4 solder joints. A picture of that cable would help tearing down more securely.
Is there a way to repair the torn ribbon cable or should I consider my iPod as dead now?
-
-
-
Inclina ligeramente el plano medio de acero para sacarlo de la caja trasera.
-
Levanta el plano medio de acero de la carcasa trasera y retira el trozo de cinta de cobre pegado a la cámara trasera.
I was able to stop at step 8 for the battery replacement.
Once you remove the metal shield, desolder the 3 leads. Then use your heat gun to warm the battery. Use plastic pry tool between copper backing and battery and separate them (two adhesive strips on the sides of the battery). Once done with this, you can snake the battery ribbon cable from between the logic board and aluminum casing. Not as easily, but still very doable, snake the new battery ribbon back through the same slot; solder 3 points and reassemble. Much easier than removing the entire board. Good luck!
Oh also, not mentioned in this guide - there is a plastic/silicon substance covering the 3 leads. Prior to desoldering remove this as much as possible with metal or plastic spudger (if metal, be sure not to bridge the connections).
I stopped dismantling here as well and was able to replace the battery and everything works on the ipod. tricky parts for me were the copper adhesive on the rear camera and getting the data display cable reconnected
I used plenty of heat first heating the ipod in an industrial oven to about 150 F and then as needed heating a heat gun.
dhawke -
what do you do if you break the copper connector to the camera?
The copper tape is mainly for heat dispersion. Without the copper tape it should work anyway but I would just lift up and move one part of the tape so that it is in contact with the other part when you put it together.
asle -
justinallison1, From what I understand, it is ok if that copper tape rips. In fact, I have seen people remove it completely. If it rips, just try and have the 2 pieces touching. (This is what I have researched and done myself with no negative results.
after removed the steel mid plate, does anybody measure the battery voltage? I measured the battery voltage is only 0.3V. is it normal? I de-soldered the battery three points and measured the battery voltage 3.8V. So It looks like battery is OK. The logic board has problem. So I connected external power source 3.7V and maximum current 50mA to the battery B+ and B-. I found the power source dropped to only 1.65V and 50mA. Could I say logic board has problem?
-
-
-
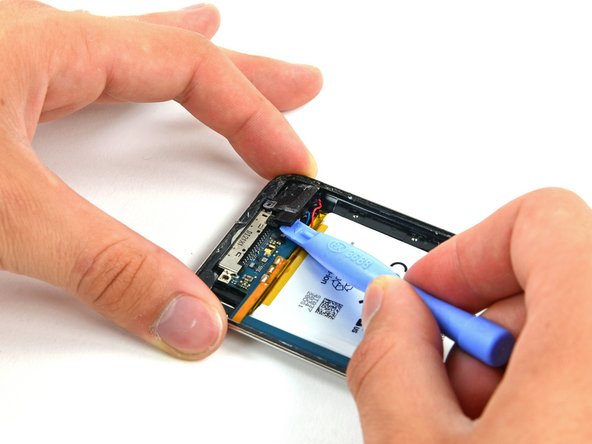
Utiliza una herramienta para abrir iPod para hacer palanca y levantar el conector de auriculares fuera de su zócalo de la tarjeta lógica.
I was able to ply the battery out slowly, without removing the logic board because the battery was so swollen. Just started by prying it out using the side of the case, not the logic board, and it peeled out slowly. As mentioned further down in the instructions, the copper flashing had to be pushed back into shape. The battery unsoldered easily, lifting as described. Just slip the flexible conductor from the battery out from under the logic board.
It powers up without a battery if you need to get data off the iPod.
-
-
-
Remueve el único tornillo Phillips de 2.6 mm que asegura el jack de audífonos conectado a la carcasa trasera.
-
-
-
-
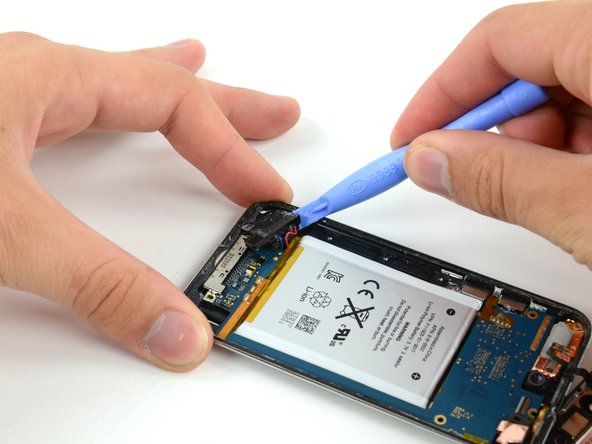
Utiliza una herramienta para abrir iPod para levantar cuidadosamente el borde del conector cercano a la batería fuera de su alojamiento.
-
Retira el conector de auriculares de su base dentro de la carcasa trasera.
-
-
-
Retira los siguientes tres tornillos cerca del borde superior de la placa lógica:
-
Un tornillo Phillips de 2.0mm
-
Dos tornillos Phillips de 2.3mm
Can you use the same colour coding as with The above sizes? [HvL]
These colors are too close together.. One red, two yellow.. Please.
Thanks for the comment! I adjusted that step, should be much easier to see now.
If you're ever having trouble seeing screw markers or other small details on a step, you can always view a larger version of the image with the "View Huge" link on the top left corner of the image.
Can someone explain what the copper/ribbon is that the lower yellow marked screw goes through is for? Perhaps only heat dissipation? The ipod I have was given to me with much of the glass smashed and picked out, so some of this is just missing. Obviously I can't put it back...
-
-
-
Utiliza el borde de una herramienta de apertura de iPod para hacer palanca suavemente, no retires la cámara de la carcasa trasera.
When you insert your tool to remove the rear camera make sure you have the tip all the way in. You can accidentally grab the middle of the camera assembly and it will come apart - and you'll have to replace the entire camera.
hi! i accidentally cut the copper adhesive on rear camera, and now it doesn't work: i start the app "camera" and it opens but still close the lens... can i fix it ? if yes, how? thanks
-
-
-
Utiliza un herramienta de apertura para IPod para levantar ligeramente la placa lógica junto la batería, lo suficiente para poder poder agarrarla con la otra mano.
-
Ten cuidado de no levantar demasiado, el cable del control de volumen está aún conectado y se puede romper con mucha facilidad.
-
Mientas levantas suavemente la placa con una mano, utiliza la herramienta de apertura para levantar la tarjeta lógica que se encuentra cerca de la cinta de cobre en el borde superior.
-
La tarjeta saldrá correctamente cuando el último conector de ensamblaje de la pantalla haya superado el borde superior de la carcasa trasera.
Use extreme caution when lifting the board. There are 2 ribbon cables that are extremely fragile, 1 connecting the rear facing camera and another connects the volume controller flex on the logic board.
Adding to Evon's comment:
BEFORE YOU LIFT UP THAT BOARD...
Use your plastic pry tool and make sure the flex cable, between the board and power button is not on top of the board. Take your time because even the slightest snag can tear that flex cable which leads to de-soldering/soldering the battery & flex cable.
Once the board is lifted the first time I usually put a piece of Kapton tape over that area of the cable in case it has to be pulled up again.
Can you explain this in a little more detail?
I have done a dozen or more iPod screens without any issue. I have one here now that does nothing. Just a black screen. It won't even take a charge.
Should I simply desolder those pads and then resolder? Sort of like unplugging and replugging to reset something?
Thanks!
Rene
Ciao dopo aver seguito il tuo aiuto per come cambiare la batteria io ho rimontato tutto ma la barra di sblocco non scorre più o i comandi in quella altezza del touch , tutto il resto funziona perfettamente.Dove potrei aver sbagliato?
Potete aiutarmi grazie
I was so so so so careful when lifting the logic board past the flex cable on the power button. Before final assembly, plugged it all in to test and it booted OK. LCD and Digitizer worked. Went to power it off and found the power button wouldn't work. Sure enough, the tiny (<0.5mm) strip of copper in that power flex cable had torn right through. About to pitch this rotten, stinking thing across the back yard into the trees. I've spent 5 hours of my life fixing this today! Aaargh!!!!!
-
-
-
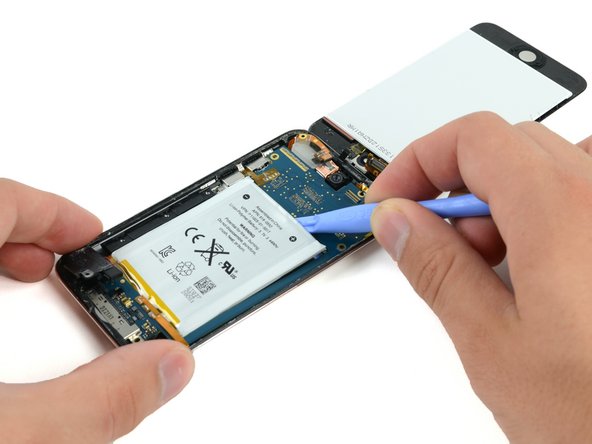
Con una herramienta de apertura de plástico, saca suavemente el altavoz del iPod de su hueco en la carcasa exterior.
-
Deja que el altavoz descanse sobre la batería para que puedas continuar con la instalación de la batería.
-
-
-
Con una herramienta de apertura de plástico, empuja con cuidado el conector de base para sacarlo del hueco de la carcasa exterior. Trabaja cada esquina de manera uniforme hasta que el conector se suelte.
This was the hardest step for me. I ended up snapping the mother board at the corner because the adhesive just suddenly released. I wish there were a few more pictures and pointers on how to remove the charging port. Does anyone know a good place to get a cheap 32 GB mother board??
Existe cola embaixo do conector, por isso, a dificuldade em retirá-lo. Eu aconselho, um pequeno aquecimento com a pistola de calor, na parte traseira da carcaça, antes de tentar a remoção do conector.
For Step 17, just slip a length of waxed dental floss under the top left and right corners of the battery, slowly slide down the back of the battery with a sawing motion. All the adhesive will be seperated w/out any risk of bending the board or puncturing the battery. Charging port will now be easily removed.
-
-
-
Una vez que se haya liberado todo el adhesivo de debajo del ensamblaje de la placa lógica/batería, levanta el ensamblaje desde el costado y gíralo con cuidado para acceder a la parte inferior de la batería.
-
-
-
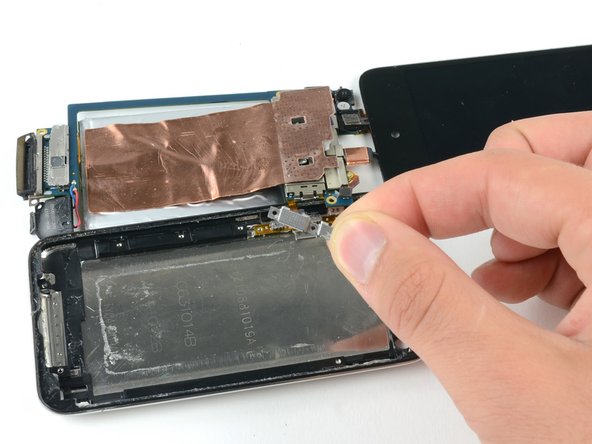
Retira los dos tornillos Phillips #00 de 1,3 mm que sujetan la cubierta metálica del cable del botón de volumen/encendido.
-
Levanta y retira la cubierta de metal del conjunto del panel trasero.
-
-
-
Retira los dos tornillos Phillips de 2,0 mm que sujetan el conjunto del botón de encendido al conjunto del panel posterior.
-
-
-
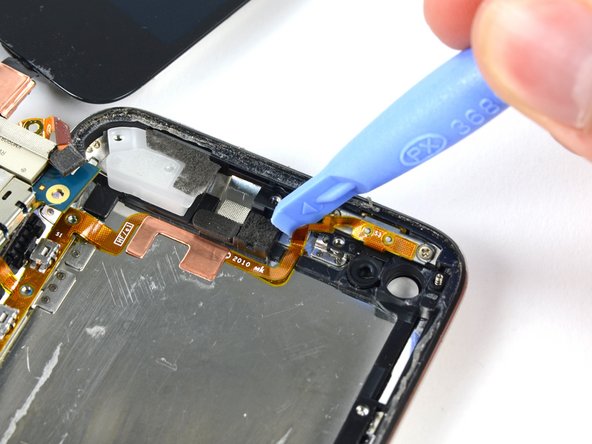
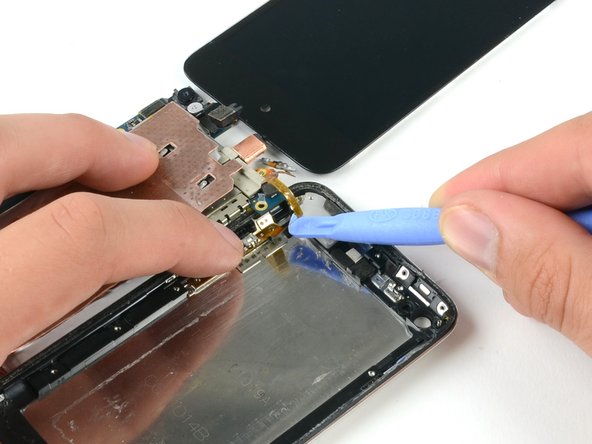
Comienza a trabajar desde el exterior del cable plano. Calienta la almohadilla de soldadura más externa mientras haces palanca suavemente desde debajo del cable plano para liberarlo de la placa. Repite este proceso para cada una de las tres almohadillas restantes, trabajando de derecha a izquierda.
-
-
-
Coloca el cable de reemplazo en su lugar y alinea el contacto del extremo derecho con el punto de soldadura del extremo derecho. Usa dos tiras pequeñas de cinta aislante para sujetar el cable contra las almohadillas de soldadura.
-
Coloca dos tiras de cinta sobre el extremo del cable plano para cubrir las dos almohadillas de soldadura más a la izquierda y mantén los contactos contra la placa lógica.
-
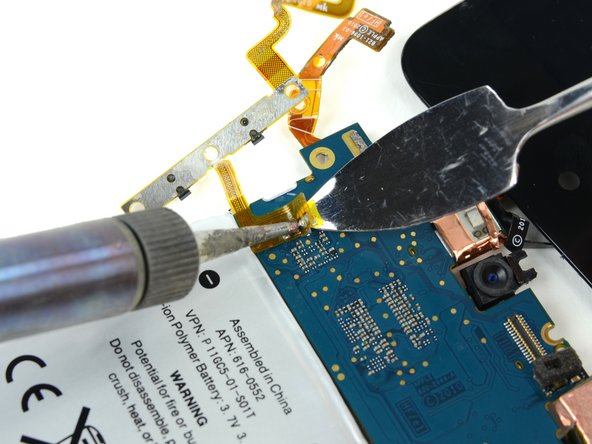
Calienta el contacto más a la derecha hasta que la soldadura debajo se derrita, luego aplica una pequeña cantidad de soldadura al contacto, permitiendo que fluya a través de los dos orificios en el cable y hacia la placa lógica.
-
Tan pronto como la soldadura fluya hacia la unión, retira tanto la soldadura como la plancha.
-
Repite este proceso con la segunda almohadilla de soldadura.
-
-
-
Retira la cinta vieja y coloca un nuevo trozo de cinta para sujetar el cable en su lugar, pero descubre las dos almohadillas restantes. Si estás satisfecho con la posición del cable en relación con las almohadillas en la placa, continúa. Si no es así, desuelda la primera conexión y vuelve a intentarlo.
-
Suelda las dos almohadillas restantes a la placa lógica, teniendo cuidado de sobrecalentar el cable o la placa.
-


Para volver a armar tu dispositivo, sigue estas instrucciones en orden inverso.
Para volver a armar tu dispositivo, sigue estas instrucciones en orden inverso.
Cancelar: No complete esta guía.
78 personas más completaron esta guía.
Un agradecimiento especial a estos traductores:
100%

¡ Francisco Javier Saiz Esteban nos está ayudando a reparar el mundo! ¿Quieres contribuir?
Empezar a traducir ›

3 comentarios
Search at ebay
do I have to use a heat gun
Fabiola Winfield - Contestar
yes it is crucial
ben folks -
but u can use a hair dryer on warm
ben folks -
I didn't use a heat gun but this was due to the glass being rather shattered and not just cracked in the corner. The rule of thumb might be to not use excessive force, if you see that you need to use the heat gun or a blow dryer as someone suggested. I also wanted to point out the the adhesive strip just around the edges was exposed and it is rather strong so I was able to pull it around part of the edge which actually helped the glass disengage.
nirv -
Hi, thanks to this tutorial achieves replace my iPod battery to 100%, it was difficult, so thanks iFixit!
The only problem I had was with the iFixit screwdriver disappointed me greatly, as it can not remove the screws with the screwdriver.
A tip for those who first make repairs before starting the disarmament carefully read through the tutorial to not make a mistake that could damage your iPod and do not forget to place pieces in a safe place so they are not lost.
Greetings from Guatemala
Alfonso.
Alfonso Espinoza - Contestar
well then u suck
ben folks -
Be careful with the heat gun!! Don`t use it too much. You can melt something inside, specially when you`re closing the iPod.
Luiz R - Contestar
No man you can use a blow dryer!
Colton B - Contestar
Would a heat bead bag be safer option to weaken the adhesive?
Angus McLauchlan - Contestar
I had success with as low as 80°C using a hair dryer to melt the adhesive, I kept track of it with a meat thermometer. The battery says it's rated only up to 60°C...
micahvanderhill - Contestar
I got through all the parts to take the wifi antenna out!! But, I'm having a hard time putting the stuff back!!
~Palm head~ But thank you ifixit for the great and awesome directions, I understand clearly!! Thank you very much
Kaiden - Contestar
A hairdryer perfectly does the job. I’d recommend heating the bottom for 20 seconds, then attempt at inserting a plastic pick between the glass and the chassis. If it doesn’t work, reapply some heat in 10 seconds intervals until the glue gives in. You shouldn’t have to exert lots of force to release the adhesive, heat should do the job.
Then apply some heat to the top of the screen to release the remaining adhesive. Opening is straightforward. Just beware of the ultra little slack of the short yet fragile flexible digitizer cable.
Olivier Biot - Contestar
Thanks for the tip!
Sean - Lua Tech -