Esta versión puede contener ediciones incorrectas. Cambie a la última instantánea verificada.
Qué necesitas
-
Este paso está sin traducir. Ayuda a traducirlo
-
Hold the device so the left side is facing towards you (like in the picture shown) so the two 4mm PH001 screws are exposed and easier to access.
-
-
Este paso está sin traducir. Ayuda a traducirlo
-
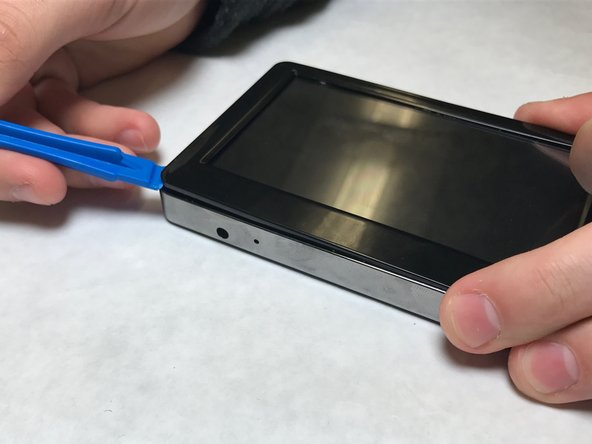
Carefully pry up one of the top corners of the screen with a plastic spudger (prying tool). Slide the tool along the edges to release it from the housing.
-
The screen is still connected to the motherboard. Use force with caution.
-
-
Este paso está sin traducir. Ayuda a traducirlo
-
Gently turn screen over, to the side, to reveal the ZIF connector attached to the motherboard.
-
-
-
Este paso está sin traducir. Ayuda a traducirlo
-
Gently using tweezers, flip the black clip up. Pull the ZIF connector out.
-
-
Este paso está sin traducir. Ayuda a traducirlo
-
Using the prying tool, slide the black clip out. Pull the ZIF connector out and to the left, the screen is now detached from the motherboard.
-
-
Este paso está sin traducir. Ayuda a traducirlo
-
Now, carefully we will remove the battery. Find the leads, or the red and black wires going to the battery from the motherboard. To free the wires you must cut the wire near the battery leads. Make sure both ends are clean and have enough exposed wire.
-
-
Este paso está sin traducir. Ayuda a traducirlo
-
Gently tug on wires to remove the connection from the logic board.
-
-
Este paso está sin traducir. Ayuda a traducirlo
-
To remove mother board gently pull away from the top of the device to make sure the earphone jack it our of the slot.
-
-
Este paso está sin traducir. Ayuda a traducirlo
-
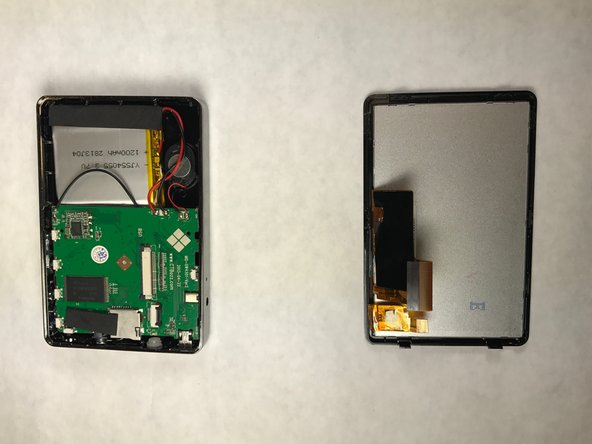
Your mother board is now completely removed from the device.
-


Equipo

IUPUI, Team 1-4, Harley Fall 2016 Miembro de IUPUI, Team 1-4, Harley Fall 2016
IUPUI-HARLEY-F16S1G4
3 Miembros
8 Guías creadas