Introducción
This guide covers the Sony Xperia XZ Premium battery removal. This process involves removing the back panel, frame, and motherboard. This is a time-consuming process and should not be rushed, so make sure you have ample time set aside.
Qué necesitas
-
-
Place a heated iOpener on the back panel of the phone to melt the adhesive inside.
-
-
Herramienta utilizada en este paso:Plastic Cards$2.99
-
Slide a thin plastic card under the back panel and around the perimeter of the phone to remove the adhesive.
-
-
-
Orient the phone horizontally with the front screen facing down and the camera on the bottom left corner.
-
-
-
-
Place the spudger under the top right frame piece and lift to loosen it.
上部右側フレームの下には、バイブレータがあります。バイブレータとマザーボードをつなぐコネクタはなぜか上部右上フレームに接着されています(接着されていなくてもよい気がします)。
上部右側フレームを持ち上げる際には、そっとコネクタを外した方が安全です。
https://youtu.be/JmN7pZdgJDU?t=133
バイブレーターのカバーは、シリコン製です。外れやすいので見失わないようにしてください。
-
-
-
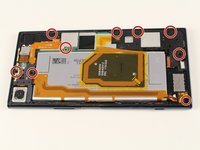
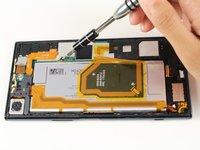
Insert spudger in the gap above the battery and lift to loosen the motherboard.
-
Use the spudger to slide under the edges of the motherboard if the motherboard does not seem to loosen after the above step.
フロントカメラの取り外し手順が省かれており、最低限カメラのシールドを止めているネジを取り外す必要があります。
また、SIMカード、SDカードも前もって外しておかないと、マザーボードが浮いてきません。 -
-
-
Insert the spudger under the battery and push to loosen it from the adhesive.
DO NOT REMOVE ADHESIVE THIS WAY. There a couple tabs that you can grab with tweezers to gently roll up and remove the adhesive in a way that won’t risk damaging the battery or the screen, or other parts of the phone. The video for the charge port shows the correct adhesive removal.
-
-
Herramienta utilizada en este paso:Plastic Cards$2.99
-
Use the plastic card to push under the battery to further remove the adhesive.
-


To reassemble your device, follow these instructions in reverse order.
To reassemble your device, follow these instructions in reverse order.
Cancelar: No complete esta guía.
8 personas más completaron esta guía.

Equipo

Cal Poly, Team S18-G2, Livingston Spring 2018 Miembro de Cal Poly, Team S18-G2, Livingston Spring 2018
CPSU-LIVINGSTON-S18S18G2
Miembros de 5
16 Guías creadas
4 comentarios
個人的意見を書きます。まず最初にこの手順はあくまでもバッテリーを取り外すだけの手順書です。作成者がこの手順書を部分的に書き直さない限り作業事故によっては「ボリューム パワースイッチフレックスケーブル」、「nfcアンテナ」、「イヤホンジャック フレックスケーブル」、最悪「マザーボード」をも交換する羽目になる事を視野に入れて作業した方がいいです。それらの注意書きがないのが残念です。
「ボリュームパワースイッチフレックスケーブル」と「nfcアンテナ」はバッテリーに接着されています。特にnfcアンテナの黒い部分は恐らくアンテナの一部と思われ奇麗に剝がそうとしても絶対に破損しますので交換必須です。
貴重なご意見、ありがとうございました。
手順ありがとうございます。
手順25の前後でで左上側のコネクタを外す手順がなかったので見事に切りました。
他、海外動画と比較していくつか手順がすっ飛んでたので、注意書きはした方がよいと思いました。
詳細を報告いただきありがとうございました。手順25の前後の作業については修理ガイド担当者に付け足しの必要を伝えておきます。コネクタを破損させてしまい申し訳ありません。少し時間がかかるかもしれませんが、貴重な情報は英語と日本語の修理ガイドに反映させていただきます。御礼まで。
Is it okay to use a hair dryer instead of iOpener?
091 03718 - Contestar