Saltar al contenido principal

Sony Xperia E4 Touch Screen Glass / LCD Display Replacement

Qué necesitas

Resumen del Video

  1. Sony Xperia E4 Touch Screen Glass / LCD Display Replacement, Battery Cover: paso 1, imagen 1 de 3 Sony Xperia E4 Touch Screen Glass / LCD Display Replacement, Battery Cover: paso 1, imagen 2 de 3 Sony Xperia E4 Touch Screen Glass / LCD Display Replacement, Battery Cover: paso 1, imagen 3 de 3
    • Remove the back cover and any installed SIM and memory cards.

    • There are 8x black screws Torx T4. Remove them.

  2. Sony Xperia E4 Touch Screen Glass / LCD Display Replacement: paso 2, imagen 1 de 3 Sony Xperia E4 Touch Screen Glass / LCD Display Replacement: paso 2, imagen 2 de 3 Sony Xperia E4 Touch Screen Glass / LCD Display Replacement: paso 2, imagen 3 de 3
    • Remove the small black rubber at the lower left corner.

    • Under it is the battery flex cable, disconnect it.

  3. Sony Xperia E4 Touch Screen Glass / LCD Display Replacement: paso 3, imagen 1 de 3 Sony Xperia E4 Touch Screen Glass / LCD Display Replacement: paso 3, imagen 2 de 3 Sony Xperia E4 Touch Screen Glass / LCD Display Replacement: paso 3, imagen 3 de 3
    • Use a plastic tool to separate the middle frame.

    • The battery is glued to the middle frame with an adhesive tape.

    • Loudspeaker

  4. Sony Xperia E4 Touch Screen Glass / LCD Display Replacement, Logic Board: paso 4, imagen 1 de 3 Sony Xperia E4 Touch Screen Glass / LCD Display Replacement, Logic Board: paso 4, imagen 2 de 3 Sony Xperia E4 Touch Screen Glass / LCD Display Replacement, Logic Board: paso 4, imagen 3 de 3
    • Disconnect the touch screen flex cable.

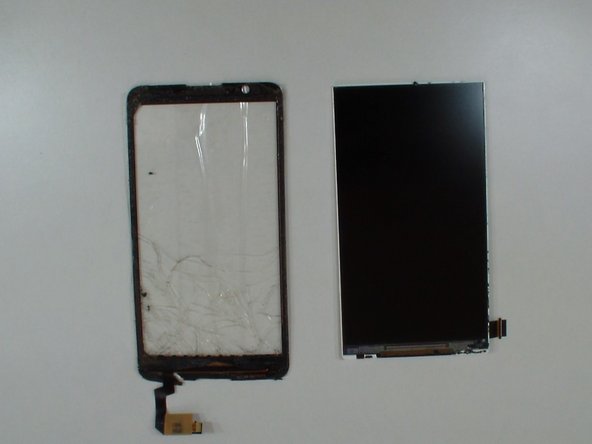
    • Under it is the LCD flex cable. Disconnect it also.

  5. Sony Xperia E4 Touch Screen Glass / LCD Display Replacement: paso 5, imagen 1 de 3 Sony Xperia E4 Touch Screen Glass / LCD Display Replacement: paso 5, imagen 2 de 3 Sony Xperia E4 Touch Screen Glass / LCD Display Replacement: paso 5, imagen 3 de 3
    • Remove the logic board.

    • Be careful for the flex cables.

  6. Sony Xperia E4 Touch Screen Glass / LCD Display Replacement, Touch Screen Glass / LCD Display: paso 6, imagen 1 de 3 Sony Xperia E4 Touch Screen Glass / LCD Display Replacement, Touch Screen Glass / LCD Display: paso 6, imagen 2 de 3 Sony Xperia E4 Touch Screen Glass / LCD Display Replacement, Touch Screen Glass / LCD Display: paso 6, imagen 3 de 3
    • Cover the glass with a scotch tape.

    • Warm the glass for about minute.

    • With a cutter lift a little the glase to make a room for the plastic tool.

  7. Sony Xperia E4 Touch Screen Glass / LCD Display Replacement: paso 7, imagen 1 de 3 Sony Xperia E4 Touch Screen Glass / LCD Display Replacement: paso 7, imagen 2 de 3 Sony Xperia E4 Touch Screen Glass / LCD Display Replacement: paso 7, imagen 3 de 3
    Herramienta utilizada en este paso:
    Plastic Cards
    $2.99
    Comprar
    • Carefully put the plastic tool between the glass and the LCD.

    • The tool must be thin, you can use also a plastic card.

    • Periodically warm the glass.

    • Remove the display frame.

  8. Sony Xperia E4 Touch Screen Glass / LCD Display Replacement: paso 8, imagen 1 de 3 Sony Xperia E4 Touch Screen Glass / LCD Display Replacement: paso 8, imagen 2 de 3 Sony Xperia E4 Touch Screen Glass / LCD Display Replacement: paso 8, imagen 3 de 3
    • Use only plastic tools and don't force the LCD.

  9. Sony Xperia E4 Touch Screen Glass / LCD Display Replacement: paso 9, imagen 1 de 3 Sony Xperia E4 Touch Screen Glass / LCD Display Replacement: paso 9, imagen 2 de 3 Sony Xperia E4 Touch Screen Glass / LCD Display Replacement: paso 9, imagen 3 de 3
    • Install adhesive tape.

    • It's easier if you order your touch screen together with adhesive sticker.

    • Start with the reassembling.

  10. Sony Xperia E4 Touch Screen Glass / LCD Display Replacement: paso 10, imagen 1 de 1
    • That's all.

Conclusión

To reassemble your device, follow these instructions in reverse order.

12 personas más completaron esta guía.

ZFix

Miembro Desde 12/09/13

191,043 Reputación

330 Guías creadas

Equipo

Master Techs Miembro de Master Techs

Community

322 Miembros

2,495 Guías creadas

4 comentarios

Grazie! È stato davvero utilissimo. :)

Andrea DePa - Contestar

Doesn't the original glass and digitalizer come out with its biadesive?

marco bigoni - Contestar

First Timer here:

I've followed this and replaced the cracked screen (the clear bit).

But it still looks cracked; could it be that I have a cracked LCD thingy as well? (is that the black bit?).

If so what's the part number for that?

MartynJ - Contestar

Why don't you just buy the screen which has the lcd and digitiser already assembled? That will save you a lot of hassle for only a few £'s more :)

Clems - Contestar

Agregar Comentario

Ver Estadísticas:

Ultimas 24 horas: 0

Ultimos 7 días: 5

Ultimos 30 días: 6

Todo El Tiempo: 20,240