Saltar al contenido principal

Sony Handycam FDR-AX33 Zoom and Photo Button Replacement

Qué necesitas

  1. Sony Handycam FDR-AX33 Zoom and Photo Button Replacement, Panel: paso 1, imagen 1 de 2 Sony Handycam FDR-AX33 Zoom and Photo Button Replacement, Panel: paso 1, imagen 2 de 2
    • Remove the battery by pushing the latch towards the body of the camera. Push the battery down and pull it out.

    • Remove the six black 4 mm Phillips #00 screws from the bottom panel of the camera.

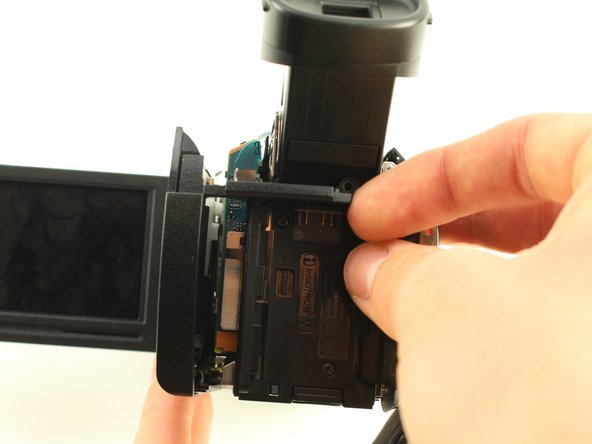
    • Pull off the bottom panel. It may be difficult, but tugging on it shouldn't cause harm to yourself or the device.

    • Be sure to un-velcro the handle strap.

  2. Sony Handycam FDR-AX33 Zoom and Photo Button Replacement: paso 2, imagen 1 de 3 Sony Handycam FDR-AX33 Zoom and Photo Button Replacement: paso 2, imagen 2 de 3 Sony Handycam FDR-AX33 Zoom and Photo Button Replacement: paso 2, imagen 3 de 3
    • Remove the 3 mm Phillips #00 screw from the bottom of the camera.

    • Remove the 4 mm Phillips #00 screw from the right panel.

    • Pull the right panel off. Again, it might be difficult, but pulling hard shouldn't harm you or the camera.

    • You may have to use the opening tool to remove this panel.

  3. Sony Handycam FDR-AX33 Zoom and Photo Button Replacement: paso 3, imagen 1 de 2 Sony Handycam FDR-AX33 Zoom and Photo Button Replacement: paso 3, imagen 2 de 2
    • Remove the two 4 mm Phillips #00 screws from the top right corner of the camera.

    • Remove the 4 mm Phillips #00 screw from in front of the flash mount.

  4. Sony Handycam FDR-AX33 Zoom and Photo Button Replacement: paso 4, imagen 1 de 2 Sony Handycam FDR-AX33 Zoom and Photo Button Replacement: paso 4, imagen 2 de 2
    • Remove the 3 mm Phillips #00 screw from below the right side of the battery slot.

    • Remove the black 5 mm Phillips #00 screw from the top of the battery slot.

  5. Sony Handycam FDR-AX33 Zoom and Photo Button Replacement: paso 5, imagen 1 de 3 Sony Handycam FDR-AX33 Zoom and Photo Button Replacement: paso 5, imagen 2 de 3 Sony Handycam FDR-AX33 Zoom and Photo Button Replacement: paso 5, imagen 3 de 3
    • Remove the three 4 mm Phillips #00 screws from the left panel underneath the display screen.

    • You’ll need to extend the eyepiece by pulling it out from the body of the camera.

    • Pull the top panel off of the device with the iFixit opening tool.

  6. Sony Handycam FDR-AX33 Zoom and Photo Button Replacement: paso 6, imagen 1 de 3 Sony Handycam FDR-AX33 Zoom and Photo Button Replacement: paso 6, imagen 2 de 3 Sony Handycam FDR-AX33 Zoom and Photo Button Replacement: paso 6, imagen 3 de 3
    • Remove the top and bottom 4 mm Phillips #00 screws from the display screen hinge.

    • Use the iFixit opening tool to remove the screen hinge.

  7. Sony Handycam FDR-AX33 Zoom and Photo Button Replacement: paso 7, imagen 1 de 2 Sony Handycam FDR-AX33 Zoom and Photo Button Replacement: paso 7, imagen 2 de 2
    • Remove the 3 mm Phillips #00 screw from between the eyepiece and the panel directly to the right of the battery slot.

    • Angle the eyepiece up to reach the screw with the screwdriver.

    • Take the panel directly to the right of the battery slot off of the camera.

  8. Sony Handycam FDR-AX33 Zoom and Photo Button Replacement: paso 8, imagen 1 de 3 Sony Handycam FDR-AX33 Zoom and Photo Button Replacement: paso 8, imagen 2 de 3 Sony Handycam FDR-AX33 Zoom and Photo Button Replacement: paso 8, imagen 3 de 3
    • Remove the 4 mm Phillips #00 screw above and to the right of the battery slot.

    • Pry the left panel out at an angle by pushing the plastic slat between the battery slot and the eyepiece.

    • Wiggle the left panel and pull it out gently.

    • The left panel can be hard to remove so make sure to apply a good amount of force, but be cautious to not harm yourself or the device.

  9. Sony Handycam FDR-AX33 Zoom and Photo Button Replacement, Zoom, Photo, and Record Button: paso 9, imagen 1 de 3 Sony Handycam FDR-AX33 Zoom and Photo Button Replacement, Zoom, Photo, and Record Button: paso 9, imagen 2 de 3 Sony Handycam FDR-AX33 Zoom and Photo Button Replacement, Zoom, Photo, and Record Button: paso 9, imagen 3 de 3
    • Remove the two 3 mm Phillips screws directly in front of the zoom button.

    • Slide the blue copper PCB out of the connector.

  10. Sony Handycam FDR-AX33 Zoom and Photo Button Replacement: paso 10, imagen 1 de 2 Sony Handycam FDR-AX33 Zoom and Photo Button Replacement: paso 10, imagen 2 de 2
    • Unclip the black plastic piece from behind the record button in order to remove the photo, record, and zoom buttons.

    • Use the black nylon spudger to remove the record button.

Conclusión

To reassemble your device, follow these instructions in reverse order.

Equipo

Cal Poly, Team S18-G2, White Winter 2019 Miembro de Cal Poly, Team S18-G2, White Winter 2019

CPSU-WHITE-W19S18G2

4 Miembros

12 Guías creadas

Un comentario

Where can I buy the spare part?

Thanks

mattyvolins - Contestar

Agregar Comentario

Ver Estadísticas:

Ultimas 24 horas: 0

Ultimos 7 días: 1

Ultimos 30 días: 17

Todo El Tiempo: 747