Saltar al contenido principal

Sony Handycam DCR-SR42 Lens Replacement

Qué necesitas

  1. Sony Handycam DCR-SR42 Lens Replacement, Hard Drive: paso 1, imagen 1 de 2 Sony Handycam DCR-SR42 Lens Replacement, Hard Drive: paso 1, imagen 2 de 2
    • Remove the battery, and use the Phillips #00 precision screwdriver to then remove the three 3mm Phillips #00 screws under the battery.

    • Wait 1 hour after removing the battery before continuing to disassemble the camera.

  2. Sony Handycam DCR-SR42 Lens Replacement: paso 2, imagen 1 de 1
    • Remove the three 3mm #00 Phillips screws on the bottom of the camera.

  3. Sony Handycam DCR-SR42 Lens Replacement: paso 3, imagen 1 de 1
    • Remove the three 3mm Phillips #00 screws on the side of the camera.

    • Remove the 4mm Phillips #00 screw under the AV port cover.

  4. Sony Handycam DCR-SR42 Lens Replacement: paso 4, imagen 1 de 2 Sony Handycam DCR-SR42 Lens Replacement: paso 4, imagen 2 de 2
    • Gently pull the black plastic hard drive cover away from the body of the camera. This will expose the hard drive.

    • Even with all the screws removed, this part will require some force to remove.

  5. Sony Handycam DCR-SR42 Lens Replacement: paso 5, imagen 1 de 2 Sony Handycam DCR-SR42 Lens Replacement: paso 5, imagen 2 de 2
    • Lift the hard drive out of the camera by grasping the grey rubber mounting brackets and pulling them upwards.

    • The hard drive is attached to the flex cable. Remove the hard drive slowly to prevent the flex cable from being damaged.

  6. Sony Handycam DCR-SR42 Lens Replacement: paso 6, imagen 1 de 1
    • Remove the rubber mounting brackets by pulling them off the hard drive.

  7. Sony Handycam DCR-SR42 Lens Replacement: paso 7, imagen 1 de 1
    • Carefully unplug the flex cable from the hard drive.

  8. Sony Handycam DCR-SR42 Lens Replacement, Internal Components: paso 8, imagen 1 de 2 Sony Handycam DCR-SR42 Lens Replacement, Internal Components: paso 8, imagen 2 de 2
    • Remove the four 3mm Phillips #00 screws from under the hard drive.

  9. Sony Handycam DCR-SR42 Lens Replacement: paso 9, imagen 1 de 3 Sony Handycam DCR-SR42 Lens Replacement: paso 9, imagen 2 de 3 Sony Handycam DCR-SR42 Lens Replacement: paso 9, imagen 3 de 3
    • Press in on the two tabs as shown and lift the metal plate up and off the camera.

    • Even with all the screws removed, this part will require some force to remove.

  10. Sony Handycam DCR-SR42 Lens Replacement: paso 10, imagen 1 de 3 Sony Handycam DCR-SR42 Lens Replacement: paso 10, imagen 2 de 3 Sony Handycam DCR-SR42 Lens Replacement: paso 10, imagen 3 de 3
    • Remove the two 4mm Phillips #00 screws from the underside of the camera.

    • Remove the 2 mm Phillips #00 screw from the screen hinge.

  11. Sony Handycam DCR-SR42 Lens Replacement: paso 11, imagen 1 de 3 Sony Handycam DCR-SR42 Lens Replacement: paso 11, imagen 2 de 3 Sony Handycam DCR-SR42 Lens Replacement: paso 11, imagen 3 de 3
    • Use the plastic opening tool to remove the plastic cover from the top of the camera.

    • Remove the two 3mm Phillips #00 screws from underneath the plastic cover.

  12. Sony Handycam DCR-SR42 Lens Replacement: paso 12, imagen 1 de 2 Sony Handycam DCR-SR42 Lens Replacement: paso 12, imagen 2 de 2
    • Remove the second plastic cover from the top of the camera.

    • Remove the 4mm Phillips #00 screw from underneath the cover.

  13. Sony Handycam DCR-SR42 Lens Replacement: paso 13, imagen 1 de 2 Sony Handycam DCR-SR42 Lens Replacement: paso 13, imagen 2 de 2
    • Carefully pry the screen assembly apart from the main body of the camera.

    • Unplug the flex cable from the screen assembly.

    • Even with all the screws removed, this part will require some force to remove.

  14. Sony Handycam DCR-SR42 Lens Replacement, Lens: paso 14, imagen 1 de 1
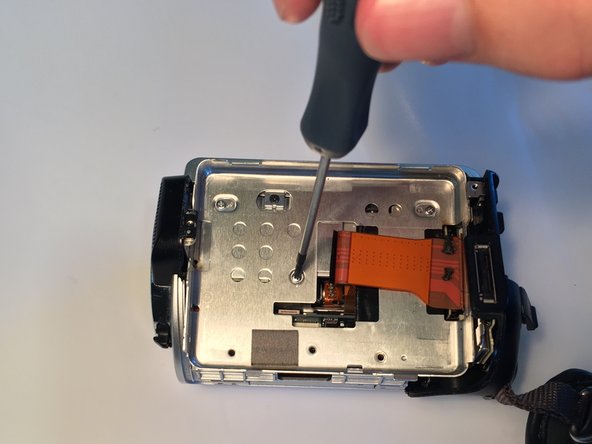
    • Remove the 3mm Phillips #00 screw from the underside of the camera near the lens housing.

  15. Sony Handycam DCR-SR42 Lens Replacement: paso 15, imagen 1 de 2 Sony Handycam DCR-SR42 Lens Replacement: paso 15, imagen 2 de 2
    • Use the plastic opening tool to pry the side casing off the camera.

  16. Sony Handycam DCR-SR42 Lens Replacement: paso 16, imagen 1 de 1
    • Remove the final 3mm #00 Phillips screw from the lens housing.

  17. Sony Handycam DCR-SR42 Lens Replacement: paso 17, imagen 1 de 1
    • Remove the lens housing from the camera.

  18. Sony Handycam DCR-SR42 Lens Replacement: paso 18, imagen 1 de 1
    • Remove the three 2mm Phillips #00 screws from around the lens.

  19. Sony Handycam DCR-SR42 Lens Replacement: paso 19, imagen 1 de 1
    • Remove the lens from the camera.

Conclusión

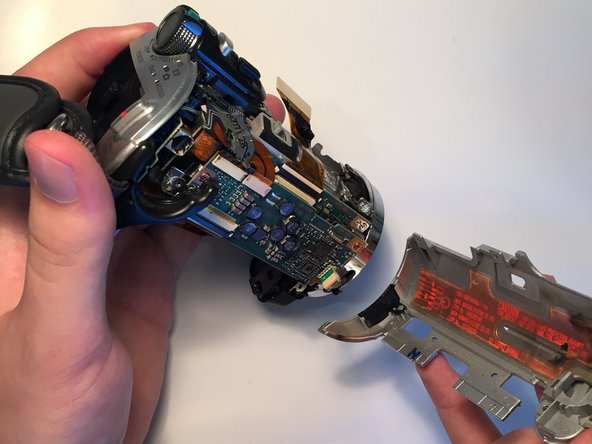
To reassemble your device, follow these instructions in reverse order.

Una persona más ha completado esta guía.

Dan Muller

Miembro Desde 03/23/15

1,020 Reputación

5 Guías creadas

Equipo

Baylor, Team 7-13, Williams Spring 2015 Miembro de Baylor, Team 7-13, Williams Spring 2015

BU-WILLIAMS-S15S7G13

4 Miembros

10 Guías creadas

0 comentarios

Agregar Comentario

Ver Estadísticas:

Ultimas 24 horas: 0

Ultimos 7 días: 1

Ultimos 30 días: 9

Todo El Tiempo: 731