Esta versión puede contener ediciones incorrectas. Cambie a la última instantánea verificada.
Qué necesitas
-
Este paso está sin traducir. Ayuda a traducirlo
-
Remove Memory Stick Pro from the card reader slot on the bottom of the camera.
-
Remove both batteries.
-
-
Este paso está sin traducir. Ayuda a traducirlo
-
Remove the single visible screw from both sides of the camera.
-
Remove the two screws that are adjacent to the warning label, which is on the underside of the camera.
-
-
Este paso está sin traducir. Ayuda a traducirlo
-
Remove the two screws holding the circuit board down.
-
-
-
Este paso está sin traducir. Ayuda a traducirlo
-
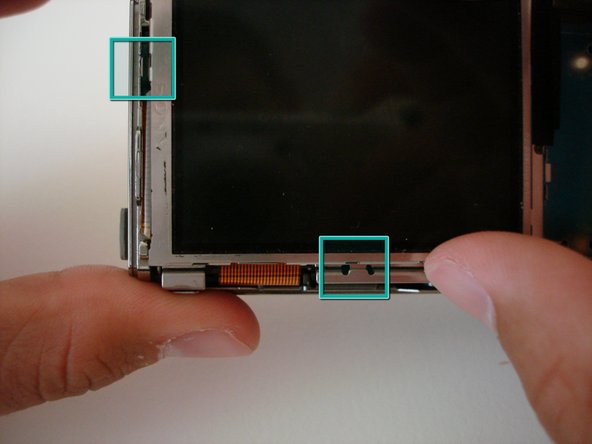
The LCD screen sits in two slots; one on the bottom, and one on the left edge.
-
Slide LCD screen from the two slots.
-
-
Este paso está sin traducir. Ayuda a traducirlo
-
To remove the LCD screen, detach the orange cable from the board.
-
If needed, replace the LCD screen.
-
-
Este paso está sin traducir. Ayuda a traducirlo
-
Remove the two screws holding down the steel back plate.
-
Remove steel back plate.
-
-
Este paso está sin traducir. Ayuda a traducirlo
-
Now remove the plastic plate that covers the motherboard.
-
-
Este paso está sin traducir. Ayuda a traducirlo
-
Disconnect the flash cable (black and white wires) before completely removing the front case.
-
Gently start to remove the case.
-
Once the cable is free, set aside the front case.
-
-
Este paso está sin traducir. Ayuda a traducirlo
-
The speaker should now be clearly seen on the underside of the camera.
-
Gently unplug the speaker from the motherboard.
-
Replace the speaker.
-
-
Este paso está sin traducir. Ayuda a traducirlo
-
Remove the orange cable connecting the battery terminal to the motherboard.
-
-
Este paso está sin traducir. Ayuda a traducirlo
-
The battery terminal is now free from the board and can be slid out.
-
-
Este paso está sin traducir. Ayuda a traducirlo
-
Detach two cables that go from the motherboard to the lens.
-
Remove lens.
-


Cancelar: No complete esta guía.
7 personas más completaron esta guía.
Equipo

Cal Poly, Team 15-50, Garner Spring 2010 Miembro de Cal Poly, Team 15-50, Garner Spring 2010
CPSU-GARNER-S10S15G50
5 Miembros
12 Guías creadas
Un comentario
Ifixit it's so awesome... For a guy who loves to bring things apart but is scared of how to do it ifixit is wonderful