Saltar al contenido principal

Sony Cyber-shot DSC-TX7 Front Sliding Lens Cover Replacement

Qué necesitas

  1. Sony Cyber-shot DSC-TX7 Front Sliding Lens Cover Replacement, Battery: paso 1, imagen 1 de 2 Sony Cyber-shot DSC-TX7 Front Sliding Lens Cover Replacement, Battery: paso 1, imagen 2 de 2
    • The battery compartment is located on the bottom of camera.

    • Move the slider from the 'lock' position to the 'open' position.

  2. Sony Cyber-shot DSC-TX7 Front Sliding Lens Cover Replacement: paso 2, imagen 1 de 3 Sony Cyber-shot DSC-TX7 Front Sliding Lens Cover Replacement: paso 2, imagen 2 de 3 Sony Cyber-shot DSC-TX7 Front Sliding Lens Cover Replacement: paso 2, imagen 3 de 3
    • Battery not shown.

    • Pull battery from compartment.

    • Insert newly charged battery into compartment, as shown in diagram (located in compartment).

    • Shut compartment door.

    • Move the slider back to the 'lock' position.

  3. Sony Cyber-shot DSC-TX7 Front Sliding Lens Cover Replacement, Front Cover: paso 3, imagen 1 de 1
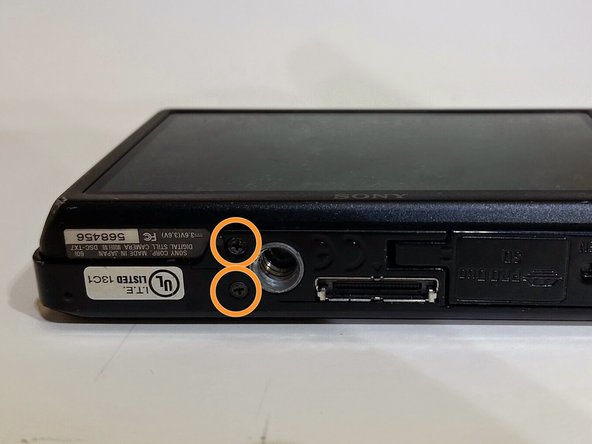
    • Use the Phillips #00 screwdriver to remove the 4mm length screws. There are 6 screws total.

  4. Sony Cyber-shot DSC-TX7 Front Sliding Lens Cover Replacement: paso 4, imagen 1 de 3 Sony Cyber-shot DSC-TX7 Front Sliding Lens Cover Replacement: paso 4, imagen 2 de 3 Sony Cyber-shot DSC-TX7 Front Sliding Lens Cover Replacement: paso 4, imagen 3 de 3
    • The 4 mm length screws are located on each side and on the bottom of the camera.

    • 2 screws on each side (4 total).

    • 2 screws on bottom.

  5. Sony Cyber-shot DSC-TX7 Front Sliding Lens Cover Replacement: paso 5, imagen 1 de 1
    • Gently pry around the front cover using the plastic opening tool.

    • Carefully separate front cover from body of camera.

  6. Sony Cyber-shot DSC-TX7 Front Sliding Lens Cover Replacement: paso 6, imagen 1 de 1
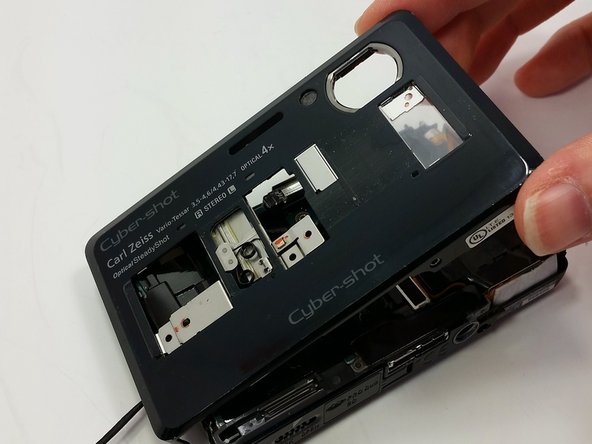
    • The front cover is now removed from the camera and the internal hardware is now visible.

    • They front cover will still be connected by a ribbon. Be careful not to break the ribbon.

  7. Sony Cyber-shot DSC-TX7 Front Sliding Lens Cover Replacement, Front Sliding Lens Cover: paso 7, imagen 1 de 2 Sony Cyber-shot DSC-TX7 Front Sliding Lens Cover Replacement, Front Sliding Lens Cover: paso 7, imagen 2 de 2
    • Remove the three 4mm length screws located on the inside of the front cover with the Phillips #00 screwdriver.

  8. Sony Cyber-shot DSC-TX7 Front Sliding Lens Cover Replacement: paso 8, imagen 1 de 2 Sony Cyber-shot DSC-TX7 Front Sliding Lens Cover Replacement: paso 8, imagen 2 de 2
    • Wiggle sliding lens cover after all screws are removed and separate from front cover.

Conclusión

To reassemble your device, follow these instructions in reverse order.

Leslie Mundell

Miembro Desde 03/18/15

411 Reputación

4 Guías creadas

Equipo

Michigan Tech, Team 1-8, Lauer Spring 2015 Miembro de Michigan Tech, Team 1-8, Lauer Spring 2015

MTU-LAUER-S15S1G8

2 Miembros

10 Guías creadas

0 comentarios

Agregar Comentario

Ver Estadísticas:

Ultimas 24 horas: 1

Ultimos 7 días: 6

Ultimos 30 días: 16

Todo El Tiempo: 656