Saltar al contenido principal

Sony Cyber-shot DSC-HX300 HDMI/USB port Replacement

Qué necesitas

  1. Sony Cyber-shot DSC-HX300 HDMI/USB port Replacement, Battery: paso 1, imagen 1 de 1
    • Make sure the camera is powered off

    • Turn the camera upside down. This is a view of the bottom of the camera.

  2. Sony Cyber-shot DSC-HX300 HDMI/USB port Replacement: paso 2, imagen 1 de 1
    • Push battery cover away from the camera.

  3. Sony Cyber-shot DSC-HX300 HDMI/USB port Replacement: paso 3, imagen 1 de 1
    • Push the blue tab that secures the battery. The battery will then spring out.

  4. Sony Cyber-shot DSC-HX300 HDMI/USB port Replacement: paso 4, imagen 1 de 2 Sony Cyber-shot DSC-HX300 HDMI/USB port Replacement: paso 4, imagen 2 de 2
    • Remove the battery.

  5. Sony Cyber-shot DSC-HX300 HDMI/USB port Replacement, Motherboard: paso 5, imagen 1 de 3 Sony Cyber-shot DSC-HX300 HDMI/USB port Replacement, Motherboard: paso 5, imagen 2 de 3 Sony Cyber-shot DSC-HX300 HDMI/USB port Replacement, Motherboard: paso 5, imagen 3 de 3
    • Make sure to remove the battery before disassembly to prevent electrocution.

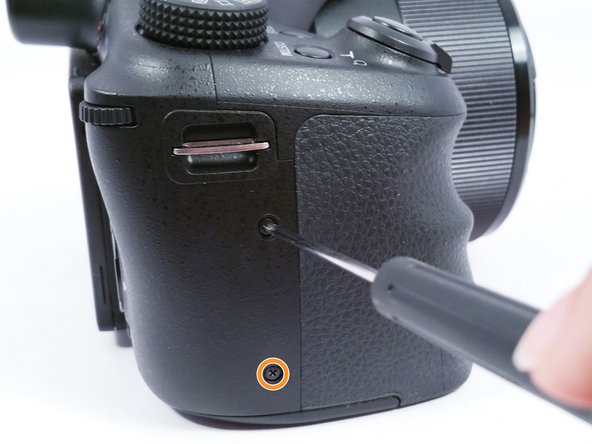
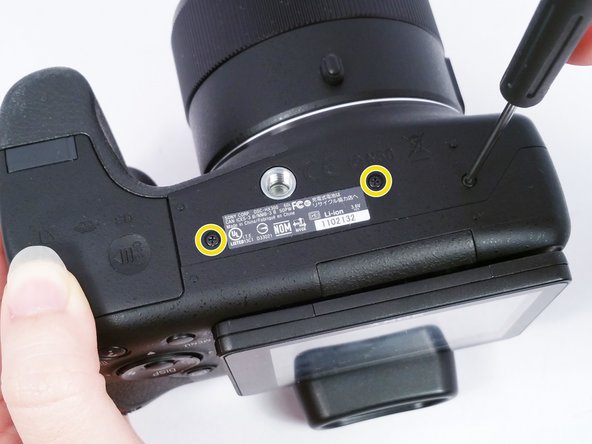
    • Remove the 3 (4 cm) Phillips head screws located on the back of the camera.

    • Remove the 2 (4 cm) Phillips head screws on the right side of the camera.

    • Turn the camera upside down to remove the remaining the 3 (4 cm) Phillips head screws holding the plastic camera housing together.

  6. Sony Cyber-shot DSC-HX300 HDMI/USB port Replacement: paso 6, imagen 1 de 2 Sony Cyber-shot DSC-HX300 HDMI/USB port Replacement: paso 6, imagen 2 de 2
    • Using a plastic opening tool, separate the plastic camera housing.

  7. Sony Cyber-shot DSC-HX300 HDMI/USB port Replacement: paso 7, imagen 1 de 1
    • Disconnect the ribbon wire attaching the screen to the camera.

  8. Sony Cyber-shot DSC-HX300 HDMI/USB port Replacement: paso 8, imagen 1 de 3 Sony Cyber-shot DSC-HX300 HDMI/USB port Replacement: paso 8, imagen 2 de 3 Sony Cyber-shot DSC-HX300 HDMI/USB port Replacement: paso 8, imagen 3 de 3
    • Carefully remove the 7 ribbon wires connected to the mother board.

    • Remove the 2 (5 cm) Phillips head screws on the speaker mounting bracket.

    • Remove the 3 (4 cm) Phillips head screws that secure the motherboard to the camera.

    • Lift up on the speaker mounting bracket to remove it.

  9. Sony Cyber-shot DSC-HX300 HDMI/USB port Replacement: paso 9, imagen 1 de 2 Sony Cyber-shot DSC-HX300 HDMI/USB port Replacement: paso 9, imagen 2 de 2
    • Carefully disconnect the ribbon wire connecting the HDMI port to the Motherboard.

    • Once the Motherboard is removed the replacement can be installed.

  10. Sony Cyber-shot DSC-HX300 HDMI/USB port Replacement, HDMI/USB port: paso 10, imagen 1 de 1
    • Remove the 3 (4 cm) Phillips head screws securing a mounting bracket over the HDMI/USB Port.

  11. Sony Cyber-shot DSC-HX300 HDMI/USB port Replacement: paso 11, imagen 1 de 1
    • Lift up on the mounting bracket to remove the HDMI/USB Port from the camera.

  12. Sony Cyber-shot DSC-HX300 HDMI/USB port Replacement: paso 12, imagen 1 de 1
    • Once the HDMI/USB Port is removed the replacement can be installed.

Conclusión

To reassemble your device, follow these instructions in reverse order.

Una persona más ha completado esta guía.

Equipo

USF Tampa, Team 4-6, Meier Fall 2015 Miembro de USF Tampa, Team 4-6, Meier Fall 2015

USFT-MEIER-F15S4G6

4 Miembros

18 Guías creadas

0 comentarios

Agregar Comentario

Ver Estadísticas:

Ultimas 24 horas: 1

Ultimos 7 días: 10

Ultimos 30 días: 32

Todo El Tiempo: 1,353