Saltar al contenido principal

Sony Cyber-Shot DSC-TX9 LED Screen Replacement

Guía Archivada
Esta guía se mantiene únicamente para fines históricos. Utiliza la última versión de la guía para llevar a cabo tu reparación.

Qué necesitas

  1. Sony Cyber-Shot DSC-TX9 LED Screen Replacement, LED Screen: paso 1, imagen 1 de 3 Sony Cyber-Shot DSC-TX9 LED Screen Replacement, LED Screen: paso 1, imagen 2 de 3 Sony Cyber-Shot DSC-TX9 LED Screen Replacement, LED Screen: paso 1, imagen 3 de 3
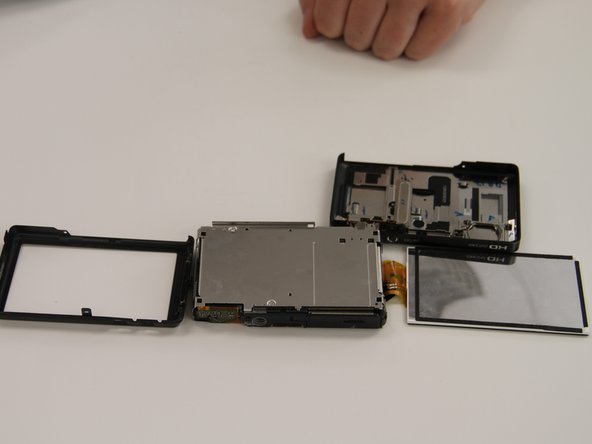
    • Remove all screws on the outside of the camera. A total of 6 screws will be removed.

    • Use a 0001 screw. Note: That the first two screws are in the first circle.

  2. Sony Cyber-Shot DSC-TX9 LED Screen Replacement: paso 2, imagen 1 de 3 Sony Cyber-Shot DSC-TX9 LED Screen Replacement: paso 2, imagen 2 de 3 Sony Cyber-Shot DSC-TX9 LED Screen Replacement: paso 2, imagen 3 de 3
    • Once all screws are removed slide open the battery cover.

    • Pop off the front plate of the camera by moving the two pieces away from each other.

    • The front plate will partially be attached to the body of the camera by a ribbon. Detach with caution.

    • Next, remove the two silver screws on the inside of the camera.

  3. Sony Cyber-Shot DSC-TX9 LED Screen Replacement: paso 3, imagen 1 de 2 Sony Cyber-Shot DSC-TX9 LED Screen Replacement: paso 3, imagen 2 de 2
    • Pop off the back plate of the camera by gently pulling the inner plate out.

    • After the back plate is removed, the camera should appear like the second picture. The LED screen should be free and accessible to replace.

  4. Sony Cyber-Shot DSC-TX9 LED Screen Replacement: paso 4, imagen 1 de 1
    • Use a pry stick to pop out the connector ribbon attached to the LCD screen.

    • A pair of tweezers may be needed to pull back a black slit to access the ribbon connector.

  5. Sony Cyber-Shot DSC-TX9 LED Screen Replacement: paso 5, imagen 1 de 1
    • Attach the new LCD screen.

    • Follow the previous steps in reverse to put the camera back together.

Conclusión

To reassemble your device, follow these instructions in reverse order.

Una persona más ha completado esta guía.

Equipo

Texas Tech, Team 19-1, Rauch Fall 2015 Miembro de Texas Tech, Team 19-1, Rauch Fall 2015

TTU-RAUCH-F15S19G1

4 Miembros

1 Guía escrita

0 comentarios

Agregar Comentario

Ver Estadísticas:

Ultimas 24 horas: 0

Ultimos 7 días: 0

Ultimos 30 días: 1

Todo El Tiempo: 379