Saltar al contenido principal

Sony Alpha ILCE-6000 Screen Replacement

Qué necesitas

  1. Sony Alpha ILCE-6000 Screen Replacement, Battery Replacement: paso 1, imagen 1 de 1
    • Turn off the camera by sliding the power switch to OFF.

  2. Sony Alpha ILCE-6000 Screen Replacement: paso 2, imagen 1 de 3 Sony Alpha ILCE-6000 Screen Replacement: paso 2, imagen 2 de 3 Sony Alpha ILCE-6000 Screen Replacement: paso 2, imagen 3 de 3
    • Flip the camera upside down and locate the battery compartment.

    • Slide the compartment lock to OPEN to unlock it.

  3. Sony Alpha ILCE-6000 Screen Replacement: paso 3, imagen 1 de 2 Sony Alpha ILCE-6000 Screen Replacement: paso 3, imagen 2 de 2
    • Locate the blue lever that keeps the battery in place.

    • Push the blue lever back to release battery.

  4. Sony Alpha ILCE-6000 Screen Replacement: paso 4, imagen 1 de 1
    • Once the battery is free, you are able to take the battery out of the compartment.

  5. Sony Alpha ILCE-6000 Screen Replacement, Screen: paso 5, imagen 1 de 3 Sony Alpha ILCE-6000 Screen Replacement, Screen: paso 5, imagen 2 de 3 Sony Alpha ILCE-6000 Screen Replacement, Screen: paso 5, imagen 3 de 3
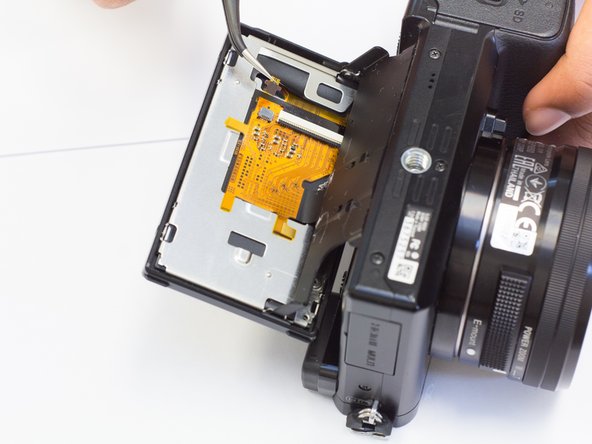
    • Flip the camera to the bottom side. Using screwdriver, remove the two screws located on the bottom of camera screen.

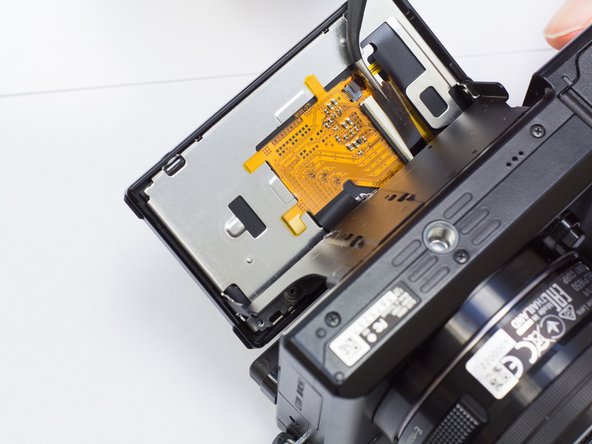
    • Flip the camera back over, locate the two other 3mm screws behind the screen and remove them.

  6. Sony Alpha ILCE-6000 Screen Replacement: paso 6, imagen 1 de 1
    • Gently pry open the screen backplate.

  7. Sony Alpha ILCE-6000 Screen Replacement: paso 7, imagen 1 de 2 Sony Alpha ILCE-6000 Screen Replacement: paso 7, imagen 2 de 2
    • Gently pry off the plastic cover at the top of the screen.

  8. Sony Alpha ILCE-6000 Screen Replacement: paso 8, imagen 1 de 2 Sony Alpha ILCE-6000 Screen Replacement: paso 8, imagen 2 de 2
    • Carefully remove the clip located at the top of the screen.

  9. Sony Alpha ILCE-6000 Screen Replacement: paso 9, imagen 1 de 1
    • Flip the camera so that it is bottom side up. Pry off the inner support plate.

  10. Sony Alpha ILCE-6000 Screen Replacement: paso 10, imagen 1 de 3 Sony Alpha ILCE-6000 Screen Replacement: paso 10, imagen 2 de 3 Sony Alpha ILCE-6000 Screen Replacement: paso 10, imagen 3 de 3
    • Gently wiggle the screen's ribbon cable until it comes free from the white slot.

  11. Sony Alpha ILCE-6000 Screen Replacement: paso 11, imagen 1 de 1
    • Pry apart the metal backplate and remove it.

  12. Sony Alpha ILCE-6000 Screen Replacement: paso 12, imagen 1 de 2 Sony Alpha ILCE-6000 Screen Replacement: paso 12, imagen 2 de 2
    • Gently remove the old screen, and replace it with the new one.

Conclusión

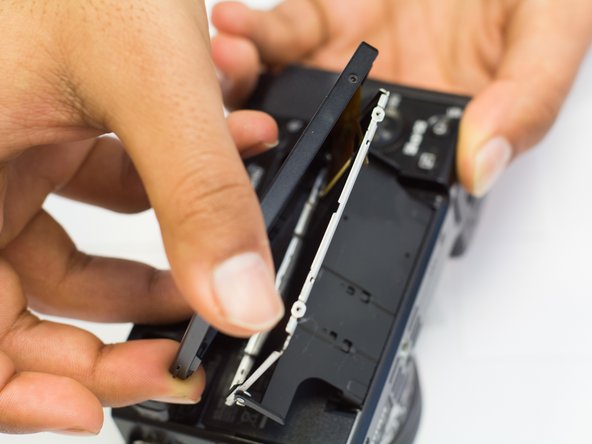
To reassemble your device, follow these instructions in reverse order.

6 personas más completaron esta guía.

Tony Au

Miembro Desde 02/02/17

360 Reputación

2 Guías creadas

Equipo

UW Tacoma, Team 1-4, Rose Winter 2017 Miembro de UW Tacoma, Team 1-4, Rose Winter 2017

UWT-ROSE-W17S1G4

4 Miembros

10 Guías creadas

4 comentarios

This is super helpful! Where did you purchase your replacement part from?

Claire Sweet - Contestar

The white connector opens by prying up the black part. What about the little black connector?

Christopher St.Louis - Contestar

Just comes out when you pull on it gently

Kevin Ketelaars -

Top left screw on back plate is a pain to put back in at an angle with magnetized JIS driver. Non magnetized or slightly loose fitting driver might help.

Trick is to get the screw fit in the thread at the right angle, then drive it in with the driver at an angle.

Kevin Ketelaars - Contestar

Agregar Comentario

Ver Estadísticas:

Ultimas 24 horas: 6

Ultimos 7 días: 29

Ultimos 30 días: 84

Todo El Tiempo: 10,336