Saltar al contenido principal

Sonos Connect Fuse Replacement

Qué necesitas

  1. Sonos Connect Fuse Replacement, Bottom Part: paso 1, imagen 1 de 1
    • Remove the rubber pads and unscrew

  2. Sonos Connect Fuse Replacement, Continue to unscrew: paso 2, imagen 1 de 1
    • Take care not to damage the wires of the Wi-Fi antennas which are very bothersome.

  3. Sonos Connect Fuse Replacement, Unclip the top cover: paso 3, imagen 1 de 2 Sonos Connect Fuse Replacement, Unclip the top cover: paso 3, imagen 2 de 2
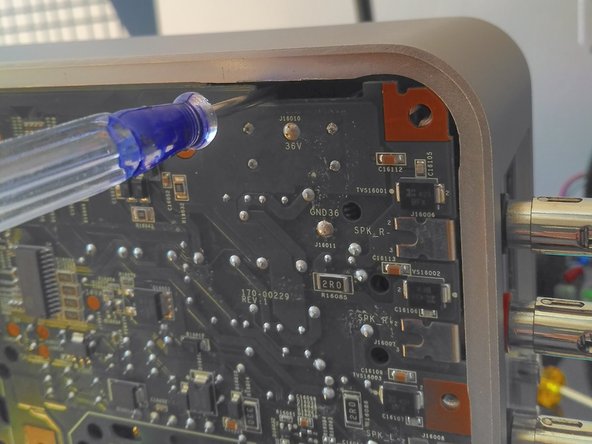
    • By using a screwdriver inserted through each of the 8 peripheral slots, you can access the clips of the top cover.

  4. Sonos Connect Fuse Replacement, Access under the top cover: paso 4, imagen 1 de 1
    • Continue unscrewing (there is a screw under the seal).

  5. Sonos Connect Fuse Replacement, Locate the fuse: paso 5, imagen 1 de 1
    • It's a soldered fuse. You will need to desolder it from the back in order to replace it.

  6. Sonos Connect Fuse Replacement, Replacement fuse: paso 6, imagen 1 de 1
    • About 1$

    • 250V 5A T fuse (time delay).

Conclusión

To reassemble your device, follow these instructions in reverse order.

Una persona más ha completado esta guía.

Un agradecimiento especial a estos traductores:

fr en

100%

Estos traductores nos están ayudando a reparar el mundo! ¿Quieres contribuir?
Empezar a traducir ›

YvesG

Miembro Desde 06/04/18

290 Reputación

2 Guías creadas

Un comentario

Bravo

Ce tuto peux rendre service a des consommateurs abusés par la sociète Sonos .

Merci

bruno vinay - Contestar

Agregar Comentario

Ver Estadísticas:

Ultimas 24 horas: 2

Ultimos 7 días: 11

Ultimos 30 días: 56

Todo El Tiempo: 1,996