Saltar al contenido principal

Shark Navigator Lift-Away Deluxe NV360 Roller Brush Replacement

Qué necesitas

  1. Shark Navigator Lift-Away Deluxe NV360 Roller Brush Replacement, Roller Brush Belt: paso 1, imagen 1 de 2 Shark Navigator Lift-Away Deluxe NV360 Roller Brush Replacement, Roller Brush Belt: paso 1, imagen 2 de 2
    • Lay the vacuum down by hand and locate the roller brush underneath the vacuum cleaner.

  2. Shark Navigator Lift-Away Deluxe NV360 Roller Brush Replacement: paso 2, imagen 1 de 3 Shark Navigator Lift-Away Deluxe NV360 Roller Brush Replacement: paso 2, imagen 2 de 3 Shark Navigator Lift-Away Deluxe NV360 Roller Brush Replacement: paso 2, imagen 3 de 3
    • Insert the metal spudger between the inside side of the wheel and the plastic body.

    • Push the metal spudger away from you to pop the wheels out.

    • Repeat the step to remove the other wheel on the other side.

  3. Shark Navigator Lift-Away Deluxe NV360 Roller Brush Replacement: paso 3, imagen 1 de 1
    • Remove the six 15mm screws using the PH1 screwdriver.

  4. Shark Navigator Lift-Away Deluxe NV360 Roller Brush Replacement: paso 4, imagen 1 de 2 Shark Navigator Lift-Away Deluxe NV360 Roller Brush Replacement: paso 4, imagen 2 de 2
    • Move the blue fulcrum connecting the bottom and the main body of the vacuum cleaner back and forth to loosen up crevice between the two halves of the roller brush enclosure.

  5. Shark Navigator Lift-Away Deluxe NV360 Roller Brush Replacement: paso 5, imagen 1 de 3 Shark Navigator Lift-Away Deluxe NV360 Roller Brush Replacement: paso 5, imagen 2 de 3 Shark Navigator Lift-Away Deluxe NV360 Roller Brush Replacement: paso 5, imagen 3 de 3
    • Insert the plastic opening tool into the crevice between the blue and the dark grey plastic frames enclosing the roller brush.

    • Apply an outward force throughout and all around the gap in order to separate the two plastic frames.

  6. Shark Navigator Lift-Away Deluxe NV360 Roller Brush Replacement: paso 6, imagen 1 de 2 Shark Navigator Lift-Away Deluxe NV360 Roller Brush Replacement: paso 6, imagen 2 de 2
    • Lift the grey frame off the bottom of the vacuum cleaner with your hands and place it on a flat surface.

  7. Shark Navigator Lift-Away Deluxe NV360 Roller Brush Replacement: paso 7, imagen 1 de 3 Shark Navigator Lift-Away Deluxe NV360 Roller Brush Replacement: paso 7, imagen 2 de 3 Shark Navigator Lift-Away Deluxe NV360 Roller Brush Replacement: paso 7, imagen 3 de 3
    • Lift the roller brush slightly upwards using your hand.

    • Take one side of the black roller brush belt off by pulling it over the end of the roller brush with your other hand.

  8. Shark Navigator Lift-Away Deluxe NV360 Roller Brush Replacement: paso 8, imagen 1 de 1
    • Remove the roller brush belt with your hands by sliding it of the end of the motor.

  9. Shark Navigator Lift-Away Deluxe NV360 Roller Brush Replacement, Roller Brush: paso 9, imagen 1 de 2 Shark Navigator Lift-Away Deluxe NV360 Roller Brush Replacement, Roller Brush: paso 9, imagen 2 de 2
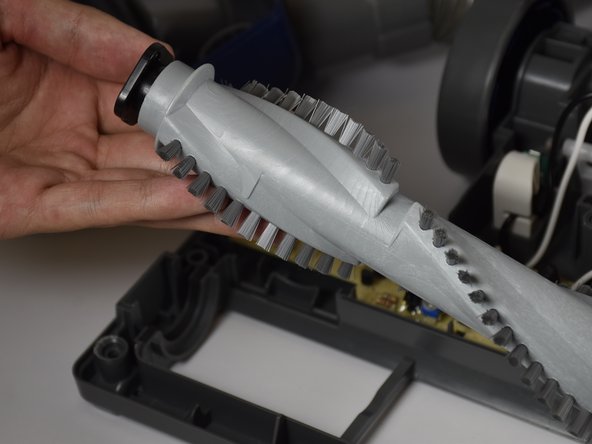
    • Remove the roller brush from the plastic frame using your hands by lifting it away.

Conclusión

To reassemble your device, follow these instructions in reverse order.

13 personas más completaron esta guía.

Equipo

Cal Poly, Team S15-G2, Livingston Fall 2017 Miembro de Cal Poly, Team S15-G2, Livingston Fall 2017

CPSU-LIVINGSTON-F17S15G2

3 Miembros

14 Guías creadas

3 comentarios

What is the part number for the roller brush?

Sean E. Belew - Contestar

what is the part number for the motor and motherboard

benjpatt - Contestar

Worst screw types. You suck

Ace - Contestar

Agregar Comentario

Ver Estadísticas:

Ultimas 24 horas: 7

Ultimos 7 días: 102

Ultimos 30 días: 524

Todo El Tiempo: 43,318