Introducción
Reparé un par de sustituciones de pantalla para el Samsung Note 20
Hice una que necesitaba un vidrio trasero y otra que no.
Creé un vidrio trasero personalizado para molestar a mi hermano mayor por no tener una funda en un teléfono nuevo. ¡Las pantallas de repuesto aún no se habían creado hasta ahora, esperamos 3 semanas!
Qué necesitas
Resumen del Video
-
-
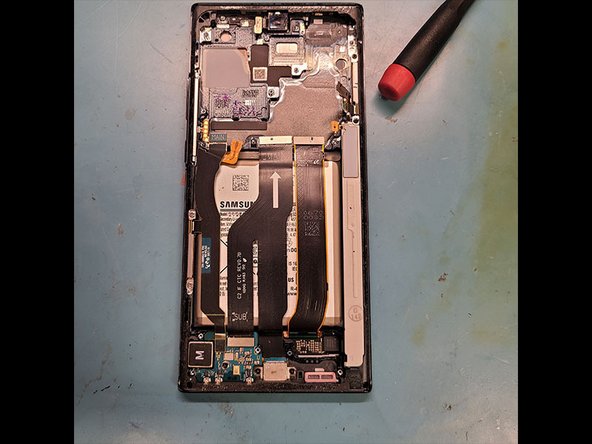
En este Note 20, el OLED está claramente roto y tiene una grieta en el lateral.
-
La parte posterior no tiene daños, así que aplica calor.
-
-
-
Comienza desde el botón hacia arriba y hacia abajo, presiona la herramienta hasta que golpee el marco mientras escuchas un sonido.
-
Herramienta de deslizamiento en tope de ángulo en la curva
-
-
-
Después de aflojar el botón saca la herramienta.
-
Ahora haz palanca con los dedos y tirz hacia arriba con la ventosa.
-
Mientras se pega la herramienta de montaje en el lado del borde curvo, se mueve lentamente hacia abajo por el borde de la curva.
-
Levanta y mueve el vidrio trasero
-
-
-
Retira los 6 tornillos PH000 de la almohadilla de carga inalámbrica que cubre la conexión de la batería.
-
Desconecta la bobina inalámbrica de las conexiones con un spudger de plástico
-
Usa un spudger en la parte superior del metal apretándolo debajo de la parte superior del soporte de la plataforma de carga inalámbrica.
-
Levanta y mueve lentamente la plataforma de carga mientras localizas la conexión de la batería
-
¡¡Conexión de la batería!!
-
-
-
Quita los 4 tornillos PH000 del soporte del auricular.
-
¡Desconecta también esta conexión!
I have another couple pictures that did not make it to the guide that the screws just disintegrated and stripped out where I dremmeled the brand new Note20 Ultra lol
I believe that is the connection for the Laser AF sensor and flashlight. I think the earpiece speaker connection is right by the earpiece on the bottom of that bracket.
-
-
-
-
Asegúrate de que esté desconectado
-
¡Desconecta todas las conexiones de los recuadros amarillos!
-
Retira los 2 tornillos PH000 que sujetan la cámara.
-
Levanta la placa base con un spudger desde el altavoz del oído hacia abajo usando el marco como nivelador
-
-
-
Ubicación de la cámara frontal
-
Usa una cuchilla de borde recto en la parte inferior de la cámara para soltarla. De hecho, puedes sacar el pegamento/adhesivo y saldrá en un solo trozo.
-
Levanta la cámara lentamente
-
-
-
Retira los 2 tornillos PH000 negros en la parte superior derecha para levantar el flex.
-
Quita los 2 tornillos PH000 en la parte inferior derecha y levanta el flex.
-
-
-
Coloca la placa principal en el marco nuevo
-
Inserta la cámara frontal después de colocar la placa
So when your laying it into the new frame, that the front part with the new glass and such? I'm just making sure I'm picturing this in my head correctly. I'm contemplating trying this but making sure I fully understand before I even think about attempting it. I guess I always thought when you opened the phone, the glass and front would come off and then you would have the parts and body of the phone in the back side frame. But here it is opposite where the back just comes off and the body is in the front frame. Correct? Im sorry, I probably sound so stupid. But I'm just double checking. Sorry this became so long and thank you for your time. :-)
- Jamie
Depends on which Samsung your working on but this is the best way if you do just screen you would still have to take apart whole device to ensure you don't short circuit anything you must unplug battery!
Samsung A50 i think is a screen 1st if device is off or
-


Durante esta reparación en el Note 20 Ultra negro, noté que la pantalla parecía renovada, tenía problemas con los tornillos que se quitaron. Hice un trabajo serio para perforar el teléfono. Que no está incluido en esta guía.
Antes trabajé en el teléfono que tenía el problema de extracción del tornillo. Ya había trabajado en el teléfono, hice un video y no tuve problemas para quitar los tornillos del teléfono. Hice que la guía de imágenes fuera claramente renovada.
Cancelar: No complete esta guía.
10 personas más completaron esta guía.
Un agradecimiento especial a estos traductores:
100%

¡ Francisco Javier Saiz Esteban nos está ayudando a reparar el mundo! ¿Quieres contribuir?
Empezar a traducir ›

8 comentarios
I did the repair and ran into issues with the REAR camera. I retraced all my hardware. its all connected. the selfie cam works. nothing got disconnected when I removed the mother board. i’ve tried to reset app cache
help plz
Do you have all the screws back in with the speakers and wireless charger coil on the phone?
Stow -
Rear camera hmm did you try repeating the connection did the cameras work before repair?
Thanks for the effort here with the guide. Unless I am missing something (lol) where is the part of the screen replacement (by screen = the display screen, right?) I see the back replacement here. You do mention the OLED screen being broken at the beginning but the guide is for the back replacement, right? (not as title suggests ‘screen replacement) Sorry maybe am wrong here.
He transfered anything from the original phone to the new sreen/frame assembly.
Thanks Daniele - this had me confused “I repaired a couple of screen replacements”…and the sentence after that. Ok, so he took the back, board, battery etc from the one with the broken screen and mated it with a new screen. So one has to assume that somewhere in step 16 is the connection with the screen flex cable. Looking to see if just the screen is cracked, does the whole disassembly need to be done? (starting from the back working way to the front)? (think it is lol but hoping asking, as videos I have seen address broken screen (not just glass cracks) replacements-maybe the glass and the digitizer are fused?) thanks
In step 14 he starts to speak about the new frame (that include the new OLED panel and digitizer). Replacing only the glass is a bit difficult and you may broke the OLED too if you are not extra careful. You have to do the same that hr did for the back glass (better if you use an opening pick and you heat the side you are working on before you insert the pick, for each side, and you do not insirte the pick more than 1 or 2 mm). If you manage to do that, you can save a lot of money, else you have to buy a new oled too. So, i will suggest you to try to remove the glass without broking anyting, then try to turn the phone on to see if you broke thee oled. Finally, you decide what to buy based on what’s broken.
Highly recommend not doing the screen repair without frame assembly but you can do it just have high chance of screen falling off, or cracking oled when claping it down