Saltar al contenido principal

Esta guía ha sufrido modificaciones. Revisa la última versión sin revisar.

Sanyo VPC S1275 Function Set Replacement

Qué necesitas

  1. Sanyo VPC S1275 Function Set Replacement, Battery: paso 1, imagen 1 de 1
    • Place your thumb on the right side of the camera over the battery door.

    • Slide the battery door to the right until the door lifts up.

  2. Sanyo VPC S1275 Function Set Replacement: paso 2, imagen 1 de 1
    • Remove and recycle old batteries.

  3. Sanyo VPC S1275 Function Set Replacement, Case: paso 3, imagen 1 de 3 Sanyo VPC S1275 Function Set Replacement, Case: paso 3, imagen 2 de 3 Sanyo VPC S1275 Function Set Replacement, Case: paso 3, imagen 3 de 3
    • Remove the following six screws using the Phillips #00 screwdriver:

    • Two screws on the left side of the camera.

    • Two screws on the right side of the camera.

    • Two screws on the bottom of the camera.

  4. Sanyo VPC S1275 Function Set Replacement: paso 4, imagen 1 de 2 Sanyo VPC S1275 Function Set Replacement: paso 4, imagen 2 de 2
    • Open the battery slot on the bottom of the camera by sliding the door to the right.

    • Remove the single 4 mm screw on the bottom right using the Phillips #00 screwdriver.

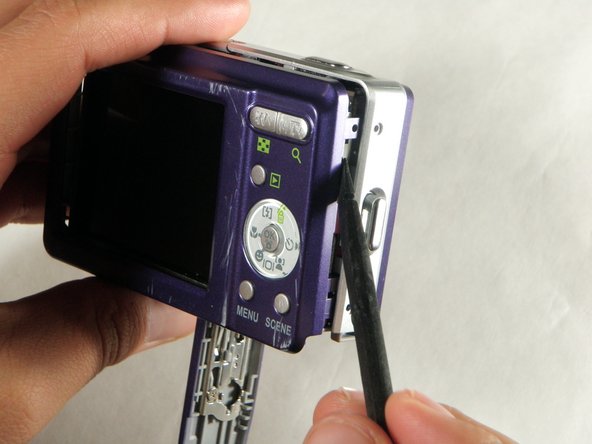
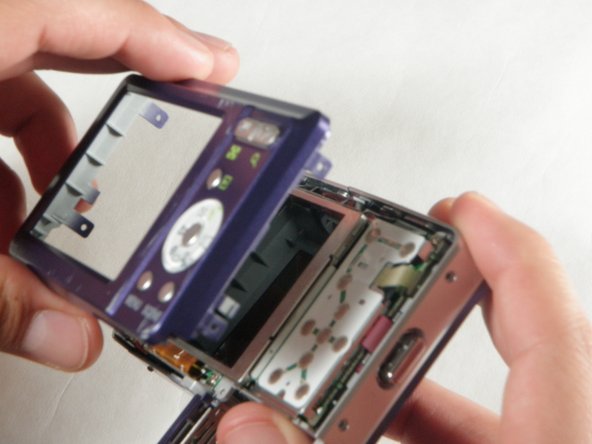
  5. Sanyo VPC S1275 Function Set Replacement: paso 5, imagen 1 de 3 Sanyo VPC S1275 Function Set Replacement: paso 5, imagen 2 de 3 Sanyo VPC S1275 Function Set Replacement: paso 5, imagen 3 de 3
    • Insert a spudger in the seam at the bottom of the camera.

    • Gently separate the rear case from the front of the camera.

  6. Sanyo VPC S1275 Function Set Replacement: paso 6, imagen 1 de 1
    • This step is only needed for the case and logic board replacement

    • Using the Phillips #00 screwdriver, remove the single screw attached to the front casing in the top left corner. The front case should easily separate.

  7. Sanyo VPC S1275 Function Set Replacement: paso 7, imagen 1 de 1
    • This step is only needed for the case replacement.

    • Using the Phillips #00 screwdriver, remove the screw on the inside of the battery door.

    • Slide the battery door off of the hinge.

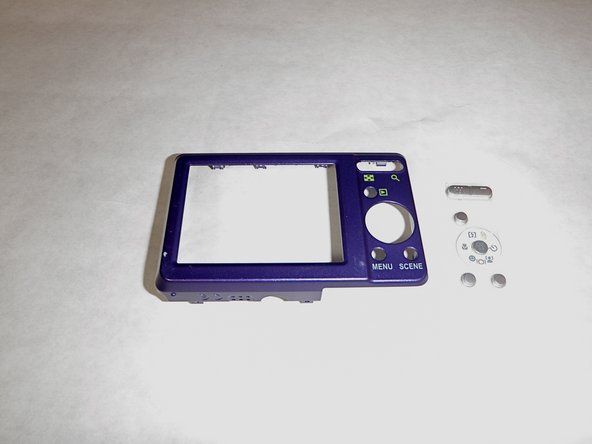
  8. Sanyo VPC S1275 Function Set Replacement, Function Set: paso 8, imagen 1 de 2 Sanyo VPC S1275 Function Set Replacement, Function Set: paso 8, imagen 2 de 2
    • Remove the function set strip by lifting it from the inside of the rear case.

    • The function strip is now free from the camera.

Conclusión

To reassemble your device, follow these instructions in reverse order.

Equipo

Cal Poly, Team 24-24, Regan Spring 2010 Miembro de Cal Poly, Team 24-24, Regan Spring 2010

CPSU-REGAN-S10S24G24

4 Miembros

12 Guías creadas

0 comentarios

Agregar Comentario

Ver Estadísticas:

Ultimas 24 horas: 0

Ultimos 7 días: 4

Ultimos 30 días: 7

Todo El Tiempo: 2,643