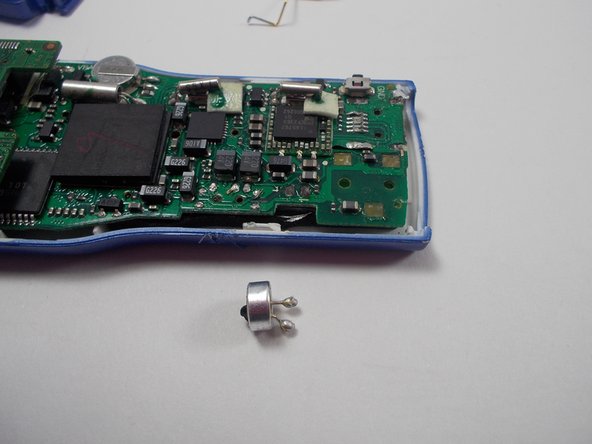
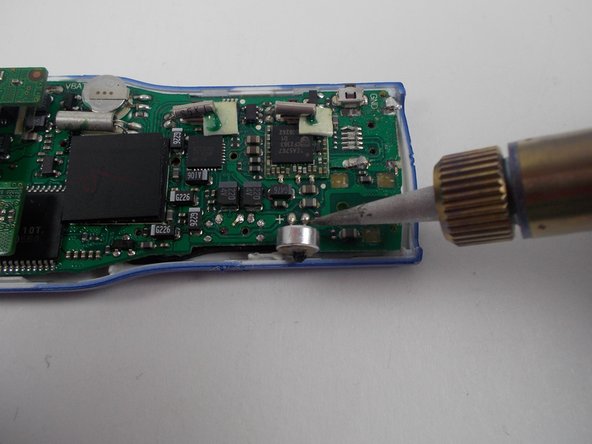
Saltar al contenido principal

Sandisk Sansa m230 Series mp3 player Microphone Replacement

Qué necesitas

  1. Sandisk Sansa m230 Series mp3 player Microphone Replacement, Sandisk Sansa m230 Series mp3 player Teardown: paso 1, imagen 1 de 1
    • Remove the battery compartment cover.

    • Remove the battery.

  2. Sandisk Sansa m230 Series mp3 player Microphone Replacement: paso 2, imagen 1 de 1
    • Locate and remove the screw next to the battery compartment lid.

  3. Sandisk Sansa m230 Series mp3 player Microphone Replacement: paso 3, imagen 1 de 1
    • Locate the interlocking pegs along the seam of the device's casings.

    • Gently pry the pegs apart one at a time, working your way around the case.

    • Be careful when prying apart the pegs: they are made of plastic and may break.

  4. Sandisk Sansa m230 Series mp3 player Microphone Replacement: paso 4, imagen 1 de 1
    • The battery contact springs may prevent the case from separating.

    • Push the battery contact springs down through the hole in the case.

  5. Sandisk Sansa m230 Series mp3 player Microphone Replacement: paso 5, imagen 1 de 1
    • The casing protecting the USB and headphone jacks must be removed.

    • Locate and gently pry apart the two interlocking clips holding it in place.

    • The outer casings may now be removed and the MP3 player should separate.

  6. Sandisk Sansa m230 Series mp3 player Microphone Replacement: paso 6, imagen 1 de 1
    • You now have access to all components found on the inside of the device!

  7. Sandisk Sansa m230 Series mp3 player Microphone Replacement, Microphone: paso 7, imagen 1 de 1
    • Locate microphone on motherboard.

  8. Sandisk Sansa m230 Series mp3 player Microphone Replacement: paso 8, imagen 1 de 1
    • Find where microphone is connected to motherboard via solder.

  9. Sandisk Sansa m230 Series mp3 player Microphone Replacement: paso 9, imagen 1 de 2 Sandisk Sansa m230 Series mp3 player Microphone Replacement: paso 9, imagen 2 de 2
    • Use the soldering iron to liquefy the solder connecting the microphone to the motherboard.

  10. Sandisk Sansa m230 Series mp3 player Microphone Replacement: paso 10, imagen 1 de 1
    • The solder and soldering iron will be very hot at this time. Do not touch unless wearing protective gloves as you will be burnt.

    • When not in use, be sure to always elevate the hot end of the soldering iron on a metal stand to prevent incidental burns.

  11. Sandisk Sansa m230 Series mp3 player Microphone Replacement: paso 11, imagen 1 de 2 Sandisk Sansa m230 Series mp3 player Microphone Replacement: paso 11, imagen 2 de 2
    • Remove the faulty microphone as you heat and melt the soldering points.

  12. Sandisk Sansa m230 Series mp3 player Microphone Replacement: paso 12, imagen 1 de 1
    • Replace the faulty microphone with a new one in working order.

  13. Sandisk Sansa m230 Series mp3 player Microphone Replacement: paso 13, imagen 1 de 2 Sandisk Sansa m230 Series mp3 player Microphone Replacement: paso 13, imagen 2 de 2
    • With the new microphone in place, use the soldering iron and solder to create a stable connection between the motherboard and microphone.

    • Give the new solder time to cool and harden.

Conclusión

To reassemble your device, follow these instructions in reverse order.

James Thorne

Miembro Desde 11/05/13

638 Reputación

6 Guías creadas

Equipo

UMass Dartmouth, Team 1-8, Shastany Fall 2013 Miembro de UMass Dartmouth, Team 1-8, Shastany Fall 2013

UMASSD-SHASTANY-F13S1G8

3 Miembros

6 Guías creadas

0 comentarios

Agregar Comentario

Ver Estadísticas:

Ultimas 24 horas: 1

Ultimos 7 días: 6

Ultimos 30 días: 6

Todo El Tiempo: 479