Saltar al contenido principal

Samsung SPH-M360 Logic Board Replacement

Qué necesitas

  1. Samsung SPH-M360 Logic Board Replacement, Battery: paso 1, imagen 1 de 3 Samsung SPH-M360 Logic Board Replacement, Battery: paso 1, imagen 2 de 3 Samsung SPH-M360 Logic Board Replacement, Battery: paso 1, imagen 3 de 3
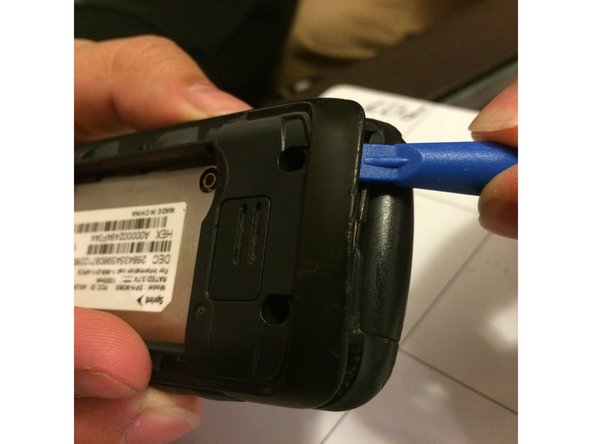
    • Locate the arrow on the panel of the rear side of the phone.

    • Use one or two fingers to apply light pressure downwards on the rear panel and push or pull in the direction of the arrow.

  2. Samsung SPH-M360 Logic Board Replacement: paso 2, imagen 1 de 3 Samsung SPH-M360 Logic Board Replacement: paso 2, imagen 2 de 3 Samsung SPH-M360 Logic Board Replacement: paso 2, imagen 3 de 3
    • Place finger inside the small semi-spherical slot near the top of the battery.

    • Lightly pull the battery away from the phone. This should not require much effort.

  3. Samsung SPH-M360 Logic Board Replacement, Casing: paso 3, imagen 1 de 1
    • Remove the four screws on the corners of the casing.

    • The volume and camera buttons may fall out

  4. Samsung SPH-M360 Logic Board Replacement: paso 4, imagen 1 de 2 Samsung SPH-M360 Logic Board Replacement: paso 4, imagen 2 de 2
    • Starting near the top of the casing, use the plastic opening tool to gently pry the casing open.

    • The case should require some effort to pry open, but do not use excessive force for risk of breaking the rear panel.

    • Slowly work the plastic opening tool around the edge of the casing, gently prying it around at all sides.

  5. Samsung SPH-M360 Logic Board Replacement: paso 5, imagen 1 de 2 Samsung SPH-M360 Logic Board Replacement: paso 5, imagen 2 de 2
    • Once the casing has been fully pried off of the phone, it should be easily removed by hand.

    • The buttons for the camera and volume may fall out while removing the casing. Be careful not to lose the small pieces.

  6. Samsung SPH-M360 Logic Board Replacement, Logic Board: paso 6, imagen 1 de 1
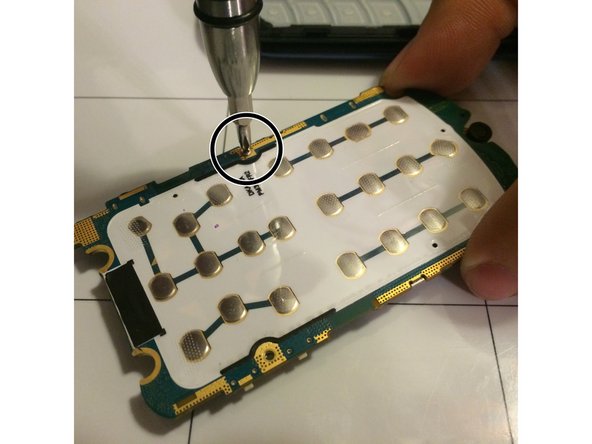
    • Use the plastic opening tool to gently detach the golden strip from the logic board.

    • The strip should detach easily with little force required.

  7. Samsung SPH-M360 Logic Board Replacement: paso 7, imagen 1 de 1
    • Use the plastic opening tool to pry the logic board out of the phone case from the bottom area of the phone.

  8. Samsung SPH-M360 Logic Board Replacement: paso 8, imagen 1 de 2 Samsung SPH-M360 Logic Board Replacement: paso 8, imagen 2 de 2
    • Flip the logic board over and locate the three screws along the edges.

    • Carefully unscrew the three screws to remove the panel covering the logic board.

    • Be careful with the screws after unscrewing them because they are small and easy to lose.

  9. Samsung SPH-M360 Logic Board Replacement: paso 9, imagen 1 de 2 Samsung SPH-M360 Logic Board Replacement: paso 9, imagen 2 de 2
    • Flip the logic board back over and use the plastic opening tool to remove the metal cover on the logic board.

    • This will not require much force, so be gentle.

Conclusión

To reassemble your device, follow these instructions in reverse order.

Una persona más ha completado esta guía.

Ashraf Nasser

Miembro Desde 10/22/15

126 Reputación

1 Guía escrita

0 comentarios

Agregar Comentario

Ver Estadísticas:

Ultimas 24 horas: 0

Ultimos 7 días: 1

Ultimos 30 días: 4

Todo El Tiempo: 201