Saltar al contenido principal

Samsung POWERbot VR9000 Powerbrush Replacement

  1. Samsung POWERbot VR9000 Powerbrush Replacement, Powerbrush: paso 1, imagen 1 de 2 Samsung POWERbot VR9000 Powerbrush Replacement, Powerbrush: paso 1, imagen 2 de 2
    • Turn off the emergency switch located at the bottom right of the POWERbot.

  2. Samsung POWERbot VR9000 Powerbrush Replacement: paso 2, imagen 1 de 2 Samsung POWERbot VR9000 Powerbrush Replacement: paso 2, imagen 2 de 2
    • Press the two yellow tabs immediately below the POWERbrush.

  3. Samsung POWERbot VR9000 Powerbrush Replacement: paso 3, imagen 1 de 2 Samsung POWERbot VR9000 Powerbrush Replacement: paso 3, imagen 2 de 2
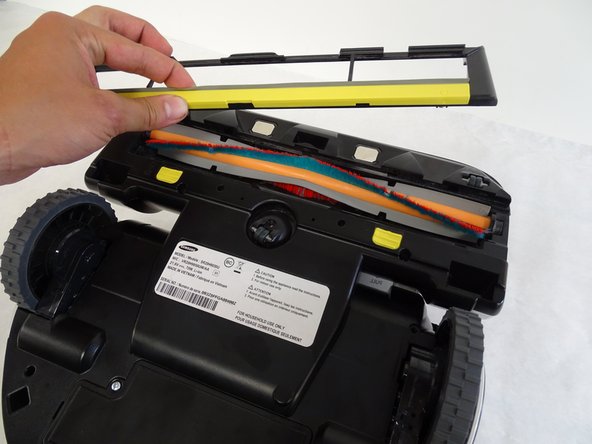
    • Lift the brush cover, indicated by the yellow strip located above the yellow tabs.

  4. Samsung POWERbot VR9000 Powerbrush Replacement: paso 4, imagen 1 de 2 Samsung POWERbot VR9000 Powerbrush Replacement: paso 4, imagen 2 de 2
    • Remove the power brush starting with the unhinged right side of the brush.

Conclusión

To reassemble your device, follow these instructions in reverse order.

Harrison Fugate

Miembro Desde 04/24/17

102 Reputación

1 Guía escrita

Equipo

Cal Poly, Team S15-G3, Banghart Spring 2017 Miembro de Cal Poly, Team S15-G3, Banghart Spring 2017

CPSU-BANGHART-S17S15G3

4 Miembros

14 Guías creadas

2 comentarios

The brush is wobbly in position. Is there an insert on the right side of the brush at the bearing. This position, the bearing look too small for the opening of the cover and the upper plastic.

Charlie nguyen - Contestar

Did you lose the rubber cover/ washer that goes over the bearing? You can replace it from Samsung if you did.

hawkswhispertwh - Contestar

Agregar Comentario

Ver Estadísticas:

Ultimas 24 horas: 0

Ultimos 7 días: 1

Ultimos 30 días: 4

Todo El Tiempo: 2,201