Saltar al contenido principal

Samsung NX1 Viewfinder Replacement

Qué necesitas

  1. Samsung NX1 Viewfinder Replacement, Viewfinder Focus Dial: paso 1, imagen 1 de 2 Samsung NX1 Viewfinder Replacement, Viewfinder Focus Dial: paso 1, imagen 2 de 2
    • Push the rubber viewfinder grip upward.

  2. Samsung NX1 Viewfinder Replacement: paso 2, imagen 1 de 2 Samsung NX1 Viewfinder Replacement: paso 2, imagen 2 de 2
    • Use the Phillips #00 screwdriver to remove one 6.4 mm screw in the center of the dial.

    • Remove the dial by lifting upward with your fingers.

  3. Samsung NX1 Viewfinder Replacement, Back Cover: paso 3, imagen 1 de 3 Samsung NX1 Viewfinder Replacement, Back Cover: paso 3, imagen 2 de 3 Samsung NX1 Viewfinder Replacement, Back Cover: paso 3, imagen 3 de 3
    • Use the Phillips #00 screwdriver to remove the four 5.5 mm screws surrounding the viewfinder.

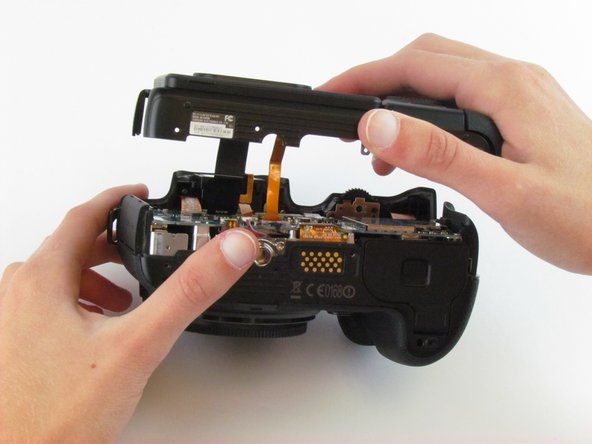
    • Use your fingers to lift the plastic viewfinder cover upward.

  4. Samsung NX1 Viewfinder Replacement: paso 4, imagen 1 de 2 Samsung NX1 Viewfinder Replacement: paso 4, imagen 2 de 2
    • Use the Phillips #00 screwdriver to remove the two 5.5 mm screws from the right side of the camera above the SD card port.

  5. Samsung NX1 Viewfinder Replacement: paso 5, imagen 1 de 1
    • Use the Phillips #00 screwdriver to remove one 5.5 mm screw on the left, above the HDMI port.

  6. Samsung NX1 Viewfinder Replacement: paso 6, imagen 1 de 1
    • Use the Phillips #00 screwdriver to remove the five 5.5 mm screws from the bottom, near the battery compartment.

    • Use the Phillips #00 screwdriver to remove one 3.8 mm screw from the bottom of the hand grip, below the battery compartmen.

  7. Samsung NX1 Viewfinder Replacement: paso 7, imagen 1 de 3 Samsung NX1 Viewfinder Replacement: paso 7, imagen 2 de 3 Samsung NX1 Viewfinder Replacement: paso 7, imagen 3 de 3
    • Use a plastic opening tool to separate the back cover from the front cover.

    • Pry the back cover in this order: bottom, right side, left side.

  8. Samsung NX1 Viewfinder Replacement: paso 8, imagen 1 de 2 Samsung NX1 Viewfinder Replacement: paso 8, imagen 2 de 2
    • Use your fingers to pull the back cover away from the front cover.

    • Do not completely separate the back cover from the front cover as two cables hold these components together.

  9. Samsung NX1 Viewfinder Replacement: paso 9, imagen 1 de 3 Samsung NX1 Viewfinder Replacement: paso 9, imagen 2 de 3 Samsung NX1 Viewfinder Replacement: paso 9, imagen 3 de 3
    • Use tweezers to pull the two ribbon cables horizontally out of their clips.

  10. Samsung NX1 Viewfinder Replacement, LCD Touch Screen: paso 10, imagen 1 de 1
    • Use the Phillips #00 screwdriver to remove the seven screws (three silver 3.5 mm screws and four black 2.7 mm screws).

  11. Samsung NX1 Viewfinder Replacement: paso 11, imagen 1 de 2 Samsung NX1 Viewfinder Replacement: paso 11, imagen 2 de 2
    • Use tweezers to remove the glued rubber piece.

  12. Samsung NX1 Viewfinder Replacement: paso 12, imagen 1 de 3 Samsung NX1 Viewfinder Replacement: paso 12, imagen 2 de 3 Samsung NX1 Viewfinder Replacement: paso 12, imagen 3 de 3
    • Use the Phillips #00 screwdriver to remove the four black 2.3 mm screws.

    • Use your fingers to separate the LCD screen from the folding mechanism.

  13. Samsung NX1 Viewfinder Replacement, Motherboard: paso 13, imagen 1 de 1
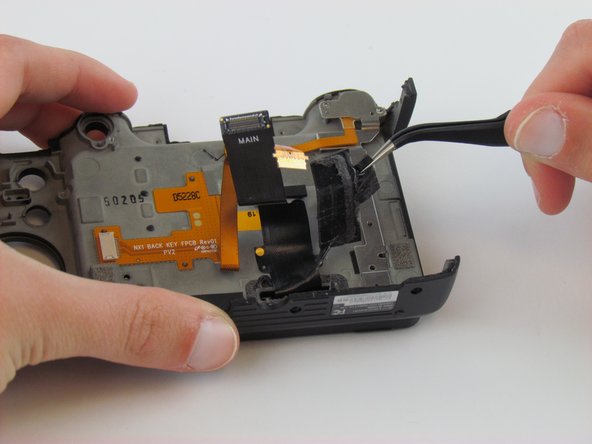
    • Use tweezers to pull the five ribbon cables horizontally out of their clips.

    • Use a spudger or your fingernail to flip up the four, small retaining flap, or zero insertion force (ZIF) connectors. Then, pull the ribbon cable out to disconnect it.

    • Remove the green tape using your fingernail. Then, use a spudger to pry the one antenna cable connector straight up from the board.

    • Use tweezers or a spudger to pry up each side of the flat-topped connector. Then, lift the one connector straight up from its socket.

    • Use tweezers or your fingers to pull the two double-bundled cables up and away from the connector in the same direction that the individual wires are running.

  14. Samsung NX1 Viewfinder Replacement: paso 14, imagen 1 de 1
    • Use the Phillips #00 screwdriver to remove the six silver 4.5 mm screws.

  15. Samsung NX1 Viewfinder Replacement: paso 15, imagen 1 de 2 Samsung NX1 Viewfinder Replacement: paso 15, imagen 2 de 2
    • Use a spudger to lift the motherboard up starting on the right side proceeding to the left side.

    • Use your fingers to lift the motherboard completely out of the camera.

  16. Samsung NX1 Viewfinder Replacement, Viewfinder: paso 16, imagen 1 de 1
    • Use tweezers to lift the black tab on the ZIF connector.

    • Use tweezers to pull the large orange ribbon cable out of the connector to get a clearer view of the screws lying beneath it.

  17. Samsung NX1 Viewfinder Replacement: paso 17, imagen 1 de 1
    • Use the Phillips #00 screwdriver to remove the three black 3.8 mm screws below the viewfinder.

  18. Samsung NX1 Viewfinder Replacement: paso 18, imagen 1 de 2 Samsung NX1 Viewfinder Replacement: paso 18, imagen 2 de 2
    • Use a spudger to gently push the viewfinder cube, starting at the top of the cube and pushing it toward the bottom of the camera.

    • Use your fingers to lift the viewfinder cube out of the camera.

Conclusión

To reassemble your device, follow these instructions in reverse order.

Una persona más ha completado esta guía.

Equipo

USF Tampa, Team 1-4, Leahy Spring 2016 Miembro de USF Tampa, Team 1-4, Leahy Spring 2016

USFT-LEAHY-S16S1G4

3 Miembros

6 Guías creadas

0 comentarios

Agregar Comentario

Ver Estadísticas:

Ultimas 24 horas: 0

Ultimos 7 días: 0

Ultimos 30 días: 7

Todo El Tiempo: 1,060