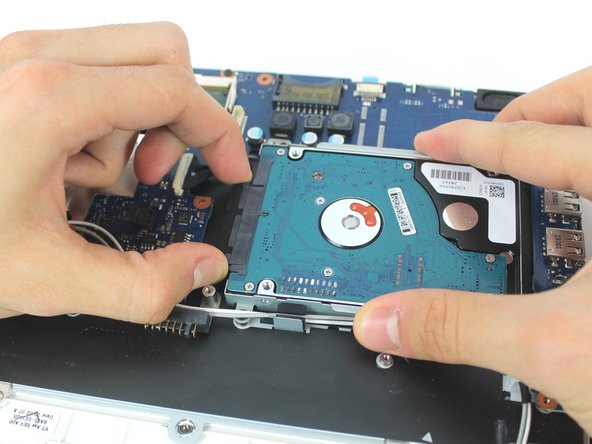
Saltar al contenido principal

Samsung NP-N210-JA02US Hard Drive Replacement

Qué necesitas

  1. Samsung NP-N210-JA02US Hard Drive Replacement, Battery: paso 1, imagen 1 de 2 Samsung NP-N210-JA02US Hard Drive Replacement, Battery: paso 1, imagen 2 de 2
    • Carefully slide both locking pins to the unlocked position.

  2. Samsung NP-N210-JA02US Hard Drive Replacement: paso 2, imagen 1 de 1
    • Slide the battery out of its housing.

  3. Samsung NP-N210-JA02US Hard Drive Replacement, Hard Drive Removal: paso 3, imagen 1 de 1
    • Remove the following 14 screws:

    • Thirteen 5 mm Phillips #1 screws

    • One 3.5 mm Philips #001 screw

  4. Samsung NP-N210-JA02US Hard Drive Replacement: paso 4, imagen 1 de 1
    • Carefully insert the plastic opening tool into the seam between the lower casing and the chrome bezel.

  5. Samsung NP-N210-JA02US Hard Drive Replacement: paso 5, imagen 1 de 1
    • Slide the opening tool across all sides of the lower case. Then, lift it up to remove the case and reveal the internal components.

  6. Samsung NP-N210-JA02US Hard Drive Replacement: paso 6, imagen 1 de 3 Samsung NP-N210-JA02US Hard Drive Replacement: paso 6, imagen 2 de 3 Samsung NP-N210-JA02US Hard Drive Replacement: paso 6, imagen 3 de 3
    • Carefully unplug the SATA connector from the hard drive.

  7. Samsung NP-N210-JA02US Hard Drive Replacement: paso 7, imagen 1 de 2 Samsung NP-N210-JA02US Hard Drive Replacement: paso 7, imagen 2 de 2
    • Remove the four black 3.5 mm Philips #1 screws on the (side) of the hard drive.

  8. Samsung NP-N210-JA02US Hard Drive Replacement: paso 8, imagen 1 de 1
    • Gently lift the hard drive from its mounting bracket.

Conclusión

To reassemble your device, follow these instructions in reverse order.

9 personas más completaron esta guía.

0Guía Comentarios

Agregar Comentario

Ver Estadísticas:

Ultimas 24 horas: 1

Ultimos 7 días: 16

Ultimos 30 días: 35

Todo El Tiempo: 3,919