Saltar al contenido principal

Samsung L100 flash assembly replacement

Qué necesitas

  1. Samsung L100 flash assembly replacement, Removing Back Cover: paso 1, imagen 1 de 3 Samsung L100 flash assembly replacement, Removing Back Cover: paso 1, imagen 2 de 3 Samsung L100 flash assembly replacement, Removing Back Cover: paso 1, imagen 3 de 3
    • Remove the six external screws from the camera using a Phillips #0 screwdriver.

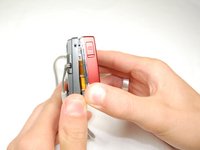
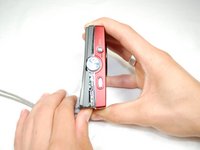
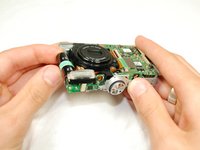
    • After the screws has been removed, the bottom of the back half of the external case should be loosened from the camera.

    • Be careful, make sure you don't lose the screws.

  2. Samsung L100 flash assembly replacement: paso 2, imagen 1 de 2 Samsung L100 flash assembly replacement: paso 2, imagen 2 de 2
    • Open the battery cover that's located on the bottom right side of the camera and carefully remove the battery.

  3. Samsung L100 flash assembly replacement: paso 3, imagen 1 de 3 Samsung L100 flash assembly replacement: paso 3, imagen 2 de 3 Samsung L100 flash assembly replacement: paso 3, imagen 3 de 3
    • Slide your fingernail or a plastic spudger in the groove from the bottom to the top right side of the camera.

  4. Samsung L100 flash assembly replacement: paso 4, imagen 1 de 1
    • Carefully squeeze the top right corner of the camera and pry off the external cover.

    • If you hear a "cracking" sound. This is normal.

    • Continue to pull the external cover and it will come off cleanly.

    • Be cautious of the flash capacitor. It carries an electrical charge, that may give you an unpleasant shock.

  5. Samsung L100 flash assembly replacement: paso 5, imagen 1 de 1
    • Carefully pull off the back cover, parts behind the back of the case might fall out.

  6. Samsung L100 flash assembly replacement, Flash Circuit Board: paso 6, imagen 1 de 1
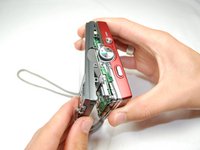
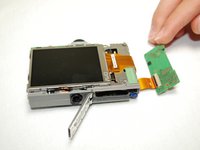
    • Remove the screws holding the circuit board.

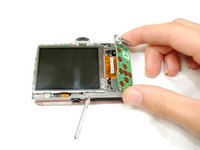
    • After you remove the screws, carefully remove the circuit board.

  7. Samsung L100 flash assembly replacement: paso 7, imagen 1 de 2 Samsung L100 flash assembly replacement: paso 7, imagen 2 de 2
    • Remove the front cover, it comes off easily.

    • Buttons might fall out when you remove the front cover.

  8. Samsung L100 flash assembly replacement: paso 8, imagen 1 de 1
    • Face camera towards you.

    • Remove the two screws from circuit board on the left side of the lens.

  9. Samsung L100 flash assembly replacement: paso 9, imagen 1 de 1
    • Carefully hold up the circuit board, while it's still connected to the camera.

    • Remove all five screws that's on top of the camera.

  10. Samsung L100 flash assembly replacement: paso 10, imagen 1 de 3 Samsung L100 flash assembly replacement: paso 10, imagen 2 de 3 Samsung L100 flash assembly replacement: paso 10, imagen 3 de 3
    • Carefully push up the top of the circuit board.

    • Pull up flash circuit board from top of camera.

Conclusión

To reassemble your device, follow these instructions in reverse order.

Una persona más ha completado esta guía.

Adriel

Miembro Desde 04/15/10

123 Reputación

2 Guías creadas

Equipo

Cal Poly, Team 6-17, Maness Spring 2010 Miembro de Cal Poly, Team 6-17, Maness Spring 2010

CPSU-MANESS-S10S6G17

4 Miembros

10 Guías creadas

0 comentarios

Agregar Comentario

Ver Estadísticas:

Ultimas 24 horas: 0

Ultimos 7 días: 1

Ultimos 30 días: 2

Todo El Tiempo: 4,003