Saltar al contenido principal

Samsung Juke SCH-u470 Keyboard Replacement

Qué necesitas

  1. Samsung Juke SCH-u470 Keyboard Replacement, Battery: paso 1, imagen 1 de 1
    • Press and hold down the button on the bottom side of the phone with your finger.

  2. Samsung Juke SCH-u470 Keyboard Replacement: paso 2, imagen 1 de 2 Samsung Juke SCH-u470 Keyboard Replacement: paso 2, imagen 2 de 2
    • While holding the button down, remove the back cover of the phone.

  3. Samsung Juke SCH-u470 Keyboard Replacement, Camera/Speaker: paso 3, imagen 1 de 1
    • Remove the four screws from the back of the phone using a Phillips #00 screwdriver.

  4. Samsung Juke SCH-u470 Keyboard Replacement: paso 4, imagen 1 de 1
    • Remove the two 7.3 mm screws from the camera and the speaker at the bottom back plate of the phone using a Phillips #00 screwdriver.

  5. Samsung Juke SCH-u470 Keyboard Replacement: paso 5, imagen 1 de 3 Samsung Juke SCH-u470 Keyboard Replacement: paso 5, imagen 2 de 3 Samsung Juke SCH-u470 Keyboard Replacement: paso 5, imagen 3 de 3
    • Locate the USB port (where the charger can be plugged in). Using the iFixit opening tool, open the phone cover.

    • Failure to open USB port cover at this stage may result in damaging the device.

  6. Samsung Juke SCH-u470 Keyboard Replacement: paso 6, imagen 1 de 1
    • Remove the 5.5 mm screws from both sides of the camera/speaker with a Phillips #00 screwdriver.

  7. Samsung Juke SCH-u470 Keyboard Replacement: paso 7, imagen 1 de 2 Samsung Juke SCH-u470 Keyboard Replacement: paso 7, imagen 2 de 2
    • Use the iFixit opening tool to remove the camera/speaker from the motherboard.

    • Practice caution to prevent damage to the attaching ribbon.

  8. Samsung Juke SCH-u470 Keyboard Replacement: paso 8, imagen 1 de 2 Samsung Juke SCH-u470 Keyboard Replacement: paso 8, imagen 2 de 2
    • Use the iFixit opening tool to gently pry the camera/speaker off.

  9. Samsung Juke SCH-u470 Keyboard Replacement, Motherboard: paso 9, imagen 1 de 2 Samsung Juke SCH-u470 Keyboard Replacement, Motherboard: paso 9, imagen 2 de 2
    • Use the iFixit opening tool to remove the yellow tab on the motherboard.

  10. Samsung Juke SCH-u470 Keyboard Replacement: paso 10, imagen 1 de 2 Samsung Juke SCH-u470 Keyboard Replacement: paso 10, imagen 2 de 2
    • Use the iFixit opening tool to remove the other orange tab to free the motherboard.

  11. Samsung Juke SCH-u470 Keyboard Replacement: paso 11, imagen 1 de 3 Samsung Juke SCH-u470 Keyboard Replacement: paso 11, imagen 2 de 3 Samsung Juke SCH-u470 Keyboard Replacement: paso 11, imagen 3 de 3
    • To completely remove the motherboard, use the iFixit opening tool to leverage it up, then use your fingers to pull it out.

    • Do not be alarmed if the volume and hold buttons are removed from the motherboard.

  12. Samsung Juke SCH-u470 Keyboard Replacement, Keyboard: paso 12, imagen 1 de 3 Samsung Juke SCH-u470 Keyboard Replacement, Keyboard: paso 12, imagen 2 de 3 Samsung Juke SCH-u470 Keyboard Replacement, Keyboard: paso 12, imagen 3 de 3
    • Open/swivel the phone so the back of the LCD panel is visible.

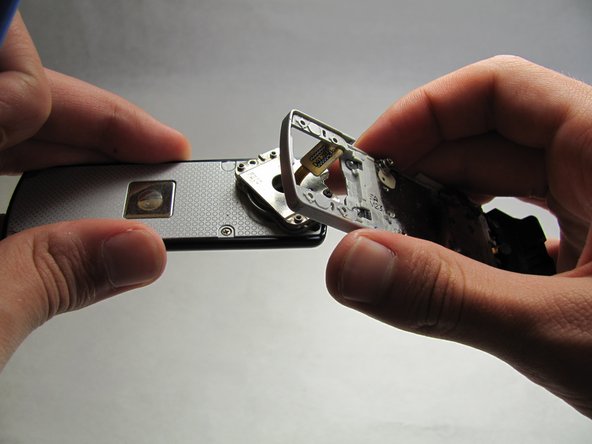
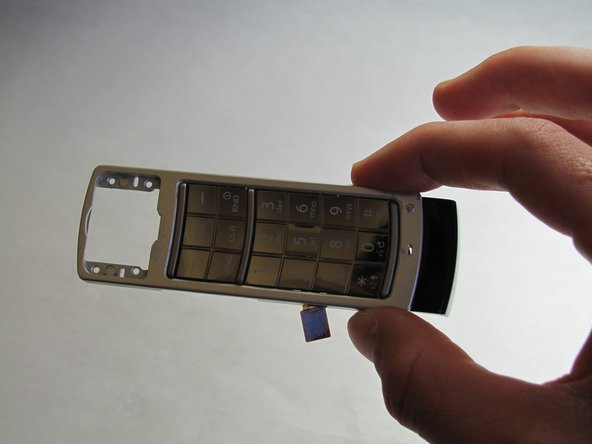
    • Use the iFixit opening tool to pry the keypad from the hinge on the back of the device.

    • A moderate amount of force may need to be applied.

Conclusión

To reassemble your device, follow these instructions in reverse order.

Una persona más ha completado esta guía.

Renee Kuzniar

Miembro Desde 04/13/10

82 Reputación

4 Guías creadas

Equipo

Cal Poly, Team 6-18, Maness Spring 2010 Miembro de Cal Poly, Team 6-18, Maness Spring 2010

CPSU-MANESS-S10S6G18

3 Miembros

12 Guías creadas

0 comentarios

Agregar Comentario

Ver Estadísticas:

Ultimas 24 horas: 0

Ultimos 7 días: 2

Ultimos 30 días: 3

Todo El Tiempo: 1,902