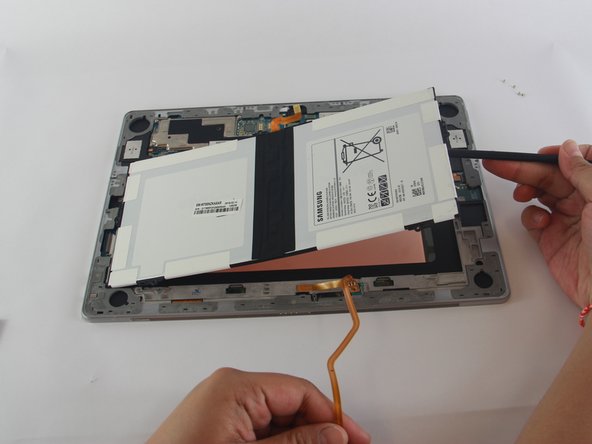
Saltar al contenido principal

Samsung Galaxy TabPro S Battery Replacement

Qué necesitas

  1. Samsung Galaxy TabPro S Battery Replacement, Battery: paso 1, imagen 1 de 1
    • Place the device face down on a flat work surface.

  2. Samsung Galaxy TabPro S Battery Replacement: paso 2, imagen 1 de 2 Samsung Galaxy TabPro S Battery Replacement: paso 2, imagen 2 de 2
    • Heat the iOpener in the microwave for 30 seconds. Then place it on each side for 20 seconds in order to loosen the adhesive sealing on the device.

  3. Samsung Galaxy TabPro S Battery Replacement: paso 3, imagen 1 de 3 Samsung Galaxy TabPro S Battery Replacement: paso 3, imagen 2 de 3 Samsung Galaxy TabPro S Battery Replacement: paso 3, imagen 3 de 3
    • Using the plastic opening tool, open up the back of the device.

  4. Samsung Galaxy TabPro S Battery Replacement: paso 4, imagen 1 de 1
    • Once opened you will notice three locations (boxed in red) that will need to be disconnected in order to proceed.

  5. Samsung Galaxy TabPro S Battery Replacement: paso 5, imagen 1 de 3 Samsung Galaxy TabPro S Battery Replacement: paso 5, imagen 2 de 3 Samsung Galaxy TabPro S Battery Replacement: paso 5, imagen 3 de 3
    • Using the black nylon spudger, for the black ribbon cable you must gently apply pressure up from underneath until you hear a popping sound.

  6. Samsung Galaxy TabPro S Battery Replacement: paso 6, imagen 1 de 2 Samsung Galaxy TabPro S Battery Replacement: paso 6, imagen 2 de 2
    • Use the black nylon spudger tool to gently remove the small orange ribbon cable from the motherboard.

  7. Samsung Galaxy TabPro S Battery Replacement: paso 7, imagen 1 de 2 Samsung Galaxy TabPro S Battery Replacement: paso 7, imagen 2 de 2
    • Use the black nylon spudger tool to gently remove the long orange ribbon cable from the motherboard.

  8. Samsung Galaxy TabPro S Battery Replacement: paso 8, imagen 1 de 2 Samsung Galaxy TabPro S Battery Replacement: paso 8, imagen 2 de 2
    • Using a J000 screwdriver, unscrew the five 3.4 mm Philips screws.

  9. Samsung Galaxy TabPro S Battery Replacement: paso 9, imagen 1 de 3 Samsung Galaxy TabPro S Battery Replacement: paso 9, imagen 2 de 3 Samsung Galaxy TabPro S Battery Replacement: paso 9, imagen 3 de 3
    • After removing the leftmost ribbon cable and all five screws, we can then use a black nylon spudger to lift the battery out of the device.

Conclusión

To reassemble your device, follow these instructions in reverse order.

9 personas más completaron esta guía.

Jyotsna Gone

Miembro Desde 02/20/17

515 Reputación

2 Guías creadas

Equipo

USF Tampa, Team 1-2, Sullivan Spring 2017 Miembro de USF Tampa, Team 1-2, Sullivan Spring 2017

USFT-SULLIVAN-S17S1G2

4 Miembros

2 Guías creadas

20 comentarios

Can you provide the part number for the battery itself?

Parker University - Contestar

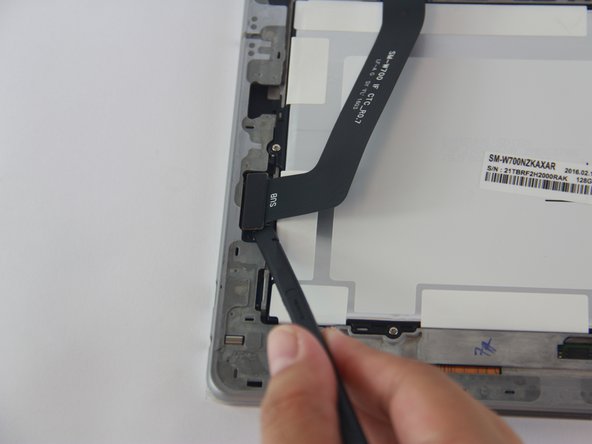
You fail to draw attention to the very real risk of breaking three small cables (one near the keyboard connector at the bottom, one on the right hand side and on at the right hand top - looking at the back panel with the SAMSUNG label right way up) - if great care is not used when removing the back panel. They are fragile cable, not mush spare length and no easy way to disconnect

Not sure if these cables and what they are attached to, are available as spares but require a more extensive disassembly to replace if they are!

Steve Williams

Steve Williams - Contestar

do you know if i can get replacement for those cables?

Jin Choi -

You are so right I severed the connection to my keyboard only to find out that my tablet and battery are fine but the screen is black because of an upgrade and now I cant use my keyboard to connect the tablet to an external monitor to fix the download. Is there any way to repair that cable? Any Help would be greatly appreciated.

mrv_18 -

pretty sure the correct way to take apart this device is to heat off the screen first, then after removing a few screws the metal chassis comes avay from the back avoiding you having to remove the back cover that has small flexed attached. therefore avoiding any chance of damaging the device by incorrect procedure. you should definitely update this guide

BenWilden - Contestar

Agregar Comentario

Ver Estadísticas:

Ultimas 24 horas: 3

Ultimos 7 días: 15

Ultimos 30 días: 112

Todo El Tiempo: 17,570