Saltar al contenido principal

Samsung Galaxy Tab S2 9.7 SM-T813 Motherboard Replacement

Qué necesitas

  1. Samsung Galaxy Tab S2 9.7 SM-T813 Motherboard Replacement, Screen: paso 1, imagen 1 de 1
    • Heat the iOpeners in a microwave for 1-2 minutes.

    • The iOpeners will be hot. Use caution and hold the tabs on the ends.

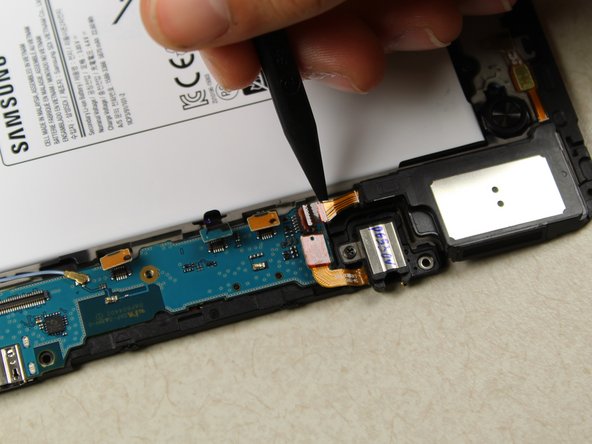
    • Place heated iOpeners on screen edges to heat the adhesive.

    • For more detailed instructions on how to use the iOpeners, please refer to the iOpener Instructions.

  2. Samsung Galaxy Tab S2 9.7 SM-T813 Motherboard Replacement: paso 2, imagen 1 de 1
    • Separate the screen assembly from the back by wedging the picks between the two components.

    • Slide the picks along the edge and leave them holding the device open all around the edges.

  3. Samsung Galaxy Tab S2 9.7 SM-T813 Motherboard Replacement: paso 3, imagen 1 de 1
    • Place suctioning device near the corner of the screen and gently lift up to create a gap between the front panel assembly and the back.

    • Insert the picks to hold the two components apart once a gap is created.

  4. Samsung Galaxy Tab S2 9.7 SM-T813 Motherboard Replacement: paso 4, imagen 1 de 1
    • Once all edges have been disconnected, carefully lift the screen off by pulling one side up.

    • Be careful not to cut yourself. Any broken glass from the screen will be sharp.

  5. Samsung Galaxy Tab S2 9.7 SM-T813 Motherboard Replacement: paso 5, imagen 1 de 1
    • Using the tweezers, gently peel up on the silver tape covering the connector.

  6. Samsung Galaxy Tab S2 9.7 SM-T813 Motherboard Replacement: paso 6, imagen 1 de 1
    • Use the plastic opening tool to get under the connector piece. This will allow you to remove the front panel assembly from the rest of the device.

  7. Samsung Galaxy Tab S2 9.7 SM-T813 Motherboard Replacement: paso 7, imagen 1 de 1
    • Detach the connecter from the inside of the device.

    • Lift the screen to separate the front panel assembly from the rest of the device.

  8. Samsung Galaxy Tab S2 9.7 SM-T813 Motherboard Replacement, Central Panel: paso 8, imagen 1 de 2 Samsung Galaxy Tab S2 9.7 SM-T813 Motherboard Replacement, Central Panel: paso 8, imagen 2 de 2
    • Remove the 17 silver 3.0 mm Phillips head screws located around the edge of the device using the screwdriver.

    • For additional information on how to remove screws, please refer to Screwdriver Best Practices.

  9. Samsung Galaxy Tab S2 9.7 SM-T813 Motherboard Replacement: paso 9, imagen 1 de 2 Samsung Galaxy Tab S2 9.7 SM-T813 Motherboard Replacement: paso 9, imagen 2 de 2
    • Remove the 2 centrally-located black 3.0 mm Phillips head screws using the screwdriver.

  10. Samsung Galaxy Tab S2 9.7 SM-T813 Motherboard Replacement: paso 10, imagen 1 de 2 Samsung Galaxy Tab S2 9.7 SM-T813 Motherboard Replacement: paso 10, imagen 2 de 2
    • Use the plastic opening tools to gently separate the middle panel from the rest of the device.

    • Move the tool around under the edges until you can remove the panel by hand.

    • Popping/cracking noises are completely normal. These are the sounds of the panel separating from the rest of the device.

  11. Samsung Galaxy Tab S2 9.7 SM-T813 Motherboard Replacement: paso 11, imagen 1 de 3 Samsung Galaxy Tab S2 9.7 SM-T813 Motherboard Replacement: paso 11, imagen 2 de 3 Samsung Galaxy Tab S2 9.7 SM-T813 Motherboard Replacement: paso 11, imagen 3 de 3
    • Lift up the central panel starting from one corner to separate it from the rest of the device.

    • Pull towards the top of the device as you lift out to ensure that the charging port connection is not damaged.

  12. Samsung Galaxy Tab S2 9.7 SM-T813 Motherboard Replacement, Motherboard: paso 12, imagen 1 de 3 Samsung Galaxy Tab S2 9.7 SM-T813 Motherboard Replacement, Motherboard: paso 12, imagen 2 de 3 Samsung Galaxy Tab S2 9.7 SM-T813 Motherboard Replacement, Motherboard: paso 12, imagen 3 de 3
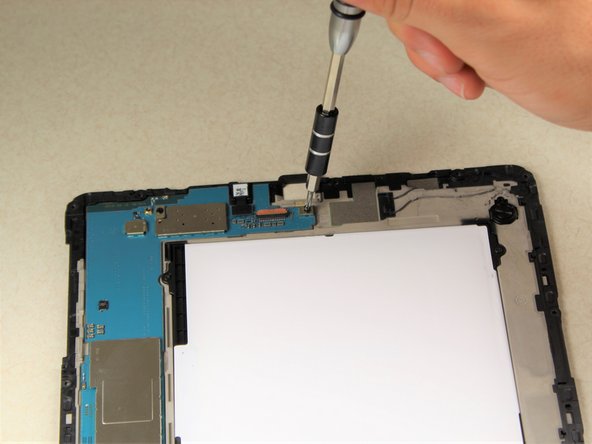
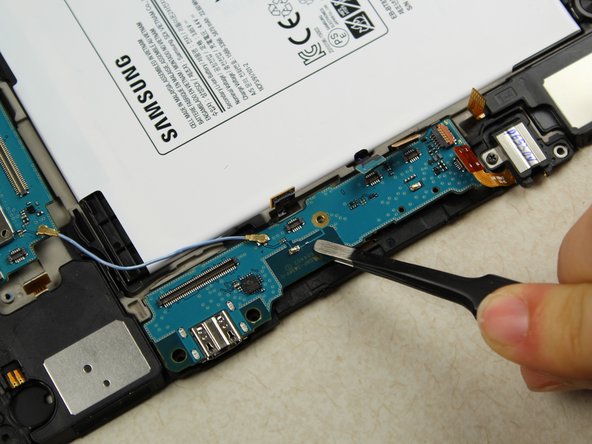
    • Using the screwdriver, remove the 4 black 3.0 mm Phillips head screws located on the upper and lower motherboard.

  13. Samsung Galaxy Tab S2 9.7 SM-T813 Motherboard Replacement: paso 13, imagen 1 de 1
    • Using the plastic opening tools unlock the 11 connectors that must be undone before the motherboard can be removed.

  14. Samsung Galaxy Tab S2 9.7 SM-T813 Motherboard Replacement: paso 14, imagen 1 de 3 Samsung Galaxy Tab S2 9.7 SM-T813 Motherboard Replacement: paso 14, imagen 2 de 3 Samsung Galaxy Tab S2 9.7 SM-T813 Motherboard Replacement: paso 14, imagen 3 de 3
    • Using the plastic opening tool, continue disconnecting cables on upper motherboard.

  15. Samsung Galaxy Tab S2 9.7 SM-T813 Motherboard Replacement: paso 15, imagen 1 de 3 Samsung Galaxy Tab S2 9.7 SM-T813 Motherboard Replacement: paso 15, imagen 2 de 3 Samsung Galaxy Tab S2 9.7 SM-T813 Motherboard Replacement: paso 15, imagen 3 de 3
    • Continue disconnecting along the left side of the device.

  16. Samsung Galaxy Tab S2 9.7 SM-T813 Motherboard Replacement: paso 16, imagen 1 de 3 Samsung Galaxy Tab S2 9.7 SM-T813 Motherboard Replacement: paso 16, imagen 2 de 3 Samsung Galaxy Tab S2 9.7 SM-T813 Motherboard Replacement: paso 16, imagen 3 de 3
    • Continue removing cables on the lower motherboard.

  17. Samsung Galaxy Tab S2 9.7 SM-T813 Motherboard Replacement: paso 17, imagen 1 de 1
    • Using tweezers, remove the green plastic film to reach the last cable.

  18. Samsung Galaxy Tab S2 9.7 SM-T813 Motherboard Replacement: paso 18, imagen 1 de 3 Samsung Galaxy Tab S2 9.7 SM-T813 Motherboard Replacement: paso 18, imagen 2 de 3 Samsung Galaxy Tab S2 9.7 SM-T813 Motherboard Replacement: paso 18, imagen 3 de 3
    • Carefully lift the orange flap using the black spudger. Then disconnect the cable from the motherboard.

  19. Samsung Galaxy Tab S2 9.7 SM-T813 Motherboard Replacement: paso 19, imagen 1 de 3 Samsung Galaxy Tab S2 9.7 SM-T813 Motherboard Replacement: paso 19, imagen 2 de 3 Samsung Galaxy Tab S2 9.7 SM-T813 Motherboard Replacement: paso 19, imagen 3 de 3
    • Using the tweezers, gently pull the cable off of the motherboard.

  20. Samsung Galaxy Tab S2 9.7 SM-T813 Motherboard Replacement: paso 20, imagen 1 de 2 Samsung Galaxy Tab S2 9.7 SM-T813 Motherboard Replacement: paso 20, imagen 2 de 2
    • Carefully lift the top portion of the motherboard off of the back panel with your hands.

  21. Samsung Galaxy Tab S2 9.7 SM-T813 Motherboard Replacement: paso 21, imagen 1 de 3 Samsung Galaxy Tab S2 9.7 SM-T813 Motherboard Replacement: paso 21, imagen 2 de 3 Samsung Galaxy Tab S2 9.7 SM-T813 Motherboard Replacement: paso 21, imagen 3 de 3
    • Using the tweezers, wiggle under the lower motherboard to remove adhesive.

    • Carefully grab the adhesives with the tweezers and lift up.

  22. Samsung Galaxy Tab S2 9.7 SM-T813 Motherboard Replacement: paso 22, imagen 1 de 2 Samsung Galaxy Tab S2 9.7 SM-T813 Motherboard Replacement: paso 22, imagen 2 de 2
    • Gently lift up the lower motherboard.

    • Keep the two portions of the motherboard together. If the connecting cable is damaged, it could further ruin the condition of the board.

  23. Samsung Galaxy Tab S2 9.7 SM-T813 Motherboard Replacement: paso 23, imagen 1 de 1
    • Remove both pieces of the motherboard carefully from the back panel.

Conclusión

To reassemble your device, follow these instructions in reverse order.

9 personas más completaron esta guía.

Nash Elder

Miembro Desde 04/18/18

740 Reputación

4 Guías creadas

Equipo

Cal Poly, Team S16-G5, Livingston Spring 2018 Miembro de Cal Poly, Team S16-G5, Livingston Spring 2018

CPSU-LIVINGSTON-S18S16G5

5 Miembros

12 Guías creadas

2 comentarios

cool like it thanks for the help.

Hina - Contestar

Very understandable, thank you very much! From the Philippines!

Sthanlie Rayos - Contestar

Agregar Comentario

Ver Estadísticas:

Ultimas 24 horas: 4

Ultimos 7 días: 11

Ultimos 30 días: 50

Todo El Tiempo: 9,116