Saltar al contenido principal

Samsung Galaxy Tab E 8.0 Screen Replacement

Qué necesitas

  1. Samsung Galaxy Tab E 8.0 Screen Replacement, Back Panel: paso 1, imagen 1 de 2 Samsung Galaxy Tab E 8.0 Screen Replacement, Back Panel: paso 1, imagen 2 de 2
    • Use the iFixit Opening Tool to pry off the back case, moving the tool around the screen.

    • Make sure the device is off and the SD card is removed before taking off the back casing.

  2. Samsung Galaxy Tab E 8.0 Screen Replacement, Back Camera: paso 2, imagen 1 de 2 Samsung Galaxy Tab E 8.0 Screen Replacement, Back Camera: paso 2, imagen 2 de 2
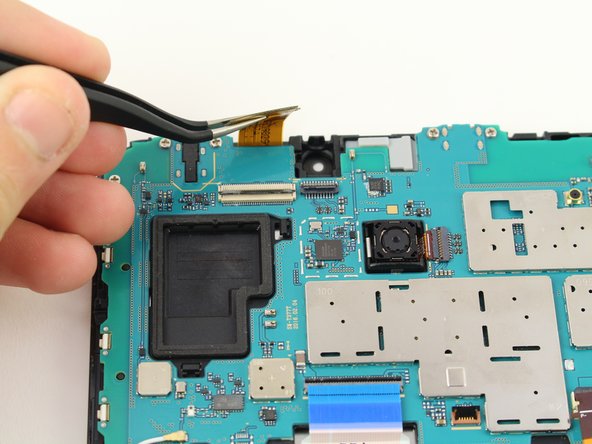
    • Use the tweezers to lift the switch connecting the back camera to the motherboard.

    • Use your hand to remove the back camera from the motherboard.

  3. Samsung Galaxy Tab E 8.0 Screen Replacement, Front Camera: paso 3, imagen 1 de 3 Samsung Galaxy Tab E 8.0 Screen Replacement, Front Camera: paso 3, imagen 2 de 3 Samsung Galaxy Tab E 8.0 Screen Replacement, Front Camera: paso 3, imagen 3 de 3
    • Use the tweezers to lift the switch connecting the front camera to the motherboard.

    • Remove the front camera from the motherboard by lifting with the tweezers.

  4. Samsung Galaxy Tab E 8.0 Screen Replacement, Motherboard: paso 4, imagen 1 de 2 Samsung Galaxy Tab E 8.0 Screen Replacement, Motherboard: paso 4, imagen 2 de 2
    • Use the tweezers to flip the switch on the bottom of the strap that goes over the battery.

    • Release the strap from the switch by lifting the strap with your hand.

  5. Samsung Galaxy Tab E 8.0 Screen Replacement: paso 5, imagen 1 de 2 Samsung Galaxy Tab E 8.0 Screen Replacement: paso 5, imagen 2 de 2
    • Use the tweezers to flip the switch that connects the top of the strap to the motherboard.

    • Lift the top end of the strap with your hand and remove the strap completely from the device.

  6. Samsung Galaxy Tab E 8.0 Screen Replacement: paso 6, imagen 1 de 2 Samsung Galaxy Tab E 8.0 Screen Replacement: paso 6, imagen 2 de 2
    • Use the tweezers to flip the switch of the connector.

    • Lift the connector from the motherboard.

    • This connector does not come completely off, but disconnects from the motherboard.

  7. Samsung Galaxy Tab E 8.0 Screen Replacement: paso 7, imagen 1 de 2 Samsung Galaxy Tab E 8.0 Screen Replacement: paso 7, imagen 2 de 2
    • Use the tweezers to flip the switch of the blue connector on the motherboard.

    • Lift the connector from the motherboard.

    • This switch can detach from the device, but just needs to disconnect from the motherboard.

    • Ensure the blue ribbon cable is not under the motherboard upon reassembly.

  8. Samsung Galaxy Tab E 8.0 Screen Replacement: paso 8, imagen 1 de 2 Samsung Galaxy Tab E 8.0 Screen Replacement: paso 8, imagen 2 de 2
    • Use the tweezers to flip the switch of the connector that runs from the battery to the motherboard.

    • Lift the connector from the motherboard.

    • This switch can detach from the device, but just needs to disconnect from the motherboard.

  9. Samsung Galaxy Tab E 8.0 Screen Replacement: paso 9, imagen 1 de 2 Samsung Galaxy Tab E 8.0 Screen Replacement: paso 9, imagen 2 de 2
    • Use a JIS #00 screwdriver to remove the six 4.5mm screws at the top of the motherboard.

    • Lift the motherboard with your hand to detach the motherboard from the device.

  10. Samsung Galaxy Tab E 8.0 Screen Replacement, Battery: paso 10, imagen 1 de 3 Samsung Galaxy Tab E 8.0 Screen Replacement, Battery: paso 10, imagen 2 de 3 Samsung Galaxy Tab E 8.0 Screen Replacement, Battery: paso 10, imagen 3 de 3
    • Use the tweezers to lift the flap on the left end of the battery and pull up with your hand to remove the battery.

    • The battery is held by an adhesive on the back, so it will take some force to remove.

  11. Samsung Galaxy Tab E 8.0 Screen Replacement, Screen: paso 11, imagen 1 de 2 Samsung Galaxy Tab E 8.0 Screen Replacement, Screen: paso 11, imagen 2 de 2
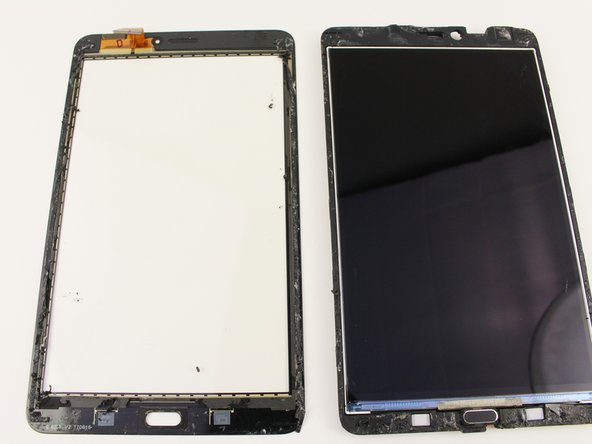
    • Use an iOpener or a heat gun/hair dryer to warm the outer 1/2 inch of the screen. It should be very warm but not too hot to touch or you may cause heat damage to components inside the device.

    • Use the iFixit Opening Tool to get between the plastic screen and the device to pry off the screen.

    • The metal spudger may be needed to get between the screen.

    • The metal spudger may cause more damage to the screen if used with force.

  12. Samsung Galaxy Tab E 8.0 Screen Replacement: paso 12, imagen 1 de 2 Samsung Galaxy Tab E 8.0 Screen Replacement: paso 12, imagen 2 de 2
    • Use the metal spudger to get between the device and the internal screen.

    • Pry out the screen from the device.

Conclusión

To reassemble your device, follow these instructions in reverse order.

6 personas más completaron esta guía.

Equipo

Cal Poly, Team S13-G4, White Fall 2018 Miembro de Cal Poly, Team S13-G4, White Fall 2018

CPSU-WHITE-F18S13G4

4 Miembros

8 Guías creadas

Un comentario

I am working on a 7” lite E. Is the procedure about the same?

George Tedrick - Contestar

Agregar Comentario

Ver Estadísticas:

Ultimas 24 horas: 1

Ultimos 7 días: 19

Ultimos 30 días: 60

Todo El Tiempo: 8,971