Saltar al contenido principal

Samsung Galaxy Tab 4 7.0 Screen Replacement

Qué necesitas

  1. Samsung Galaxy Tab 4 7.0 Screen Replacement, Back Panel: paso 1, imagen 1 de 2 Samsung Galaxy Tab 4 7.0 Screen Replacement, Back Panel: paso 1, imagen 2 de 2
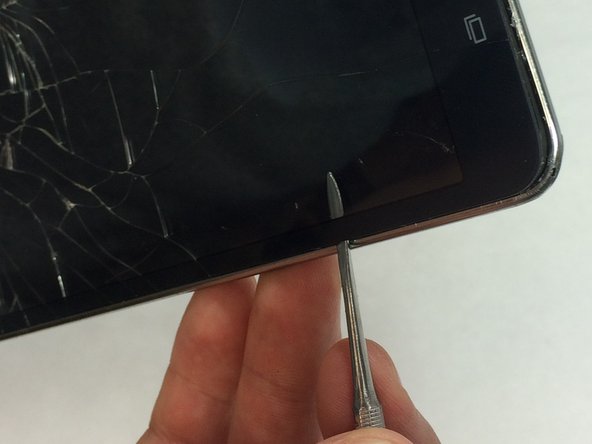
    • Starting at any corner, insert the pry tool between the chrome screen frame and black phone housing.

    • Slide the pry tool around the tablet while applying force to pry the screen away from the phone housing.

  2. Samsung Galaxy Tab 4 7.0 Screen Replacement: paso 2, imagen 1 de 1
    • Carefully separate the rear housing from the front panel assembly.

  3. Samsung Galaxy Tab 4 7.0 Screen Replacement, Motherboard: paso 3, imagen 1 de 3 Samsung Galaxy Tab 4 7.0 Screen Replacement, Motherboard: paso 3, imagen 2 de 3 Samsung Galaxy Tab 4 7.0 Screen Replacement, Motherboard: paso 3, imagen 3 de 3
    • Using the bent tweezers, carefully pull the flat cables away from the connectors.

    • Do not bend the flat cables at the tips as they may become permanently deformed.

  4. Samsung Galaxy Tab 4 7.0 Screen Replacement: paso 4, imagen 1 de 3 Samsung Galaxy Tab 4 7.0 Screen Replacement: paso 4, imagen 2 de 3 Samsung Galaxy Tab 4 7.0 Screen Replacement: paso 4, imagen 3 de 3
    • Using the plastic opening tool, gently pry the chip connections away from the motherboard.

  5. Samsung Galaxy Tab 4 7.0 Screen Replacement: paso 5, imagen 1 de 2 Samsung Galaxy Tab 4 7.0 Screen Replacement: paso 5, imagen 2 de 2
    • Use the Phillips 000 screwdriver to remove the remaining five 1.2 mm screws.

  6. Samsung Galaxy Tab 4 7.0 Screen Replacement: paso 6, imagen 1 de 2 Samsung Galaxy Tab 4 7.0 Screen Replacement: paso 6, imagen 2 de 2
    • Use extreme care while removing the motherboard to avoid damaging the component.

    • Remove the motherboard by rotating it away from the rest of the phone as shown in the first photo.

  7. Samsung Galaxy Tab 4 7.0 Screen Replacement, Battery: paso 7, imagen 1 de 3 Samsung Galaxy Tab 4 7.0 Screen Replacement, Battery: paso 7, imagen 2 de 3 Samsung Galaxy Tab 4 7.0 Screen Replacement, Battery: paso 7, imagen 3 de 3
    • You do not need to remove the motherboard in order to remove the battery as the photos may indicate.

    • Work the spudger underneath the battery as shown and pry the battery away from the phone case.

    • The battery is attached to the case with adhesive, so a bit of force is required during removal.

  8. Samsung Galaxy Tab 4 7.0 Screen Replacement, Screen: paso 8, imagen 1 de 2 Samsung Galaxy Tab 4 7.0 Screen Replacement, Screen: paso 8, imagen 2 de 2
    • Evenly heat the surface of the screen using your heating tool to loosen the adhesive that is holding the screen to the phone case.

    • If using the heating pad, you may have to reheat it once or twice during this process.

    • If you're using a heat gun, avoid heating one spot for more than a few seconds.

  9. Samsung Galaxy Tab 4 7.0 Screen Replacement: paso 9, imagen 1 de 3 Samsung Galaxy Tab 4 7.0 Screen Replacement: paso 9, imagen 2 de 3 Samsung Galaxy Tab 4 7.0 Screen Replacement: paso 9, imagen 3 de 3
    • Carefully insert the spudger between the glass and the chrome outer frame of the tablet.

    • Now, slowly pry your way around the screen to loosen the glass from the frame.

  10. Samsung Galaxy Tab 4 7.0 Screen Replacement: paso 10, imagen 1 de 3 Samsung Galaxy Tab 4 7.0 Screen Replacement: paso 10, imagen 2 de 3 Samsung Galaxy Tab 4 7.0 Screen Replacement: paso 10, imagen 3 de 3
    • After you’ve removed the glass from the screen, feed the chip connection through the phone casing.

    • The screen may need a little more force to separate from the upper edge of the tablet.

Conclusión

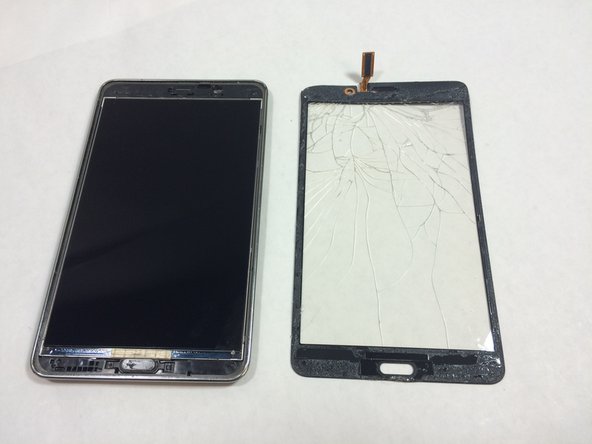
To reassemble your device, follow these instructions in reverse order.

36 personas más completaron esta guía.

Aubrey Goodwin

Miembro Desde 08/31/15

2,700 Reputación

3 Guías creadas

Equipo

USF Tampa, Team 1-3, Remmell Fall 2015 Miembro de USF Tampa, Team 1-3, Remmell Fall 2015

USFT-REMMELL-F15S1G3

4 Miembros

12 Guías creadas

11 comentarios

Where is the microfuse located?

bbruns - Contestar

Do you have to remove the battery to replace the screen?

Vic Rector - Contestar

This is digitizer replacement guide - not screen replacement !!

K P - Contestar

This worked perfectly for me. Thank you!

gjarmour - Contestar

This worked perfectly for me. I just bought the assembly instead of going through the full deal (which if I had it would have saved me about 30 bucks overall). But was easy enough to do anyway. I still intend to get the digitizer/glass and finish so I have a spare for future breaks. (I have kids and they are hard on these tablets)

gjarmour - Contestar

Agregar Comentario

Ver Estadísticas:

Ultimas 24 horas: 1

Ultimos 7 días: 8

Ultimos 30 días: 38

Todo El Tiempo: 46,165