Saltar al contenido principal

Samsung Galaxy Tab 3 8.0 Rear Camera Replacement

Qué necesitas

  1. Samsung Galaxy Tab 3 8.0 Rear Camera Replacement, Battery - Open up the tablet: paso 1, imagen 1 de 2 Samsung Galaxy Tab 3 8.0 Rear Camera Replacement, Battery - Open up the tablet: paso 1, imagen 2 de 2
    • Start out by separating the screen from the back cover using the larger plastic opening tool to pry them apart.

    • Be careful when removing the screen as negligence can cause damage.

  2. Samsung Galaxy Tab 3 8.0 Rear Camera Replacement, Remove Back Cover: paso 2, imagen 1 de 2 Samsung Galaxy Tab 3 8.0 Rear Camera Replacement, Remove Back Cover: paso 2, imagen 2 de 2
    • Once every part of the screen is separated from the back cover, you should be able to fully remove it with your hands.

  3. Samsung Galaxy Tab 3 8.0 Rear Camera Replacement, Disconnect Battery: paso 3, imagen 1 de 2 Samsung Galaxy Tab 3 8.0 Rear Camera Replacement, Disconnect Battery: paso 3, imagen 2 de 2
    • To remove the battery you must use something small, such as tweezers, to disconnect the battery from its port.

    • Note: the connection lifts up to remove.

  4. Samsung Galaxy Tab 3 8.0 Rear Camera Replacement, Remove Battery: paso 4, imagen 1 de 1
    • After the battery is disconnected, use the pulling tab to safely remove the battery.

  5. Samsung Galaxy Tab 3 8.0 Rear Camera Replacement, Disconnect Speakers: paso 5, imagen 1 de 2 Samsung Galaxy Tab 3 8.0 Rear Camera Replacement, Disconnect Speakers: paso 5, imagen 2 de 2
    • Disconnect the relays attached to the motherboard.

  6. Samsung Galaxy Tab 3 8.0 Rear Camera Replacement, Unscrew Speakers: paso 6, imagen 1 de 3 Samsung Galaxy Tab 3 8.0 Rear Camera Replacement, Unscrew Speakers: paso 6, imagen 2 de 3 Samsung Galaxy Tab 3 8.0 Rear Camera Replacement, Unscrew Speakers: paso 6, imagen 3 de 3
    • Unscrew the 2.9mm screws from the speakers using a Phillips head #000 screwdriver, then lift the speakers from the device.

  7. Samsung Galaxy Tab 3 8.0 Rear Camera Replacement, Disconnect All Relays: paso 7, imagen 1 de 2 Samsung Galaxy Tab 3 8.0 Rear Camera Replacement, Disconnect All Relays: paso 7, imagen 2 de 2
    • Using the plastic remover tool carefully unseat the four rectangular electric leads from the board. Each rectangle is a different size, the first one is large, the second one is medium, and the last two are small.

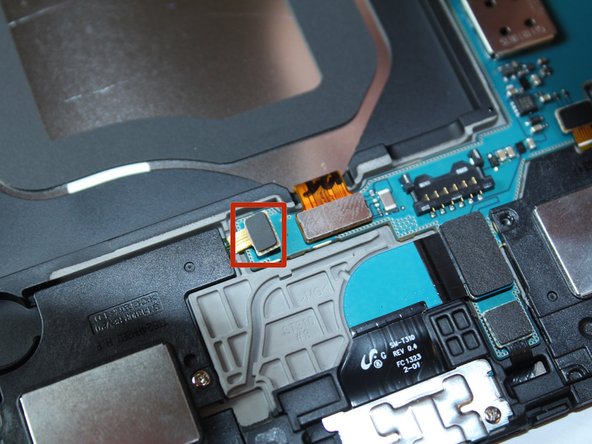
    • Using the plastic remover tool carefully unseat the square electric lead (marked in orange) from the board.

    • Using the plastic remover tool carefully unseat the small square and the two rectangular electric leads (marked in yellow) from the board.

  8. Samsung Galaxy Tab 3 8.0 Rear Camera Replacement, Unscrew Motherboard: paso 8, imagen 1 de 3 Samsung Galaxy Tab 3 8.0 Rear Camera Replacement, Unscrew Motherboard: paso 8, imagen 2 de 3 Samsung Galaxy Tab 3 8.0 Rear Camera Replacement, Unscrew Motherboard: paso 8, imagen 3 de 3
    • Unscrew the one 2.9mm Phillips #000 screw above the battery, and the three 2.9mm Phillips #000 screws to the right of the battery.

  9. Samsung Galaxy Tab 3 8.0 Rear Camera Replacement, Remove the Motherboard: paso 9, imagen 1 de 2 Samsung Galaxy Tab 3 8.0 Rear Camera Replacement, Remove the Motherboard: paso 9, imagen 2 de 2
    • Carefully lift the board from the device.

  10. Samsung Galaxy Tab 3 8.0 Rear Camera Replacement, Disconnect the Rear Camera: paso 10, imagen 1 de 3 Samsung Galaxy Tab 3 8.0 Rear Camera Replacement, Disconnect the Rear Camera: paso 10, imagen 2 de 3 Samsung Galaxy Tab 3 8.0 Rear Camera Replacement, Disconnect the Rear Camera: paso 10, imagen 3 de 3
    • Flip the motherboard to reveal the rear camera connection and with tweezers gently lift the connector pins and remove the camera.

Conclusión

To reassemble your device, follow these instructions in reverse order.

4 personas más completaron esta guía.

Equipo

USF Tampa, Team 4-2, Brown Fall 2014 Miembro de USF Tampa, Team 4-2, Brown Fall 2014

USFT-BROWN-F14S4G2

3 Miembros

26 Guías creadas

Un comentario

That worked a treat, thanks a lot Anthony, I don’t quite know when I broke my rear camera but I suspect it’s after being dropped, unfortunatly more than once, a replacement camera was sourced from ebay and only cost £3.29 that included the postage! So all is well again now.

Here’s a link to where I bought mine, I can recommend them 100%

https://www.ebay.co.uk/itm/Genuine-Rear-...

Once again, Cheers!

mooog1 - Contestar

Agregar Comentario

Ver Estadísticas:

Ultimas 24 horas: 0

Ultimos 7 días: 0

Ultimos 30 días: 2

Todo El Tiempo: 1,313