Saltar al contenido principal

Samsung Galaxy S4 Mini Home Button Flex Cable Assembly Replacement

Qué necesitas

  1. Samsung Galaxy S4 Mini Home Button Flex Cable Assembly Replacement, Home Button Flex Cable Assembly: paso 1, imagen 1 de 3 Samsung Galaxy S4 Mini Home Button Flex Cable Assembly Replacement, Home Button Flex Cable Assembly: paso 1, imagen 2 de 3 Samsung Galaxy S4 Mini Home Button Flex Cable Assembly Replacement, Home Button Flex Cable Assembly: paso 1, imagen 3 de 3
    • Start by removing the back case, battery, sim card, and sd card.

    • Now remove the 10 screws using a #00 philips screwdriver.

    • After the ten screws are removed, proceed by separating the middle housing from the back housing using a opening tool such as a guitar pick or another separating tool.

  2. Samsung Galaxy S4 Mini Home Button Flex Cable Assembly Replacement: paso 2, imagen 1 de 3 Samsung Galaxy S4 Mini Home Button Flex Cable Assembly Replacement: paso 2, imagen 2 de 3 Samsung Galaxy S4 Mini Home Button Flex Cable Assembly Replacement: paso 2, imagen 3 de 3
    • Now that the back housing is removed we can locate the flex cable connections on the logic board.

    • There are five flex cable connections on the exposed side of the logic board. These are highlighted in orange. There is also one connection on the usb charge board which is highlighted in red. This flex connection is for the home button, and the two capacitive buttons (back button and menu button).

    • Make sure to remove the small bracket that is in place over the area of the front facing camera.

  3. Samsung Galaxy S4 Mini Home Button Flex Cable Assembly Replacement: paso 3, imagen 1 de 3 Samsung Galaxy S4 Mini Home Button Flex Cable Assembly Replacement: paso 3, imagen 2 de 3 Samsung Galaxy S4 Mini Home Button Flex Cable Assembly Replacement: paso 3, imagen 3 de 3
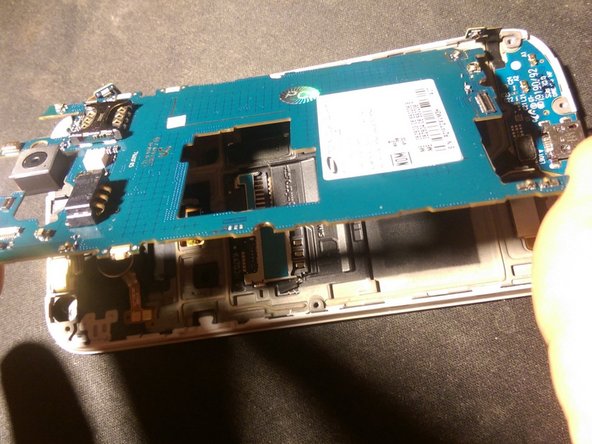
    • Use a plastic pry tool to free the flex cable connections on the logic board.

    • Once all flex connections are freed then proceed to lift from the side that the power button is on. The displays flex cable is located on the other side of the logic board so use caution and don't lift to fast or with to much force.

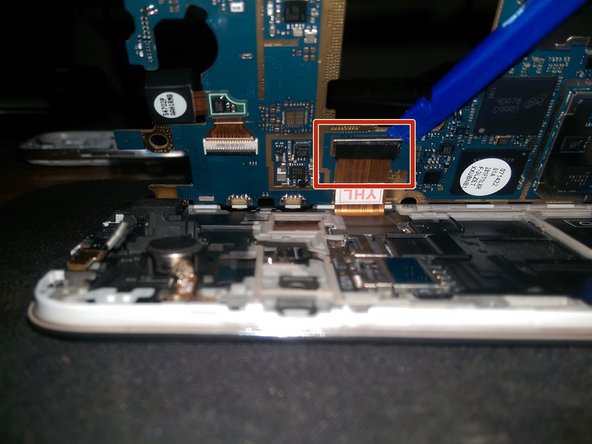
    • With the board tilted at an angle take your plastic pry tool and free up the displays flex cable connection from the logic board.

    • Now all cables are disconnected and you can safely remove the logic board.

  4. Samsung Galaxy S4 Mini Home Button Flex Cable Assembly Replacement: paso 4, imagen 1 de 2 Samsung Galaxy S4 Mini Home Button Flex Cable Assembly Replacement: paso 4, imagen 2 de 2
    • If you have not done so already then go ahead and disconnect the one flex cable connection from the usb board.

    • You may also need to free up the area marked in yellow if it is adhered down.

    • This is the connection for the home button assembly. It also is the cable for your capacitive keys backlight.

  5. Samsung Galaxy S4 Mini Home Button Flex Cable Assembly Replacement: paso 5, imagen 1 de 3 Samsung Galaxy S4 Mini Home Button Flex Cable Assembly Replacement: paso 5, imagen 2 de 3 Samsung Galaxy S4 Mini Home Button Flex Cable Assembly Replacement: paso 5, imagen 3 de 3
    • Next you will need to remove the display to be able to gain access to the home button flex cable assembly.

    • Use a heat gun, hair dryer, or an iOpener to heat the adhesive that is holding the screen in place. Heat around the outer edges of the display in a constant moving fashion.

    • If using a heat gun make sure to not overheat the display. Make sure you keep the heat gun moving and do not heat in one area for to long. Doing so can cause damage to the display.

    • Also try not to stick your separating tools to far in the device especially at the top and bottom of the display. Doing so could cause you to cut through a flex cable for the digitizer/LCD at the top of screen or the home button flex cable on the bottom of the display.

  6. Samsung Galaxy S4 Mini Home Button Flex Cable Assembly Replacement: paso 6, imagen 1 de 3 Samsung Galaxy S4 Mini Home Button Flex Cable Assembly Replacement: paso 6, imagen 2 de 3 Samsung Galaxy S4 Mini Home Button Flex Cable Assembly Replacement: paso 6, imagen 3 de 3
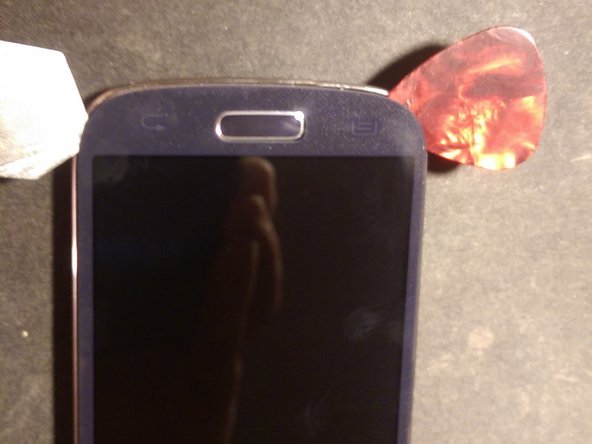
    • Once the adhesive is loosened slowly lift the screen starting torward the top of the display and make sure to slide the displays ribbon cable through the slot in the display housing.

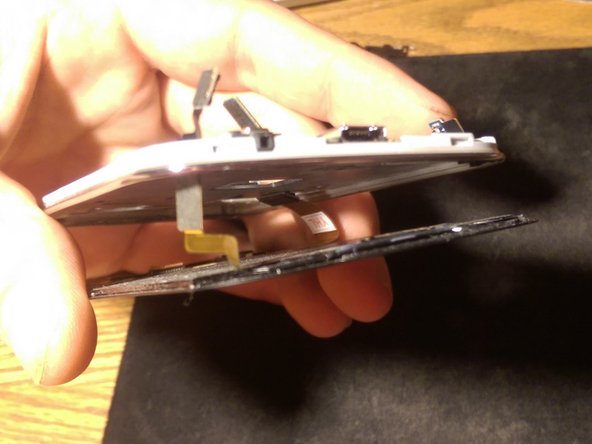
    • Once you get to the bottom of the display you will need to also slide the flex cable through its slot in the displays housing as well.

    • It is a little trickier to get the home button flex cable through its opening so be patient and do not use to much force. You have to kind of zig zag it out so be careful.

  7. Samsung Galaxy S4 Mini Home Button Flex Cable Assembly Replacement: paso 7, imagen 1 de 3 Samsung Galaxy S4 Mini Home Button Flex Cable Assembly Replacement: paso 7, imagen 2 de 3 Samsung Galaxy S4 Mini Home Button Flex Cable Assembly Replacement: paso 7, imagen 3 de 3
    • Now that the display has been removed we can proceed to removing the home button flex cable assembly.

    • Use a plastic pry tool and first pry up the back button section. It is held in place with adhesive so you can use a little heat to loosen the adhesive if need be.

    • The back button is not adhered down and you can simply pop it out.

    • Last you need to pry up the section that the menu button resides in. It is held in place with adhesive as well.

    • Now the home button assembly if removed and you can proceed to install your new home button flex cable assembly. This can be done by using these directions in reverse order.

Conclusión

To reassemble your device, follow these instructions in reverse order.

9 personas más completaron esta guía.

BurnieG

Miembro Desde 02/23/15

10,843 Reputación

5 Guías creadas

0 comentarios

Agregar Comentario

Ver Estadísticas:

Ultimas 24 horas: 0

Ultimos 7 días: 1

Ultimos 30 días: 13

Todo El Tiempo: 13,430