Saltar al contenido principal

Samsung Galaxy S III Motherboard Replacement

Qué necesitas

  1. Samsung Galaxy S III Motherboard Replacement, Rear Case: paso 1, imagen 1 de 2 Samsung Galaxy S III Motherboard Replacement, Rear Case: paso 1, imagen 2 de 2
    • The following four steps can be accomplished without a plastic opening tool. However, it's recommended to use a tool to best avoid breaking any clips along the perimeter of the rear case.

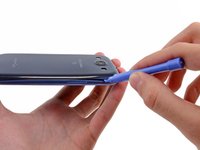
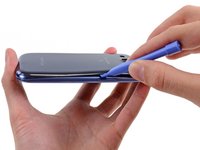
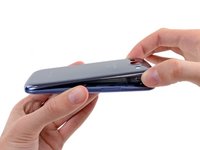
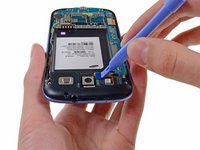
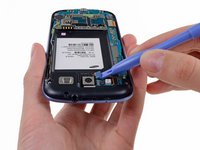
    • Insert a plastic opening tool or fingernail into the notch in the gap between the rear case and the rest of the phone, located at the top of the device.

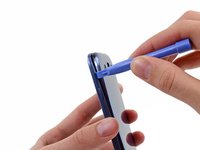
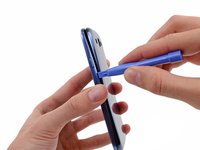
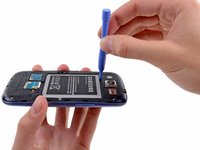
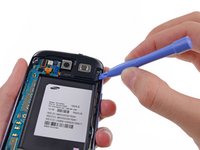
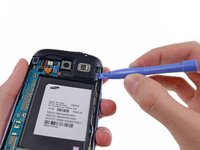
    • Gently twist the opening tool to disconnect the clips securing the top of the rear case.

  2. Samsung Galaxy S III Motherboard Replacement: paso 2, imagen 1 de 2 Samsung Galaxy S III Motherboard Replacement: paso 2, imagen 2 de 2
    • Slide the plastic opening tool left along the top edge and repeat the twisting motion to widen the gap between the rear case and the phone.

  3. Samsung Galaxy S III Motherboard Replacement: paso 3, imagen 1 de 2 Samsung Galaxy S III Motherboard Replacement: paso 3, imagen 2 de 2
    • Continue to move the plastic opening tool around the perimeter of the top left corner, gently prying up along the rear case.

  4. Samsung Galaxy S III Motherboard Replacement: paso 4, imagen 1 de 2 Samsung Galaxy S III Motherboard Replacement: paso 4, imagen 2 de 2
    • Pry along the top right side, and continue prying down the right side of the rear case.

  5. Samsung Galaxy S III Motherboard Replacement: paso 5, imagen 1 de 2 Samsung Galaxy S III Motherboard Replacement: paso 5, imagen 2 de 2
    • Lift up and remove the rear case from the phone.

    • You may need to peel the case up to separate it from any clips still holding it to the bottom of the phone.

  6. Samsung Galaxy S III Motherboard Replacement, Battery: paso 6, imagen 1 de 2 Samsung Galaxy S III Motherboard Replacement, Battery: paso 6, imagen 2 de 2
    • This step can be accomplished without the need of a plastic opening tool. Just use your finger if you want to.

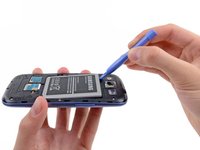
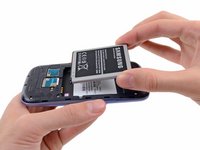
    • Wedge a plastic opening tool into the small notch above the battery.

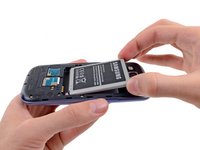
    • Pry the battery up out of its recess.

  7. Samsung Galaxy S III Motherboard Replacement: paso 7, imagen 1 de 2 Samsung Galaxy S III Motherboard Replacement: paso 7, imagen 2 de 2
    • Remove the battery.

  8. Samsung Galaxy S III Motherboard Replacement, SIM Card: paso 8, imagen 1 de 3 Samsung Galaxy S III Motherboard Replacement, SIM Card: paso 8, imagen 2 de 3 Samsung Galaxy S III Motherboard Replacement, SIM Card: paso 8, imagen 3 de 3
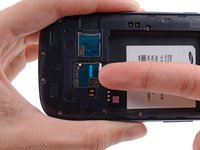
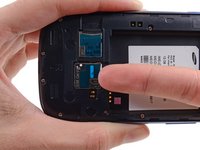
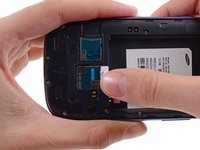
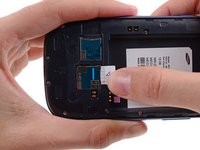
    • Using your fingernail, push the SIM card slightly deeper into its slot, until you hear a click.

    • After the click, release the card and it will pop out of its slot.

    • For reassembly, push the SIM card into the slot until it clicks in place.

  9. Samsung Galaxy S III Motherboard Replacement: paso 9, imagen 1 de 3 Samsung Galaxy S III Motherboard Replacement: paso 9, imagen 2 de 3 Samsung Galaxy S III Motherboard Replacement: paso 9, imagen 3 de 3
    • Use your thumb to slide enough of the SIM card out of its slot to grab ahold of it.

    • Grasp and remove the SIM card away from the phone.

  10. Samsung Galaxy S III Motherboard Replacement, microSD Card: paso 10, imagen 1 de 3 Samsung Galaxy S III Motherboard Replacement, microSD Card: paso 10, imagen 2 de 3 Samsung Galaxy S III Motherboard Replacement, microSD Card: paso 10, imagen 3 de 3
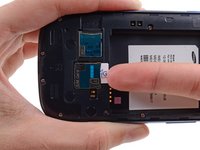
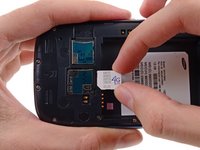
    • Using your fingernail, push the microSD card slightly deeper into its slot, until you hear a click.

    • After the click, release the card and it will pop out of its slot.

    • For reassembly, push the microSD card into the slot until it clicks in place.

  11. Samsung Galaxy S III Motherboard Replacement: paso 11, imagen 1 de 2 Samsung Galaxy S III Motherboard Replacement: paso 11, imagen 2 de 2
    • Use your thumb to slide the microSD card out of the slot.

    • Remove the microSD card from the phone.

  12. Samsung Galaxy S III Motherboard Replacement, Plastic Midframe: paso 12, imagen 1 de 1
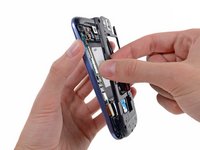
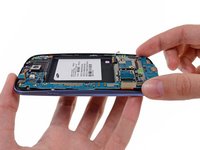
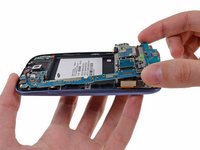
    • Remove the ten 4.0 mm Phillips screws securing the midframe to the front panel assembly.

  13. Samsung Galaxy S III Motherboard Replacement: paso 13, imagen 1 de 2 Samsung Galaxy S III Motherboard Replacement: paso 13, imagen 2 de 2
    • Grasp the left side of the plastic midframe with your thumb and forefinger and lift it away from the phone.

    • The midframe lightly snaps in place, and can be removed with very little force.

  14. Samsung Galaxy S III Motherboard Replacement, Headphone Jack/Speaker Assembly: paso 14, imagen 1 de 2 Samsung Galaxy S III Motherboard Replacement, Headphone Jack/Speaker Assembly: paso 14, imagen 2 de 2
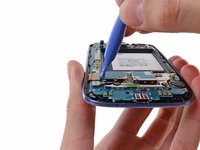
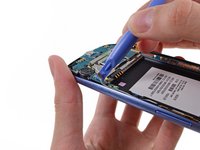
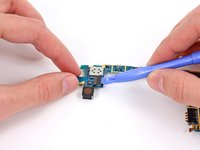
    • Use a plastic opening tool to pry the rear-facing camera connector up from its socket on the motherboard.

    • Make sure you are prying on the connector and not the socket, or you may damage the motherboard.

  15. Samsung Galaxy S III Motherboard Replacement: paso 15, imagen 1 de 2 Samsung Galaxy S III Motherboard Replacement: paso 15, imagen 2 de 2
    • Insert a plastic opening tool outboard of the speaker portion of the headphone jack/speaker assembly.

    • Gently pry the headphone jack/speaker assembly up from the front assembly.

  16. Samsung Galaxy S III Motherboard Replacement: paso 16, imagen 1 de 1
    • Lift the headphone jack/speaker assembly out of the Galaxy S III.

  17. Samsung Galaxy S III Motherboard Replacement, Motherboard Assembly: paso 17, imagen 1 de 1
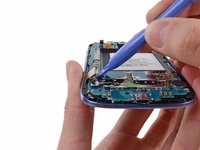
    • Use a plastic opening tool to pry the front-facing camera connector from its socket on the motherboard.

    • Do not try to remove the front-facing camera just yet. Its cable is still routed beneath the motherboard assembly to the ambient light sensor.

  18. Samsung Galaxy S III Motherboard Replacement: paso 18, imagen 1 de 2 Samsung Galaxy S III Motherboard Replacement: paso 18, imagen 2 de 2
    • Disconnect the digitizer cable by gently prying its connector up from its socket on the motherboard.

  19. Samsung Galaxy S III Motherboard Replacement: paso 19, imagen 1 de 2 Samsung Galaxy S III Motherboard Replacement: paso 19, imagen 2 de 2
    • Disconnect the display data cable from the motherboard.

  20. Samsung Galaxy S III Motherboard Replacement: paso 20, imagen 1 de 3 Samsung Galaxy S III Motherboard Replacement: paso 20, imagen 2 de 3 Samsung Galaxy S III Motherboard Replacement: paso 20, imagen 3 de 3
    • Pry the Wi-Fi antenna cable connector up from its socket on the motherboard.

    • Gently move the cable out of the way of the motherboard.

  21. Samsung Galaxy S III Motherboard Replacement: paso 21, imagen 1 de 1
    • Remove the single 3.0 mm Phillips screw securing the motherboard to the front panel assembly.

  22. Samsung Galaxy S III Motherboard Replacement: paso 22, imagen 1 de 2 Samsung Galaxy S III Motherboard Replacement: paso 22, imagen 2 de 2
    • Carefully lift the bottom of the motherboard assembly away from the front panel assembly.

    • Remove the motherboard assembly from the front panel assembly, minding any cables that may snag on it.

  23. Samsung Galaxy S III Motherboard Replacement, Rear-Facing Camera: paso 23, imagen 1 de 2 Samsung Galaxy S III Motherboard Replacement, Rear-Facing Camera: paso 23, imagen 2 de 2
    • Flip the motherboard over. We recommend setting it on a grounded work surface.

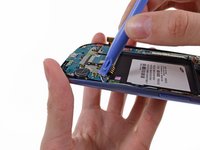
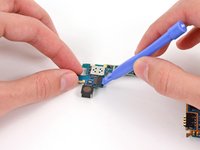
    • Use a plastic opening tool to pry the rear-facing camera connector from its socket.

  24. Samsung Galaxy S III Motherboard Replacement: paso 24, imagen 1 de 1
    • Remove the rear-facing camera off the motherboard.

  25. Samsung Galaxy S III Motherboard Replacement, Motherboard: paso 25, imagen 1 de 1
    • The motherboard remains.

Conclusión

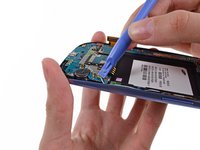
To reassemble your device, follow these instructions in reverse order.

268 personas más completaron esta guía.

40 comentarios

Between step 13 and 14, there should be a step to detach the cable to the camera lens and speaker assembly and the removal of the assembly.

ewu777 - Contestar

Where do i buy the original motherboard and what is the cost

Mustafa Mukhtiar - Contestar

I have a motherboard of samsung galaxy s3 sgh-t999 t mobile pm me here's my email tan.jeffrey84@yahoo.com for more info

Dragneel Natzu -

Cheapest place to buy them is ebay.

Tracy Smith -

Agregar Comentario

Ver Estadísticas:

Ultimas 24 horas: 2

Ultimos 7 días: 14

Ultimos 30 días: 50

Todo El Tiempo: 297,046