Esta versión puede contener ediciones incorrectas. Cambiar a la última instantánea verificada.
Qué necesitas
-
Este paso está sin traducir. Ayuda a traducirlo
-
Remove the Samsung S-Pen stylus.
-
Remove the micro SD storage card.
-
-
Este paso está sin traducir. Ayuda a traducirlo
-
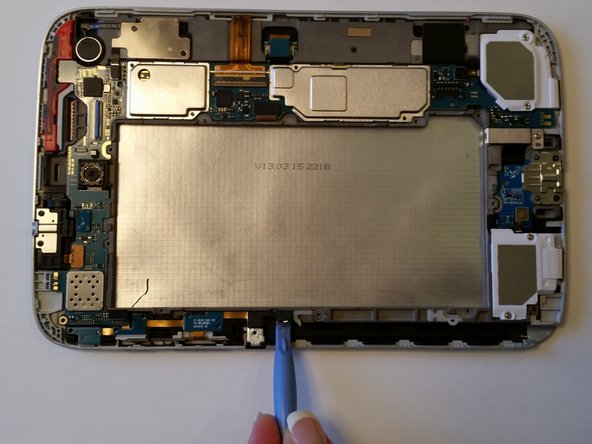
Using the plastic opening tool, start where the S-pen was located and carefully pry up the corner.
-
-
Este paso está sin traducir. Ayuda a traducirlo
-
Work your way around the entire device by carefully prying and sliding the plastic opening tool.
-
-
Este paso está sin traducir. Ayuda a traducirlo
-
Remove the 8 Phillips#00 3-mm screws holding the battery in place.
-
-
Este paso está sin traducir. Ayuda a traducirlo
-
Lift the top left corner of the battery up by the black tab.
-
-
-
Este paso está sin traducir. Ayuda a traducirlo
-
Gently grasp and lift up the white connector located at the bottom right corner of the battery. It is connected to the battery by two blue and two red wires.
-
-
Este paso está sin traducir. Ayuda a traducirlo
-
The volume and power buttons are joined together on a common strip, so you are replacing both simultaneously.
-
-
Este paso está sin traducir. Ayuda a traducirlo
-
Disconnect the black connector by pulling up using a plastic opening tool underneath the edge. This connection attaches the power/volume cable to the mother board.
-
-
Este paso está sin traducir. Ayuda a traducirlo
-
Remove the 3-mm screw holding the upper left corner of the main board using a Phillips#00 screwdriver.
-
-
Este paso está sin traducir. Ayuda a traducirlo
-
Gently pry the lower edge of the cable off the plastic stud just above the stylus opening.
-
-
Este paso está sin traducir. Ayuda a traducirlo
-
Gently pry the middle of the cable up and off of the two plastic studs.
-
Gently pry the part of the cable adjacent to the power button up and off the two plastics studs.
-
Gently pry the upper part of the cable up and off the two plastic studs.
-
-
Este paso está sin traducir. Ayuda a traducirlo
-
Using tweezers, pull the part of the cable that is located behind the volume buttons out of the slot.
-
-
Este paso está sin traducir. Ayuda a traducirlo
-
Hold the corner of the motherboard up and carefully slide the cable out.
-


Cancelar: No complete esta guía.
25 personas más completaron esta guía.
Equipo

USF Tampa, Team 12-2, Blackwell Fall 2014 Miembro de USF Tampa, Team 12-2, Blackwell Fall 2014
USFT-BLACKWELL-F14S12G2
4 Miembros
16 Guías creadas
7 comentarios
My wife's Samsung galaxy note 8 would not turn on. She has had it for three years and we thought it should be scrapped. I searched for this problem on line and found this site. Ordered new on off kit on e-bay. Followed these instructions. Very straight forward. Took less than 30 minutes. Reassembled and returned tablet to wife, who is very happy. Hoping for a good meal tonight! Thanks very much Joel. Martin
what is the part number or kit number of the on/off kit, how to order. please help.
My Samsung Galaxy Note 8.0 (wifi only) will not switch on or respond in any way to a known-good charger being plugged into it. It hasn't had much use since new, so I don't believe it's a worn out battery or switch, but I tested those anyway. It will not reset, or hard-reset, and I have removed and tested the function of the power tact-switch, that that works fine. The battery reads 4.2V. I fear that I've bricked it. Nothing I do gives any response. Is there anything else I can try?
Worked last night, was charged, checked charger(good), replaced charge port, replaced power/volume button, replaced battery. Not a peep out of the tablet. No battery image on screen. Tried hard reset etc. Nada. What now, trash can??? Can't see spending another 45 to 50 $$$ for mother board. Can any body prove Samsung built deliberate ob's into the tablet. Like read the software code.
This is not a note 8 though