Saltar al contenido principal

Samsung Galaxy J1 Rear Camera Replacement

Qué necesitas

  1. Samsung Galaxy J1 Rear Camera Replacement, Midframe: paso 1, imagen 1 de 1
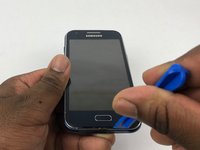
    • Insert a finger nail or plastic opening tool between the back cover and the device.

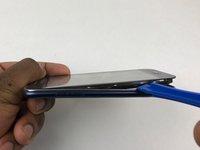
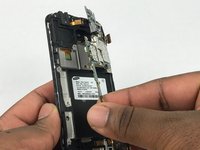
    • Gently pry the rear cover off of the back of the phone.

  2. Samsung Galaxy J1 Rear Camera Replacement: paso 2, imagen 1 de 2 Samsung Galaxy J1 Rear Camera Replacement: paso 2, imagen 2 de 2
    • Using a finger, pull the SIM card down out of its slot.

    • Remove the SIM card.

    • The pictured device is missing the SIM card and battery.

  3. Samsung Galaxy J1 Rear Camera Replacement: paso 3, imagen 1 de 1
    • Using a Phillips #00 screwdriver remove the eleven 3 mm screws.

  4. Samsung Galaxy J1 Rear Camera Replacement: paso 4, imagen 1 de 3 Samsung Galaxy J1 Rear Camera Replacement: paso 4, imagen 2 de 3 Samsung Galaxy J1 Rear Camera Replacement: paso 4, imagen 3 de 3
    • Insert a plastic opening tool between the screen and the back of the device.

    • Starting at the bottom of the device, gently slide the tool along the edges of the screen.

    • Gently pry the main assembly from the midframe of the device.

    • When removing the main assembly, pry gently so as to not crack the glass screen or break any clips within the device.

  5. Samsung Galaxy J1 Rear Camera Replacement, Rear Camera: paso 5, imagen 1 de 2 Samsung Galaxy J1 Rear Camera Replacement, Rear Camera: paso 5, imagen 2 de 2
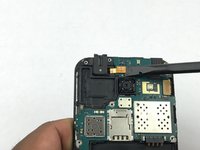
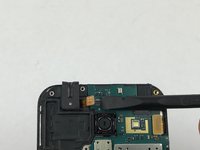
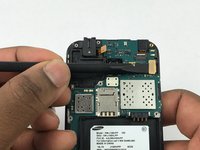
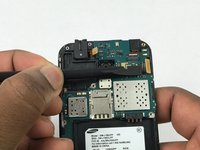
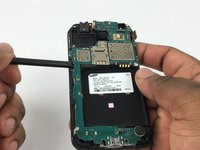
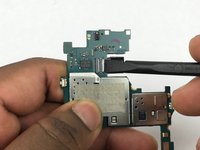
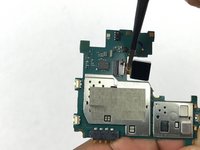
    • Use the flat end of a spudger to disconnect the ear speaker connector from the motherboard.

  6. Samsung Galaxy J1 Rear Camera Replacement: paso 6, imagen 1 de 2 Samsung Galaxy J1 Rear Camera Replacement: paso 6, imagen 2 de 2
    • Use the flat end of a spudger to disconnect the digitizer connector from the motherboard.

  7. Samsung Galaxy J1 Rear Camera Replacement: paso 7, imagen 1 de 3 Samsung Galaxy J1 Rear Camera Replacement: paso 7, imagen 2 de 3 Samsung Galaxy J1 Rear Camera Replacement: paso 7, imagen 3 de 3
    • Use a plastic opening tool to gently pry under the motherboard.

    • Remove motherboard.

  8. Samsung Galaxy J1 Rear Camera Replacement: paso 8, imagen 1 de 3 Samsung Galaxy J1 Rear Camera Replacement: paso 8, imagen 2 de 3 Samsung Galaxy J1 Rear Camera Replacement: paso 8, imagen 3 de 3
    • Use the flat end of a spudger to disconnect the rear camera from the motherboard.

    • Remove the rear camera.

Conclusión

To reassemble your device, follow these instructions in reverse order.

Una persona más ha completado esta guía.

Sean Kramer

Miembro Desde 02/14/18

1,452 Reputación

6 Guías creadas

Equipo

USF Tampa, Team S5-G4, Eyestone Spring 2018 Miembro de USF Tampa, Team S5-G4, Eyestone Spring 2018

USFT-EYESTONE-S18S5G4

3 Miembros

6 Guías creadas

0 comentarios

Agregar Comentario

Ver Estadísticas:

Ultimas 24 horas: 0

Ultimos 7 días: 6

Ultimos 30 días: 10

Todo El Tiempo: 1,879