Introducción
If your phone has been dropped and the glass or the LCD has broken, with this guide you can replace the display assembly of your Galaxy A20e and make it as good as new.
Qué necesitas
-
-
Release the back cover with the help of a thin blade or a Jimmy. Insert the tool between the frame display and the cover unclipping it along the entire perimeter.
-
Insert a Jimmy between the display frame and the side shell and slide it along the edge, in order to completely disengage the two parts.
-
-
-
-
Remove the battery by placing a few drops of alcohol underneath the battery and letting it sit for about a minute. This will weaken the double-sided adhesive that holds the battery.
-
-
-
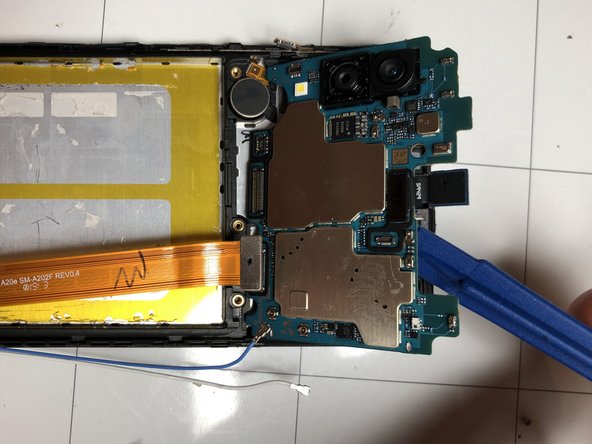
Disconnect the two blue and white antenna wires.
-
Remove the motherboard by lifting it away by the upper part.
-
Carefully remove the microphone, as it is glued and easily damaged. Try to warm up that area a little to make it easier.
-
-
-
Once you have completed the component removal, you can begin the reassembly by placing the components on the new display.
what do u mean by remove the power/volume flat and separate plastic from display
Ciao,
significa che devi sganciare i connettori dei rispettivi collegamenti
Smilzo -
-


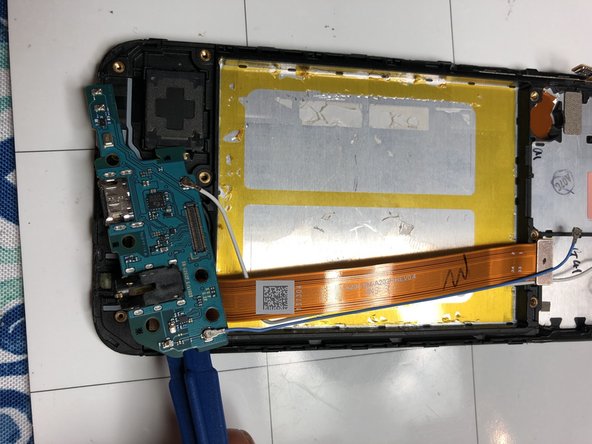


To reassemble your device, follow these instructions in reverse order.
To reassemble your device, follow these instructions in reverse order.
Cancelar: No complete esta guía.
16 personas más completaron esta guía.
Un agradecimiento especial a estos traductores:
100%


Estos traductores nos están ayudando a reparar el mundo! ¿Quieres contribuir?
Empezar a traducir ›

12 comentarios
this guide isn’t for a A20 its for an A20e
Ciao,il codice completo è A20E SM-A202f .
se cerchi questo codice nelle guide riparazione trovi telefono-Android-Samsung-A- A20e SM-A202f trovi la mia guida del display. Non posso nominarla come la cartella genitore,non so se questo è un bug. Grazie
Smilzo -
If you're gonna re-use the battery I wouldn't use heat, it damages the cells inside of the battery. Just pry with a spudger and have
I'm sorry I don't agree with a spudger without adequate heat the battery would bend to be removed. The adhesive is very resistant and the heat must be dosed appropriately for the situation so as not to damage the battery and the other components
Smilzo -
In another vid, to remove the battery “without" heat, the person used “rubbing alcohol” said it consumes the adhesive making it very easy to remove, placing it with a syringe like tip, along both the left and right sides, when the phone is in the normal upright position. And because rubbing alcohol evaporates, it's not harmful to the phone. Then a spudger can be used without brute force. That was a vid for the A205. (2019)
hello, everyone is free to use the method they prefer based on their experience. I use heat adequately. you use the method that gives you the most confidence. Greetings
Smilzo -
Grazie, davvero un ottimo lavoro! Sono riuscita persino io a sostituire il display del cellulare di mia figlia. Ora è come nuovo... In attesa della prossima caduta! Se posso permettermi un piccolo commento, al passo 9 "Rimuovi la scheda logica inferiore" manca "svitando anche la vite che si trova alla destra del connettore della scheda logica inferiore", anche se dalle foto, chiarissime, si vede comunque bene che al passaggio 8 la vite c'era e al 9 non c'è più. Grazie ancora! :-)
Onorato di essere stato utile
Smilzo -
salve, ma se devo sostituire solo il vetro?
Ciao @angelocharl5424 Sfortunatamente non abbiamo nessun contenuto per sostituire soli il vetro del Samsung Galaxy A20e. Però Internet è pieno di risorse! iFixit è un wiki, quindi sei benvenuto per documentare una guida per questa riparazione quando l’avrai finita! Infine puoi aggiungere questo dispositivo alla lista di richiesta di nuove guide.
salve,sconsiglio fortemente la sostituzione,avrebbe sicuramente un esito disastroso in quanto sono incollati insieme al display ,ci vogliono attrezzature particolare per avere una sostituzione decente. costa molto meno ed hai piu probabilita di riuscita sostituire il gruppo intero. puoio cercare qualsiasi guida qua oppure su youtube di sostituzione vetro (che sia incollato al display) per renderti conto del tipo di lavoro che richiede. saluti
Smilzo -
se monto girato il flat che si stacca si sopra che sotto, cosa succede? si bruccia solo qualcosa facilmente reperibile? grazie
please put A20e as main heading not A20
Fix it phones dorchester - Contestar