Introducción
A few years ago the touch screen on my Samsung DV457GVGSWR dryer would no longer let me touch items in the lower left corner of the screen. We worked around it, but the condition worsened over time, and eventually the bottom 1/4th of the screen was no longer accessible, and the dryer became almost unusable. I purchased a replacement touch screen from Amazon, and it was very easy to replace. If you can turn a screwdriver, you can fix your machine, too.
Qué necesitas
-
-
Gather a few common tools: a small Philips head screwdriver (#1), a spudger or flathead screwdriver (any household size should work), and a 10mm socket on a 1/4 drive ratchet makes unscrewing the lid easy without having to pull the dryer too far from the wall.
-
Pull the dryer away from the wall far enough to remove the two rear screws holding the lid on. The screws are located on the rear of the top panel about where the arrows point.
-
The recommended 10mm socket will help capture the screws so they don't fall down behind the dryer; but if you don't have a 10mm socket, you can use a stubby Philips screwdriver. Be careful not to drop the screws!
-
-
-
-
Slide the lid back a bit. It only has to move far enough to give you access to the screws. Remove the two screws at either end of the plastic rail.
-
Detach the panel by pressing up with your fingertips near the tabs shown by the arrows. It takes a little force, but not much. Once it's unhooked, lift the panel slightly and tip the top towards you.
-
Remove the four screws at the corners of the touch screen panel.
-
-
-
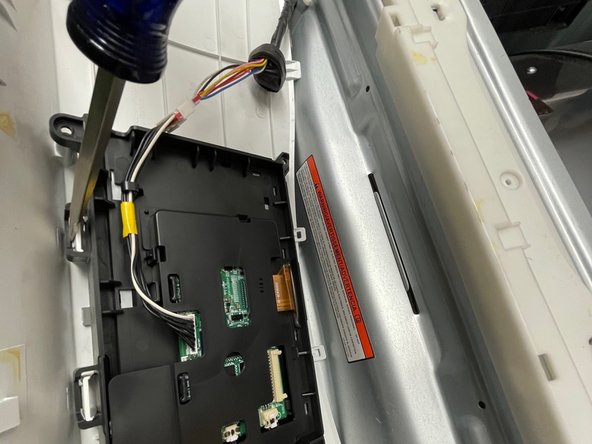
Disconnect the cable connecting the touch screen to the machine. Press the small tab to unlock the connector.
-
Press the connector halves apart using your thumb to push on the locking tab until they separate.
-
Use the flathead screwdriver to gently unlock the two tabs holding the top of the touch screen in place. Lift the touch screen assembly out of the panel.
-


Reassemble the dryer by reversing the steps above.
Reassemble the dryer by reversing the steps above.
