Saltar al contenido principal

Rollei 6000/6008 Battery LiFePO4 Replacement

Qué necesitas

Resumen del Video

  1. Rollei 6000/6008 Battery LiFePO4 Replacement, Dismantle battery: paso 1, imagen 1 de 3 Rollei 6000/6008 Battery LiFePO4 Replacement, Dismantle battery: paso 1, imagen 2 de 3 Rollei 6000/6008 Battery LiFePO4 Replacement, Dismantle battery: paso 1, imagen 3 de 3
    • Save the tiny screws. They are easily lost and hard to replace.

    • Watch out the cables inside may very short.

  2. Rollei 6000/6008 Battery LiFePO4 Replacement, Remove old battery and obsolete stuff: paso 2, imagen 1 de 3 Rollei 6000/6008 Battery LiFePO4 Replacement, Remove old battery and obsolete stuff: paso 2, imagen 2 de 3 Rollei 6000/6008 Battery LiFePO4 Replacement, Remove old battery and obsolete stuff: paso 2, imagen 3 de 3
    • Depending on battery type this may look a bit different.

    • Sometimes the batteries have a very tight fit and are not to easy to remove. Try pulling with pliers

  3. Rollei 6000/6008 Battery LiFePO4 Replacement, Desolder old battery: paso 3, imagen 1 de 2 Rollei 6000/6008 Battery LiFePO4 Replacement, Desolder old battery: paso 3, imagen 2 de 2
    • The original NiCd batteries had two additional cables for a temperature sensor. See yellow one, which also has the original plastic housing.

    • Be sure to dispose the old battery pack properly. They contain harmful chemicals and need special treatment for waste disposal!

  4. Rollei 6000/6008 Battery LiFePO4 Replacement, Prepare batteries for soldering: paso 4, imagen 1 de 3 Rollei 6000/6008 Battery LiFePO4 Replacement, Prepare batteries for soldering: paso 4, imagen 2 de 3 Rollei 6000/6008 Battery LiFePO4 Replacement, Prepare batteries for soldering: paso 4, imagen 3 de 3
    • This step helps later to have the solder stick to the batteries

  5. Rollei 6000/6008 Battery LiFePO4 Replacement, Align the batteries: paso 5, imagen 1 de 2 Rollei 6000/6008 Battery LiFePO4 Replacement, Align the batteries: paso 5, imagen 2 de 2
    • I had to turn around one of the batteries later in the guide to allow easier soldering... depends on the wiring though.

  6. Rollei 6000/6008 Battery LiFePO4 Replacement: paso 6, imagen 1 de 3 Rollei 6000/6008 Battery LiFePO4 Replacement: paso 6, imagen 2 de 3 Rollei 6000/6008 Battery LiFePO4 Replacement: paso 6, imagen 3 de 3
    • The PCB/BMS Board plus wiring diagram

    • The wiring diagram may be different depending on the PCB used. But the principle is the same for all types.

  7. Rollei 6000/6008 Battery LiFePO4 Replacement, Testing the size.: paso 7, imagen 1 de 1
    • Check the size of the battery pack together with the BMS Board. It should easily fit with a bit of space inside the housing. Otherwise you may get problems down the road of this guide.

  8. Rollei 6000/6008 Battery LiFePO4 Replacement, Soldering: paso 8, imagen 1 de 3 Rollei 6000/6008 Battery LiFePO4 Replacement, Soldering: paso 8, imagen 2 de 3 Rollei 6000/6008 Battery LiFePO4 Replacement, Soldering: paso 8, imagen 3 de 3
    • You can also use normal thin wire, but be aware that the space within the housing is limited.

  9. Rollei 6000/6008 Battery LiFePO4 Replacement, cutting the connector: paso 9, imagen 1 de 3 Rollei 6000/6008 Battery LiFePO4 Replacement, cutting the connector: paso 9, imagen 2 de 3 Rollei 6000/6008 Battery LiFePO4 Replacement, cutting the connector: paso 9, imagen 3 de 3
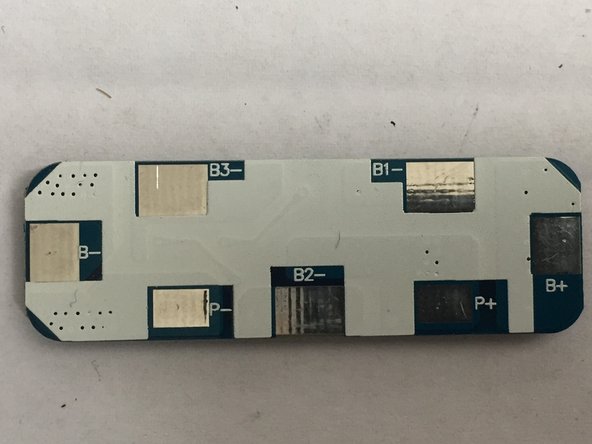
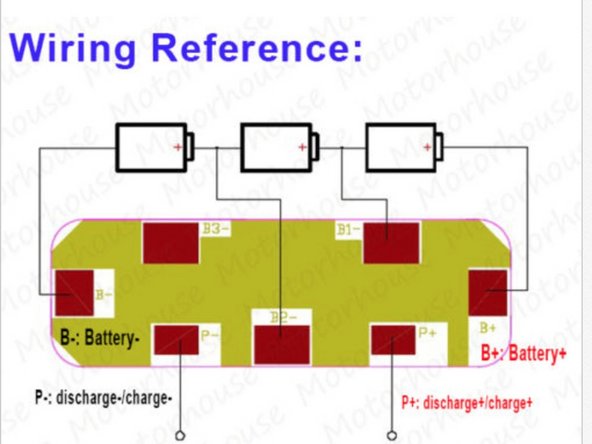
    • This is based on the specific PCB used and my be different for others

  10. Rollei 6000/6008 Battery LiFePO4 Replacement, Solder B+ on PCB: paso 10, imagen 1 de 3 Rollei 6000/6008 Battery LiFePO4 Replacement, Solder B+ on PCB: paso 10, imagen 2 de 3 Rollei 6000/6008 Battery LiFePO4 Replacement, Solder B+ on PCB: paso 10, imagen 3 de 3
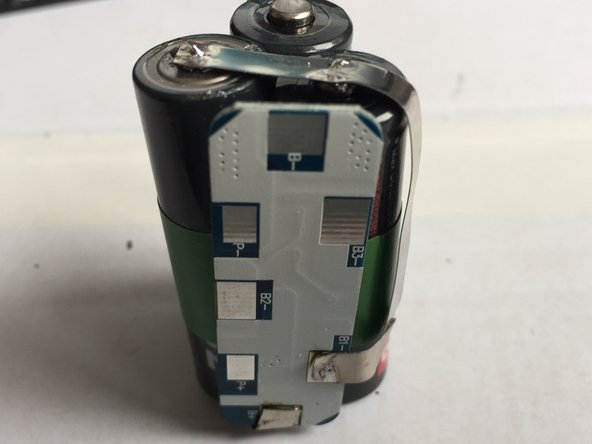
    • Add a bit of solder on the connector you want to use next. I started with B+ and connected it to the + pole of the first battery.

    • Test again if everything fits in the housing.

    • Warning! The housing is metal. Make sure not to short-cut something!

  11. Rollei 6000/6008 Battery LiFePO4 Replacement, Connect - of B1 and + of B2: paso 11, imagen 1 de 3 Rollei 6000/6008 Battery LiFePO4 Replacement, Connect - of B1 and + of B2: paso 11, imagen 2 de 3 Rollei 6000/6008 Battery LiFePO4 Replacement, Connect - of B1 and + of B2: paso 11, imagen 3 de 3
    • Again do not short cut anything!

    • The hilium connector helps here to save lots of space compared to wires

  12. Rollei 6000/6008 Battery LiFePO4 Replacement: paso 12, imagen 1 de 3 Rollei 6000/6008 Battery LiFePO4 Replacement: paso 12, imagen 2 de 3 Rollei 6000/6008 Battery LiFePO4 Replacement: paso 12, imagen 3 de 3
    • Fold the hilium and use pliers to flatten it

    • Use scissors to cut to the right length

    • Again add a bit of solder before soldering the hilium connector

  13. Rollei 6000/6008 Battery LiFePO4 Replacement, Solderig B1- and isolation: paso 13, imagen 1 de 3 Rollei 6000/6008 Battery LiFePO4 Replacement, Solderig B1- and isolation: paso 13, imagen 2 de 3 Rollei 6000/6008 Battery LiFePO4 Replacement, Solderig B1- and isolation: paso 13, imagen 3 de 3
    • See the finalised soldering of Step 12

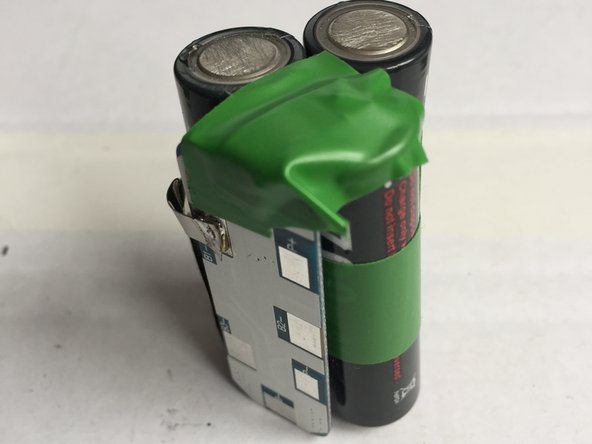
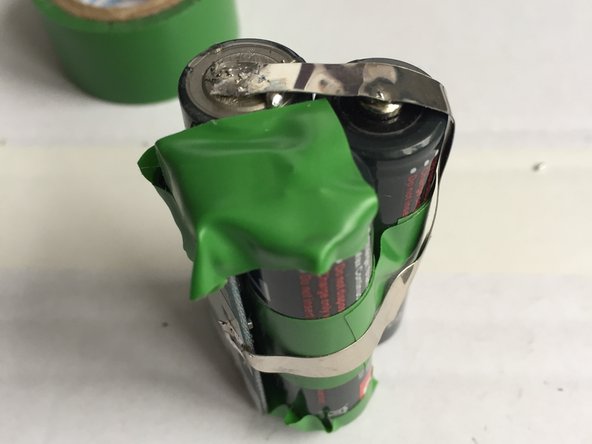
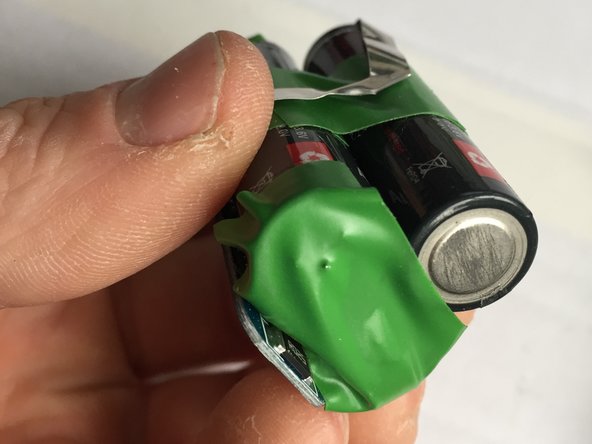
    • Use electric tape to isolate the finished work (this prevents shortcuts)

  14. Rollei 6000/6008 Battery LiFePO4 Replacement, More electrical tape: paso 14, imagen 1 de 3 Rollei 6000/6008 Battery LiFePO4 Replacement, More electrical tape: paso 14, imagen 2 de 3 Rollei 6000/6008 Battery LiFePO4 Replacement, More electrical tape: paso 14, imagen 3 de 3
    • Try to isolate but do not cover the writings on the PCB so you can still see, what is already wired.

  15. Rollei 6000/6008 Battery LiFePO4 Replacement, Turn around B3: paso 15, imagen 1 de 2 Rollei 6000/6008 Battery LiFePO4 Replacement, Turn around B3: paso 15, imagen 2 de 2
    • It is hard to get the orientation if all batteries correct on first try. But the tape allows cutting and reorientation if needed.

    • This is only needed to use less of the connector and allow easier wiring without crossings

  16. Rollei 6000/6008 Battery LiFePO4 Replacement, Wiring B2 & B3: paso 16, imagen 1 de 3 Rollei 6000/6008 Battery LiFePO4 Replacement, Wiring B2 & B3: paso 16, imagen 2 de 3 Rollei 6000/6008 Battery LiFePO4 Replacement, Wiring B2 & B3: paso 16, imagen 3 de 3
    • Again add a bit of solder to the poles.

    • And use fold the connector tape.

    • Watch out for shortcuts

  17. Rollei 6000/6008 Battery LiFePO4 Replacement, Fold and cut the connector for B2-: paso 17, imagen 1 de 3 Rollei 6000/6008 Battery LiFePO4 Replacement, Fold and cut the connector for B2-: paso 17, imagen 2 de 3 Rollei 6000/6008 Battery LiFePO4 Replacement, Fold and cut the connector for B2-: paso 17, imagen 3 de 3
    • Now you see why the electrical tape is needed for isolation. If the connector roll is touching the wrong parts you may get a short cut, that may brick your PCB.

  18. Rollei 6000/6008 Battery LiFePO4 Replacement, Soldering B2- on the PCB: paso 18, imagen 1 de 3 Rollei 6000/6008 Battery LiFePO4 Replacement, Soldering B2- on the PCB: paso 18, imagen 2 de 3 Rollei 6000/6008 Battery LiFePO4 Replacement, Soldering B2- on the PCB: paso 18, imagen 3 de 3
    • The pliers help to not burn your fingers.

    • See on 2nd picture how much space we save with the hilium connectors.

    • On 3rd picture we see how solder punctured the electrical tape. In the next step we add another layer for security.

  19. Rollei 6000/6008 Battery LiFePO4 Replacement, Even more isolation: paso 19, imagen 1 de 3 Rollei 6000/6008 Battery LiFePO4 Replacement, Even more isolation: paso 19, imagen 2 de 3 Rollei 6000/6008 Battery LiFePO4 Replacement, Even more isolation: paso 19, imagen 3 de 3
    • I cut the electrical tape to not cover the markings on the PCB.

  20. Rollei 6000/6008 Battery LiFePO4 Replacement, and even more isolation: paso 20, imagen 1 de 3 Rollei 6000/6008 Battery LiFePO4 Replacement, and even more isolation: paso 20, imagen 2 de 3 Rollei 6000/6008 Battery LiFePO4 Replacement, and even more isolation: paso 20, imagen 3 de 3
    • Adding another layer of isolation as we have crossing hilium connectors here.

  21. Rollei 6000/6008 Battery LiFePO4 Replacement, Finalising the battery pack: paso 21, imagen 1 de 3 Rollei 6000/6008 Battery LiFePO4 Replacement, Finalising the battery pack: paso 21, imagen 2 de 3 Rollei 6000/6008 Battery LiFePO4 Replacement, Finalising the battery pack: paso 21, imagen 3 de 3
    • Note from the wiring diagram the B3-connector of the PCB is unused.

    • So we add electrical tape to isolate it.

  22. Rollei 6000/6008 Battery LiFePO4 Replacement, Adding P+/P- wires: paso 22, imagen 1 de 2 Rollei 6000/6008 Battery LiFePO4 Replacement, Adding P+/P- wires: paso 22, imagen 2 de 2
    • These are the charge/discharge ports of our battery pack

    • Be sure that the length of the wire is long enough to wire it to the Rollei outlet later.

    • If you use a multimeter to check the voltage you will see it's 0V

    • The PCB needs to be activated, we do this by doing some short charging

  23. Rollei 6000/6008 Battery LiFePO4 Replacement, Testing the battery pack: paso 23, imagen 1 de 2 Rollei 6000/6008 Battery LiFePO4 Replacement, Testing the battery pack: paso 23, imagen 2 de 2
    • A bit of charging is sufficient. The MaHa charger shows the voltage of 10,4V

    • Now also the multimeter shows the correct voltage.

    • The PCB is now activated and the battery pack correctly wired.

    • If this step is not working as expected, then check all wiring, soldering and diagrams again to validate there are no mistakes.

  24. Rollei 6000/6008 Battery LiFePO4 Replacement, Wiring to the lid of the Rollei battery: paso 24, imagen 1 de 2 Rollei 6000/6008 Battery LiFePO4 Replacement, Wiring to the lid of the Rollei battery: paso 24, imagen 2 de 2
    • This is the most tricky soldering part.

    • Make sure there is not anything connected that shouldn't.

    • The battery has two + and two - poles. Make sure the + (white cable) is connected to the right input. Have a look at the red cables. One is going directly to the camera connector. The other one is protected by a fuse that protects your camera.

  25. Rollei 6000/6008 Battery LiFePO4 Replacement, Add foam to fill free space: paso 25, imagen 1 de 3 Rollei 6000/6008 Battery LiFePO4 Replacement, Add foam to fill free space: paso 25, imagen 2 de 3 Rollei 6000/6008 Battery LiFePO4 Replacement, Add foam to fill free space: paso 25, imagen 3 de 3
    • Find out how much foam you need by putting the battery pack with foam layers outside of the housing.

    • Keep space for wires and fuse at the top.

  26. Rollei 6000/6008 Battery LiFePO4 Replacement, Assembly: paso 26, imagen 1 de 3 Rollei 6000/6008 Battery LiFePO4 Replacement, Assembly: paso 26, imagen 2 de 3 Rollei 6000/6008 Battery LiFePO4 Replacement, Assembly: paso 26, imagen 3 de 3
    • Align battery pack, lid and housing

    • Notice that the screws are on one side only.

    • Two tiny squares snap into the other side.

    • Check that the lid is closing completely, without much pressure (Pic. 3). Otherwise remove a bit foam

  27. Rollei 6000/6008 Battery LiFePO4 Replacement, Screwing together: paso 27, imagen 1 de 2 Rollei 6000/6008 Battery LiFePO4 Replacement, Screwing together: paso 27, imagen 2 de 2
    • Final assembly steps

  28. Rollei 6000/6008 Battery LiFePO4 Replacement, Final testing: paso 28, imagen 1 de 3 Rollei 6000/6008 Battery LiFePO4 Replacement, Final testing: paso 28, imagen 2 de 3 Rollei 6000/6008 Battery LiFePO4 Replacement, Final testing: paso 28, imagen 3 de 3
    • Note: the lid is now turned around (thus mirrored to the wiring diagram)

    • It is expected that the two connectors to the right produce 0V

    • Make sure you get roughly 10V with the right polarity

    • Repeat this step, to double-check. BEFORE inserting the battery into your camera.

  29. Rollei 6000/6008 Battery LiFePO4 Replacement, Protecting misuse: paso 29, imagen 1 de 3 Rollei 6000/6008 Battery LiFePO4 Replacement, Protecting misuse: paso 29, imagen 2 de 3 Rollei 6000/6008 Battery LiFePO4 Replacement, Protecting misuse: paso 29, imagen 3 de 3
    • Fill the two unused connectors (from the temp sensor) with hard glue. This prevents users from accidentally using a Rollei Charger N or G, which are not suitable for the battery type and might cause fire or explosion.

    • Charge the battery with a Lithium capable LiFePO4 charger only!

    • Notice that the battery has now only 81g compared to 210g for the old NiCd.

    • Happy using your Rollei again!

  30. Rollei 6000/6008 Battery LiFePO4 Replacement, Building a Charger Tray: paso 30, imagen 1 de 3 Rollei 6000/6008 Battery LiFePO4 Replacement, Building a Charger Tray: paso 30, imagen 2 de 3 Rollei 6000/6008 Battery LiFePO4 Replacement, Building a Charger Tray: paso 30, imagen 3 de 3
    • Attached you can find a STL file (under Media) to 3D-PRINT a charging tray for the new pin layout (remember blocking some pins so the Rollei Charger N cannot fry your new battery). The 3D Model can also be downloaded from here: https://www.thingiverse.com/thing:215677...

    • Print the 3D Model (or get it printed online).

    • Get a connector socket (for the charger I used I got one of these: https://bit.ly/2NwmhUo ) with 12.6mm diameter (you can use others but the 3D model might not fit then).

    • Solder wires to two pins (check the diameter of the pins so they fit the battery!) Make sure they're tick enough to have electrical contact. I used two small nails I shortened. Glue the pins into the two holes so they stick out roughly 5-6mm. Validate that the battery fits and connects (use a meter!)

    • Solder the other ends of the cables to the socket and glue the socket into the hole. Fill the bottom side of the tray with hot glue to fix everything.

    • A charger can be ordered from eBay: search for 11V Charger 1A Smart to 9.6V LiFe LiFePO4

    • https://www.ebay.com/itm/11V-Charger-1A-...

Conclusión

Have fun with your Rollei again! :)

3 personas más completaron esta guía.

Markus

Miembro Desde 11/16/15

211 Reputación

1 Guía escrita

43 comentarios

Hello Markus,

I have followed your instructions to rebuilt the battery pack. Batteries charged as expected to 10.4V, however both of my cameras 6008I and 6008 AF showing “Charge” briefly and will not turn on with the new LiFePo4 pack. I think the selected voltage of 9.6V is probably just too low.

Thanks,

Victor Dombrovskiy

Victor Dombrovskiy - Contestar

Hello Victor,

It looks like we have the same issue with our 6008 AF. Mine does not work correctly. It turns on, it meters exposure but neither AF no rewind mechanism work. I am arrfaid the reason is not voltage only, there should be other reason.

Kind regards,

Hermann

hermanneinbinder - Contestar

Hey guys, sad to hear it’s not yet working for you. The initial current the camera draws is pretty high (around 4,5A peak). So make sure the cells you chose can deliver this current.

Markus - Contestar

Hi,++Markus++ ,

What charger is used to charge the battery?

kinglang - Contestar

I am using one of these: P2012-l3 12.6v 1.5a LiPo Lithium Ion Charger for 11.1V Li-ion Battery

The PCB BMS Protection Board for 3 Packs 18650 LiFePO4 LiFe Battery Cell 3S does the balancing and cut off. So every “C.V. Voltage for LiFePo4: 10.8V±1%” should work.

Markus - Contestar

Agregar Comentario

Ver Estadísticas:

Ultimas 24 horas: 2

Ultimos 7 días: 22

Ultimos 30 días: 139

Todo El Tiempo: 13,857