Esta versión puede contener ediciones incorrectas. Cambiar a la última instantánea verificada.
Qué necesitas
-
-
Quita los siguientes ocho tornillos que aseguran la carcasa inferior.
-
Dos tornillos Pentalobe P5 de 1.8 mm
-
Cuatro tornillos Pentalobe P5 de 2.9 mm
-
Dos tornillos Pentalobe P5 de 6.1 mm
-
-
-
Usa el lado plano de un spudger para presionar y sostener los pequeños botones dorados de ‘desconexión de batería’.
-
Si el LED de poder sigue iluminado, continua sosteniendo el botón hasta que el LED se apague, y después suelta. Esto puede tardar hasta 10 segundos.
-
Si el LED no se enciende, suelta el botón después de 5-10 segundos. Presiona y sostiene otra vez por 5-10 segundos, y suelta. Finalmente, presiona y sostiene una tercera vez por 5-10 segundo, y suelta.
-
-
-
Cuidadosamente voltea el MacBook, para que la carcasa inferior se mantenga plana.
-
Levanta el ensamble de la carcasa superior/pantalla en un ángulo de 90º, y asientalo en contra de algo fuerte para que no lo tengas que sostener.
-
Agrega una pieza de cinta cerca del trackpad para asegurar la carcasa superior y prevenir movimientos accidentales.
-
-
-
Como precaución añadida, puedes desconectar fisicamente la batería insertando una púa de insolación de batería entre la placa lógica y el conector de la batería.
-
-
-
-
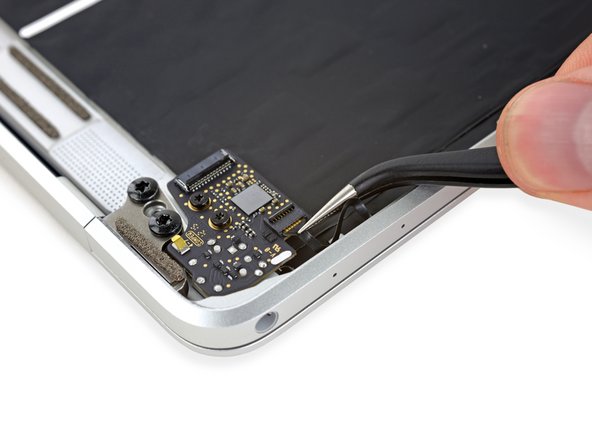
Usa unas pinzas para despegar la cinta que cubre el conector del cable de la pantalla.
-
-
-
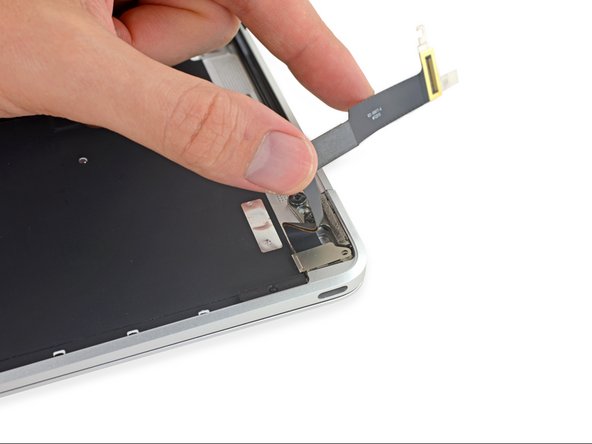
Usa una espátula para abrir la tapa de retención del conector ZIF para el cable de cinta de montaje de doble micrófono.
-
-
-
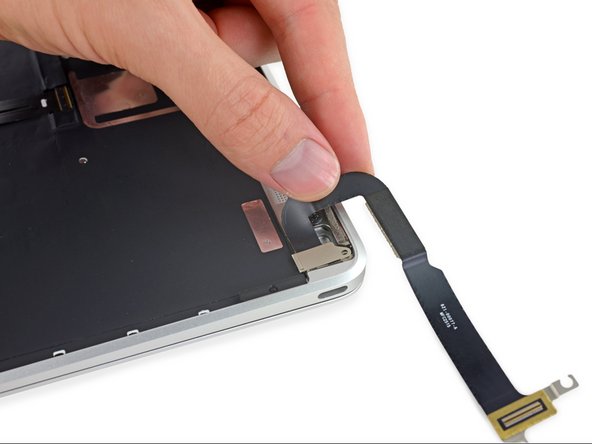
Prepara un iOpener y aplique calor a la carcasa superior directamente detrás del ensamblaje del micrófono.
-
-
Este paso está sin traducir. Ayuda a traducirlo
-
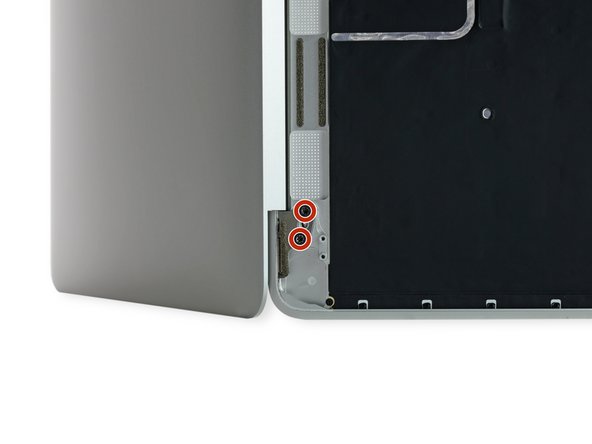
Remove the two 3.3 mm T5 Torx screws securing the display cable assembly.
-
-
Este paso está sin traducir. Ayuda a traducirlo
-
Remove the single 4.3 mm Phillips #00 screw securing the USB-C port ribbon cable.
-
-
Este paso está sin traducir. Ayuda a traducirlo
-
Unfold the USB-C port ribbon cable until it lays flat, allowing access to the bracket beneath.
-
-
Este paso está sin traducir. Ayuda a traducirlo
-
Lift and remove the metal bracket securing the USB-C port ribbon cable connector.
-
-
Este paso está sin traducir. Ayuda a traducirlo
-
Use a spudger to disconnect the USB-C port ribbon cable by prying the connector straight up.
-
Pry from the side nearest the back edge of the MacBook.
-
Remove the ribbon cable.
-
-
Este paso está sin traducir. Ayuda a traducirlo
-
Fully open the display.
-
Set the MacBook down on its right edge with the display facing away from you, as shown.
-
-
Este paso está sin traducir. Ayuda a traducirlo
-
Remove the four 4.8 mm T8 Torx screws securing the display hinges.
-
-
Este paso está sin traducir. Ayuda a traducirlo
-
Holding the display assembly with one hand and the upper case with the other, push them together slightly to move the hinges out of their recesses in the the upper case.
-
Push the upper case forward while pulling back gently on the display.
-
Once the two display hinges have cleared the upper case, remove the display and set it aside.
-
-
Este paso está sin traducir. Ayuda a traducirlo
-
Remove the single 2.9 mm T3 Torx screw securing the USB-C port to the upper case.
-
-
Este paso está sin traducir. Ayuda a traducirlo
-
Slide the USB-C port out of its recess in the upper case, and remove the USB-C port.
-
-
Este paso está sin traducir. Ayuda a traducirlo
-
Use a pair of tweezers to remove the tape covering the keyboard ribbon cable connector on the trackpad.
-
-
Este paso está sin traducir. Ayuda a traducirlo
-
Using a spudger, flip open the retaining flap on the keyboard ribbon cable ZIF connector.
-
-
Este paso está sin traducir. Ayuda a traducirlo
-
Gently pull the keyboard ribbon cable out of its slot in the frame.
-
-
Este paso está sin traducir. Ayuda a traducirlo
-
Remove the five 2.5 mm T3 Torx screws securing the trackpad to the case.
-
-
Este paso está sin traducir. Ayuda a traducirlo
-
Use a spudger to flip up the retaining flap on the keyboard ribbon cable ZIF connector.
-
-
Este paso está sin traducir. Ayuda a traducirlo
-
Gently peel the keyboard ribbon cable up from the case, and remove the cable.
-


Cancelar: No complete esta guía.
20 personas más completaron esta guía.

4 comentarios
please where do i have to put the mushrooms screws? 923-01012
If you look closely at this image in Step 36 you can see them pretty clearly.
I changed the keyboard itself; you follow the instructions to step 35 (skipping 29 to 30, microphone removal) and then remove the keyboard ribbon cable connector to the trackpad (step 45). Maybe the most complicated step is ungluing the black backing stuck to the back of the keyboard and then there are almost a hundred tiny screws holding the keyboard to the frame, mostly only an eye strain. Got the keyboard through ebay (spanish keyboard layout).
I replaced my keyboard and it won’t turn on.