Introducción
Si tu panel táctil está roto o necesitas removerlo para acceder a la batería de forma más fácil, sigue estos pasos.
Para tu seguridad, descarga la batería de tu MacBook Pro por debajo del 25% antes de comenzar este procedimiento. Una batería de iones de litio cargada puede crear un fuego peligroso e incontrolable si se perfora accidentalmente.
Qué necesitas
-
-
Enciende tu Mac y ejecuta Terminal.
-
Copia y pega el siguiente comando (o escríbelo exactamente) en la Terminal:
-
sudo nvram AutoBoot=%00
-
Presiona [return]. Si se te solicita, introduce tu contraseña de administrador y vuelve a pulsar [return]. Nota: La tecla de retorno también puede estar etiquetada como ⏎ o "enter".
-
sudo nvram AutoBoot=%03
-
-
-
Usa un destornillador P5 Pentalobe para remover seis tornillos que sujetan la caja inferior.
-
Dos tornillos de 6.2 mm
-
Cuatro tornillos de 3.4 mm
-
-
-
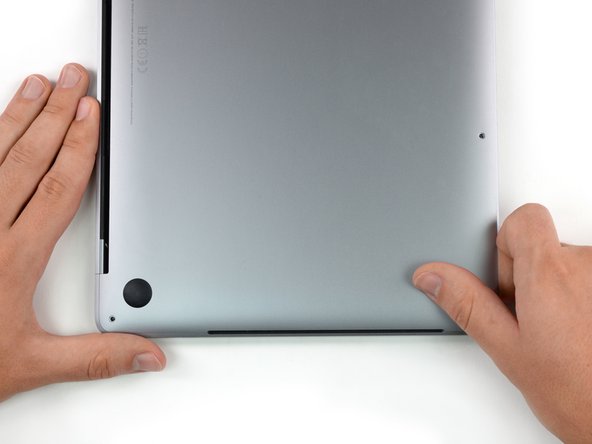
Aplica una ventosa a la parte inferior de la caja, cerca de la zona central del MacBook Pro.
-
Levanta la ventosa para crear una grieta entre la caja inferior y el chasis.
-
-
-
Inserta una esquina de una púa de apertura en el espacio entre la caja inferior y el chasis.
-
Desliza la púa de apertura alrededor de la esquina más cercana y a la mitad del lado de la caja.
-
-
-
Repite el paso anterior en el lado opuesto, deslizando la púa de apertura debajo de la minúscula y subiendo por el lado para liberar el segundo clip.
Recommend being very careful on this step and the following step when using any opening tool to always keep the “pointy end” up when prying, especially about 40mm up the side, to avoid completely destroying the speaker diaphragms.
-
-
-
Inserta tu púa de apertura una vez más bajo el borde frontal de la caja inferior, cerca de uno de los dos agujeros centrales para tornillos.
-
Dale un giro firme a la púa para liberar el tercer clip que asegura la caja inferior al chasis.
-
Repite el paso anterior en el lado opuesto, deslizando la púa de apertura debajo de la minúscula y subiendo por el lado para liberar el segundo clip.
-
-
-
Tira de la caja inferior con firmeza hacia la parte delantera del MacBook (lejos de la zona de la bisagra) para separar el último de los clips que aseguran la caja inferior
-
Tira primero en una esquina, luego en la otra.
-
-
-
Remueve la caja inferior.
-
Colócalo en su lugar y alinea los clips deslizantes cerca de la bisagra de la pantalla. Presiona hacia abajo y desliza la cubierta hacia la bisagra. Debería dejar de deslizarse cuando los clips se enganchen.
-
Cuando los clips deslizantes están totalmente acoplados y la caja inferior parezca estar correctamente alineada, presiona firmemente sobre la caja inferior para acoplar los cuatro clips ocultos que hay debajo. Deberías sentir y oírlos encajar en su lugar.
-
-
-
-
Con cuidado, despega el gran trozo de cinta que cubre el conector de la batería, en el borde de la placa lógica más cercana a la batería.
-
Remueve la cinta.
-
-
-
Usa la punta de un spudger para levantar la pequeña lengüeta negra de cierre que asegura el cable en su conector.
Be very careful here. It is easy to break the whole connector off the battery board, which is what I did. Luckily the connector is part of the replacement battery, so you just need to remove the connector from the cable. The pictures here should provide more detail so you can see better what is going on.
thanks a lot !!!!! great help :)
-
-
-
Desconecta el cable de datos de la placa de la batería deslizándolo de su zócalo.
-
Deslízate en paralelo a la placa lógica, en la dirección del cable.
As simple as this step might seem, the golden leads will disapper the moment you remove it as it has some adhesive under the black strip that covers it. Ensure you peel it back enough to display the golden leads after swapping the batteries out.
Your battery may come with this ribbon cable. In that case, disconnect the other end.
-
-
-
Dobla el cable de datos de la placa de la batería a un lado y apártalo.
-
-
-
Utiliza un spudger para levantar suavemente el conector de alimentación de la batería, desconectando la batería.
-
Levanta el conector lo suficiente para que se mantenga separado de su enchufe. Si accidentalmente haces contacto durante el transcurso de la reparación, podrías dañar tu MacBook Pro.
To completely avoid accidental contacts I recommend to wrap this connector in a piece of paper and hold it in place with tape.
Do not put tape directly on the contact underside, as that may leave some glue that would affect the contact conductivity.
I put a piece of tape on the underside of the connector (sticky side up) to insure against accidental battery contact. If you put tape on the logic board side of the connection, some insulating padding material might accidentally stick to the tape when the tape is removed during reassembly.
-
-
-
Utiliza un destornillador Torx T3 para retirar los dos tornillos de 1.8 mm que fijan el soporte del conector del cable del panel táctil.
-
-
-
Usa un spudger para desconectar el cable plano del panel táctil levantando cuidadosamente su conector de la placa lógica.
-
-
-
Prepara un iOpener y colócalo sobre el cable plano del panel táctil durante un minuto aproximadamente, para suavizar el adhesivo que sujeta el cable plano del panel táctil a la parte superior de la batería.
-
Si no tienes un iOpener, usa un secador de pelo para calentar el cable. El cable debe estar caliente, pero no demasiado caliente para tocarlo. Ten cuidado de no sobrecalentar la batería.
-
-
-
Con cuidado, quita el cable del trackpad de la batería y empújalo para que no estorbe.
-
-
-
Usa un destornillador T5 Torx para remover los diez tornillos que sujetan el ensamblaje del panel táctil.
-
Dos tornillos de 4.3 mm
-
Ocho tornillos de 5.8 mm
Heating the wrist-pad area and carefully using a plastic card to separate the adhesive allowed me to remove the battery without needing to use the solvent or removing the track-pad. No need for taping the speakers.
I attempted as well the shortcut with no solvent and no track-pad removal. Also, I didn't apply heating. Everything was totally fine yet a bit risky. In such conditions it is very hard not using the spudger flat tip to lift the battery packs. Well, I highly recommend NOT using the spudger on the two central packs. In fact, it would be extremely easy to destroy surface mounted components on the track-pad board which would be accessible through the metal frame holes under the packs (see pics along this guide). Plastic cards are always fine. Next time, I would probably avoid spudger and introduce floss as shown in Picture 34 below.
bc_ -
-
-
-
Remueve el ensamblaje del panel táctil.
-
Asegúrate de no perder las seis pequeñas arandelas (dos circulares y cuatro rectangulares) que se encuentran en la parte inferior del panel táctil.
Should include instruction to wedge thin paper one every side of the trackpad to keep it aligned during reinstallation. Without the wedges, the trackpad would come out misaligned, which might damage it from excessive friction. Kapton tape might also work, didn't try it though.
These instructions were standard for Unibody models in the past, don't know why it wasn't included here.
-


Compara la nueva parte de reemplazo con la parte original: es posible que tengas que transferir los componentes restantes o quitar los respaldos adhesivos de la nueva parte antes de instalarla.
Para volver a montar el dispositivo, sigue los pasos anteriores en orden inverso.
Lleva tus desechos electrónicos a un centro de reciclaje certificado.
¿La reparación no salió como planificaste? Intenta algunas soluciones de problemas básicos o consulta nuestra comunidad de respuestas para ayuda.
Cancelar: No complete esta guía.
4 personas más completaron esta guía.
Un agradecimiento especial a estos traductores:
100%


Estos traductores nos están ayudando a reparar el mundo! ¿Quieres contribuir?
Empezar a traducir ›

2 comentarios
How is the trackpad cable removed? is it simply adhesive or solder?
Is this step necessary? I can’t perform this step as I am attempting to repair water damage and need to remove logic board & most likely replace the battery.
Macrepair SF - Contestar
@mac_medic You definitely don’t want the power coming on while the board is wet. In your case, I think powering on the machine to disable Auto Boot would do more damage than it prevents. I agree, skip this step and be prepared to disconnect the battery quickly if the laptop automatically powers on. Good luck!
Jeff Suovanen -
Thats right! You don't want power running while working on your logic board.
Dan -
This did not work when running High Sierra.
Kyle B - Contestar
Tried this on a 2018 MBP 13” Touchbar (there’s no iFixit guide for this model yet). Need to replace a broken screen.
Luckily I managed to connect to an external screen (Cmd-Down Brightness to switch displays) and enter above command. Seems to work, but there’s another problem with this model - it powers up as soon as any key is pressed……. ffs <gnashes teeth>
Cool_Breeze - Contestar
I unscrew the battery first and wrap electrical tape over the logic board battery connector before attempting any repairs to the board. Haven’t had any problems yet and I’ve worked on about 10 of these models already. Also when you open the bottom case use a suction cup at the bottom and pull up then run a plastic spudger along the edges to disconnect the clips. Also only use a plastic spudger on the board. Saw a youtube video from a repair shop and he did not disconnect the power and used all metal tools during the entire process of removing the board. His last step was to disconnect the battery terminal.
Brian - Contestar
Is this step necessary if my mac can turn on? Battery fully dead(
Nursat b - Contestar
BEFORE YOU START: The included torx head stripped off before I was done (and you might need an additional T4) so stop now and go buy a good one. Also they fail to warn you above to get some blue threadlocker ahead of time.
Jason Sherron - Contestar
This command did not work for me and I read that sometime in later 2020 Apple stopped this command from working…any ideas on a work around?
Patrick Machacek - Contestar
Not able to do that with damaged screen
richardjgreen - Contestar
If you have a damaged screen you can still use a converter from thunderbolt (USB 3) to HDMI and plug your Macbook Pro to your TV as monitor display. Just make sure to chose the right Source (HDMI IN) in your TV. I did it and to make it work I unplug and plug again in my Macbook and so I could disable the Auto boot
Roberto Sanchez Bustos -
Hi. This does not work on 2018 13” MacBook Pro with Touch Bar. I did exactly this to disable auto boot. But when I check by using nvram -p it says: auto-boot true. Am I doing something incorrectly? I did everything step by step. Copied and pasted the sudo command, pressed enter and then entered my password. I have Big Sur 11.1 installed. Is there any other way since I need to replace the screen. Thank you. Adrian
Adrian Vizik - Contestar
Hi everyone. This is also a little pointless if you can’t see anything on the screen, and you don’t have a display adapter to USB C to display it. I agree with Brian about removing the back and disconnecting the battery cable before you even think about opening the lid of the MacBook. Applying the insulation tape is also a handy little tip that just makes sure there is no way to discharge from either the board or battery.
Roberto Enrieu - Contestar
running `nvram -p | grep 'AutoBoot'` in terminal verifies that it was accepted
result: `AutoBoot %00`
Marek Polák - Contestar
Running Big Sur 11.6.7 on a 2019 16" MBP, it's "auto-boot". So it's:
nvram -p | grep 'auto-boot'to display the current state, the default istrue- and then to change it,sudo nvram auto-boot=falsewhich turns it off.Ed Mechem -
This step is completely unnecessary if you follow the guide to disconnect the battery properly. Just put some tape between the battery and logic board connection to prevent it from accidentally touching and therefore powering on the laptop.
Grant Ormsby - Contestar
It took me a few tries to make this command work, as I was able to copy and paste the command into Terminal, but could not type in my laptop’s password. I finally typed my password into a text document, copied it (command C), and then pasted it into Terminal and it worked.
tommy404 - Contestar
I didn’t do this. Mine never auto-booted before I replaced the battery. Now it does.
hatuxka - Contestar
BEFORE YOU DO ANYTHING - CHECK THE BATTERY!
I-fixit sent me a bad battery, which I didn’t realize until it was already install. They sent me a new one, but I wasted hours uninstalling and reinstalled.
Get a volt meter and measure the voltage on the output of the battery pack. If it reads 0 V, SEND IT BACK. It should read over 2 V.
bcardanha - Contestar
I've just received my replacement battery and it reads 0,042V between the two main connectors. Do you think it's dead?
peter sussex -
When I did this from Terminal.app within Recovery Mode, the “sudo” was not recognized but I could invoke it without the sudo part. It seems to have been accepted when looking at “nvram -p”
johann beda - Contestar
When in Recovery Mode, you already have superuser powers. So you don't need to prefix commands with the sudo command to invoke them with root privileges; you already have them. Do a
pwd(print working directory) after opening Terminal in Recovery Mode, and you'll see that you're in the root user's directory.Ed Mechem -
I received the battery kit for my 2018 MacBook Pro and as per the above comment from bcardanha - Oct 12, 2021, I checked the voltage on the pads marked + and - . It was zero volts so I panicked a bit.
I sent a message on the iFixiT Facebook page and I got no reply. I finally found the customer service email for Ifixit Europe and sent them an email voicing my concern as I was not keen to work for couple of hours just to discover that the battery is faulty. I had an almost instant reply on the email (kudos to them) and they adviced me to go ahead and install the new battery as the voltage measured when battery is not connected is not relevant.
I took a leap of faith and after two hours… the new battery showed 50% charge and everything seems to be working just fine. I am happy it worked.
Mircea Comanici - Contestar
After removing the old battery and installing the new battery I powered up the MBP before screwing the bottom on. I discovered the my keyboard would not function. It took a few hours of investigation and frustration that I discovered the track pad power ribbon had become partially dislodged from the trackpad. I was able to see that this through the little machined slot where the battery sat. I had to remove the trackpad to reinsert the power ribbon back into the connector in the trackpad. after reassembling and reinstalling the battery etc the keyboard worked. Just food for thought if your run into the keyboard issue.
Ed Mease - Contestar
This should be the default. IMO I tell you to power on - not the lid.
G Sena - Contestar
Est ce que cela fonctionne sur un macbook pro 2017 sans touchbar ?
maël muzelet - Contestar
Bonjour Maël, oui, ce tutoriel concerne "les MacBook Pro 2016 (et plus récents) et les MacBook Retina 12" 2017 (et plus récents)"
Claire Miesch -
Excellent instructions. I was able to follow and install the new screen. I recommend that you get a good set of tools before you begin. I started with an inexpensive repair kit bought online. The Penta and torx bits failed. I bought an IFIXIT kit with quality bits and I was able to do everything I needed.
Tom Markham - Contestar
If you're not running an admin account the sudo command won't work (which honestly, you should not be running admin). Rather than logging in to your admin amount via the OS, in the terminal type "login [admin username]," then the password and you'll be able to do the sudo command as described above. Once you're complete, type "logout [admin username]" and you'll be good to go. Obviously replace [admin username] with whatever the account name for your admin user is.
arichard2401 - Contestar
For those unable to complete this step because the screen is too damaged I recommend leaving your macbook on until the battery dies.
Nicholas R Licato - Contestar
Just replaced my 2018 15" MBP battery. Running Sonoma.
I found no way to disable AutoBoot (The status can be checked in the Power section of system report).
Anyway, i left my battery completely drain before opening the MBP, and had no issues during the process.
Cédric Bontems - Contestar
After sending this command in terminal when I checked what happens if I now open the lid, instead the screen lit slightly up (still black) then a battery symbol showing the charging state showed up.
Now, after replacement of the battery, this is all I get to see.
No reset of NVRAM nor PRAM helped.
Currently the new battery charges (58% atm) and it feels like it‘s mocking me.
webrockers - Contestar
I suspected the keyboard or TouchID sensor wouldn’t work, so I went on and checked every connector.
I missed connecting the left TouchID sensor from step 31.
webrockers -