Introducción
El motor acciona el cabezal giratorio del cepillo de dientes. Si está dañado o desgastado por el uso, será necesario reemplazarlo. Algunos pasos de este procedimiento requieren conexiones para desoldar. Para obtener una revisión de las técnicas de soldadura, consulta esta How to Solder Guide.
Qué necesitas
-
-
Usa la estación de carga para quitar el pequeño tapón de plástico del extremo del cepillo de dientes insertando la estación de carga en el inserto del extremo y girándolo 90 grados en sentido contrario a las agujas del reloj.
-
-
-
Usa un spudger para aflojar las dos lengüetas de plástico al lado de la bobina de inducción que aseguran el ensamblaje interno al marco.
-
Empuja el cabezal giratorio para sacar el conjunto de la carcasa de plástico negro.
You need to release the induction coil’s plastic clips before you try to slide it out! This is a key missing step.
I agree with Matthew. You must insert a spudger and release the plastic clips while pressing down on the rotating head. I held the rotating head with a pair of pliars and then released the plastic clips and it popped right out.
i third that, this needs to be added ASAP, you have no chance of getting it out without unclicking those two latches that lock the inner assembly to the outer casing.
I'd recommend changing this to say where these tabs are. Basically, you insert the spudger between the left and right side plastic arms/tabs going to the coil assembly and the body. If you have light pressure applied to the head at the right time, you'll feel them move when you insert a spudger and put a tiny bit of leverage.
You can see these tabs most easily in step 7. The tab shown in the second photo doesn't really have anything to do with anything (maybe that's the ill-advised leverage method).
-
-
-
-
Desenvuelve los extremos de los cables de las clavijas de plástico blanco con un par de pinzas.
Unnecessary step for battery replacement! The electrode of the battery is solely the single solder point in the middle and the battery comes out just as well if you just leave the coil. If all you want is to replace the battery. just leave the coil, It’s fiddly and risky to break the wire and more work, only disadvantages. Good efforts!
I'm not doing this right now, but thank you!
Achtung dieser Schritt ist für den reinen Akkutausch unnötig und quasi falsch! Die Spule kann verbleiben, der Akku ist einzig die einzelne mittige Lötstelle!
-
-
-
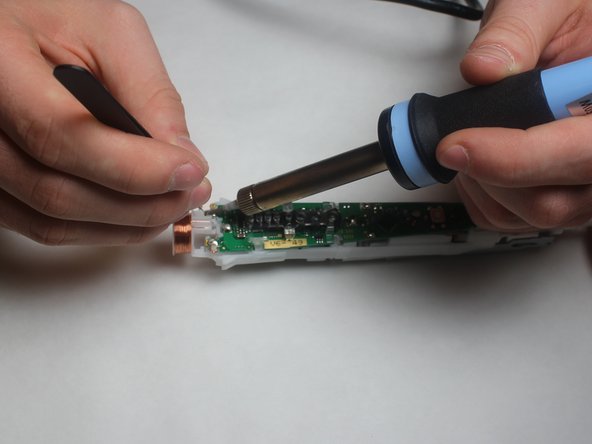
Desuelda los cables LED rojos de las almohadillas de soldadura cerca de la cabeza giratoria del dispositivo.
-
-
-
Usa un par de pinzas para quitar la carcasa de plástico y el LED del dispositivo.
-
-
-
Retira la carcasa del motor de la carcasa de plástico. Esto se puede lograr utilizando la espátula de nailon para sacar la carcasa del motor de las estructuras de soporte.
-
-
-
Desuelda los terminales del motor de la placa base y retirar el conjunto de motor.
-


Para volver a armar tu dispositivo, sigue estas instrucciones en orden inverso.
Para volver a armar tu dispositivo, sigue estas instrucciones en orden inverso.
Cancelar: No complete esta guía.
Una persona más ha completado esta guía.
Un agradecimiento especial a estos traductores:
100%

¡ Francisco Javier Saiz Esteban nos está ayudando a reparar el mundo! ¿Quieres contribuir?
Empezar a traducir ›
Equipo

IUPUI, Team S1-G1, Harley Fall 2017 Miembro de IUPUI, Team S1-G1, Harley Fall 2017
IUPUI-HARLEY-F17S1G1
3 Miembros
14 Guías creadas
4 comentarios
Hallo,
Super-Anleitung. Kannst Du verraten, was für einen Motor man zur Austausch benötigt?
Spannung, Leistung, Umdrehungen, Maße, etc.?
Und vielleicht eine Bezugsquelle.
Danke Dir,
Kai
Die Spule unten muss nicht ab! Woher bekommst du eine Ersatz motor? Im Internet findet man Nichts?!
Vielleicht bei diesem Verkäufer?
VauWeh -