Saltar al contenido principal

Reemplazo del CPU del iMac Intel 21.5" Retina 4K Display (2017)

Qué necesitas

  1. Reemplazo del CPU del iMac Intel 21.5" Retina 4K Display (2017), Montaje de la pantalla: paso 1, imagen 1 de 1
    • Con la bisagra libre para moverse, el iMac estará desequilibrado y será difícil de trabajar. Las reparaciones son rápidas y fáciles con una cuña iMac, pero se pueden completar sin una.

    • Si estás usando la cuña de servicio iFixit, sigue estas instrucciones de ensamble para armarlo.

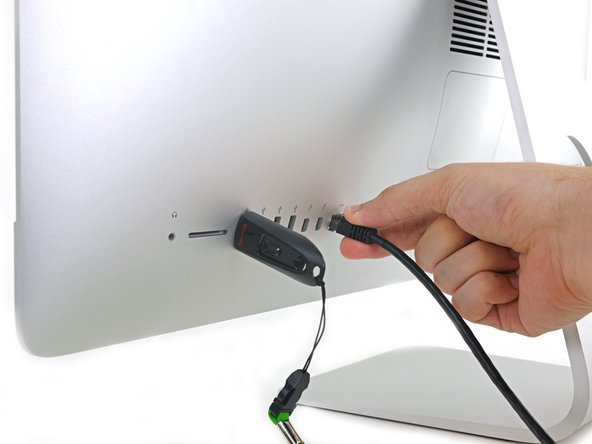
    • Antes de comenzar el trabajo en su iMac: Desenchufe la computadora y mantenga presionado el botón de encendido durante diez segundos para vaciar los condensadores de alimentación de energía.

    • Sea muy cuidadoso de no tocar los cables del condensador ni las juntas de soldadura expuestas en la parte posterior de la fuente de alimentación. Solo toque la tabla por los bordes.

    The wedge is an extremely tight fit for this model. I was worried that the amount of force needed to use it as shown might damage the stand, so I used it with the long side down instead. It worked fine that way and didn’t need anywhere near as much force to insert.

    roberttrevellyan - Contestar

    Here are a couple tips from me:

    1) Expose the adhesive to extreme temperatures. I did this by transporting my iMac in my car, screen-down on a piece of cardboard on a cold February morning (in Chicago). When I went to pick up the iMac, the screen practically fell off the chassis. I would have been distraught by this if I hadn’t already planned this replacement. So it was a happy accident.

    2) Remember to expell the residual power from the power supply by pushing the power button while the iMac is unplugged. This does NOT guarantee it’s safe to touch, but when I accidentally brushed the solder and exposed capacitors, I didn’t get shocked.

    jerrid_foiles - Contestar

    Instead of using the wedge, I placed the iMac faced up with the top side (web cam) facing me while I ran the pizza roller around. It worked out great!

    Sam Fung - Contestar

    “All iMacs also come with a traditional hard drive” mine doesn’t!! it’s HDD bay is completely empty, no SATA cable or anything. I guess I’ll have to upgrade the PCIe SSD instead.

    Chris Hughes - Contestar

    There is no replacement glass for this model, it is part of the LCD and impossible to remove or replace- the entire LCD has to be replaced unfortunately if the glass is cracked or damaged. You will have to Google search for a replacement. Also be careful with some of the lock tight tork screws as I broke one of my screw mounts taking one out.

    Phil Tesone - Contestar

    I used this service wedge but also found it a very tight fit. The same stabilization can be achieved by using a big rolled up towel.

    Ernst - Contestar

    While this is a good instruction guide, I recommend to also look at OWC’s instruction video about drive installation, before starting the exercise. Those install videos are very detailed and useful.

    Ernst - Contestar

    Main advice: TAKE YOUR TIME with the pizza roller.

    Make several passes, until you really feel like there's no more sticker in the way. Stay away from the camera though (approx. 1inch / 2.5cm on both sides). This will reduce the work left with the plastic card. Adhesive is really on the edge of the screen so there is absolutely no need to go any further than the recommended 1cm / 3/8inch depth.

    Where are the sensitive parts?

    Facing your iMac, imagine you're looking at a watch. There are antennas on 1, 2 and 4 o'clock. Do not insert any metal piece there (nor anywhere else, btw). Other than that AND the screen cables underneath the camera, not much danger.

    Froggy Manny - Contestar

  2. Reemplazo del CPU del iMac Intel 21.5" Retina 4K Display (2017): paso 2, imagen 1 de 2 Reemplazo del CPU del iMac Intel 21.5" Retina 4K Display (2017): paso 2, imagen 2 de 2
    • Comenzando a la izquierda de la pantalla, cerca del botón de encendido, inserte la herramienta de apertura iMac en el espacio entre el panel de vidrio y la carcasa trasera.

    • El centro de la herramienta de apertura iMac evitará que empuje demasiado la rueda. Si usa una herramienta diferente, inserte no más de 3/8 "en la pantalla. De lo contrario, corre el riesgo de cortar los cables de la antena y causar daños graves.

    Don’t get too worried about starting exactly where the picture says. The glue is stronger in some parts so just start wherever is easier and then work slowly and patiently around in the direction shown.

    Richard Cook - Contestar

    As this guide doesn’t cover replacing the adhesive strips, I found referring to the following was useful (noting that it’s not for the same model of iMac, so the modification they mention wasn’t necessary): Reemplazo de tiras adhesivas de la pantalla de iMac Intel 21.5"

    Alan Digby - Contestar

    It is very easy to crack the glass in front of the LCD during this step. I used the guitar pick, maybe it was too thick… crack is just on the frame but anyway it is disappointing :(

    Nikolay - Contestar

    This part of the exercise should be done with extreme patience. I took my sweet time with the opening tool, rolling it through the entire panel and enclosure gap over and over again, until I was very sure no parts were sticking together anymore. And when I thought I was I done, I decided to do it over again.

    Ernst - Contestar

    You can "warm up" the adhesive before try to cut it with the tool using a hair dryer. Heat the edges for about a minute, keep moving it so you don't cause stress in the glass. Also the above note.. use the tool and then the cards. Do not use a guitar pick or other objects as the thickness will cause you to break the front glass, which is a bonded part of the display (expensive).

    Carl Schultz - Contestar

    Merci pour ce conseil

    bry nicolas -

  3. Reemplazo del CPU del iMac Intel 21.5" Retina 4K Display (2017): paso 3, imagen 1 de 3 Reemplazo del CPU del iMac Intel 21.5" Retina 4K Display (2017): paso 3, imagen 2 de 3 Reemplazo del CPU del iMac Intel 21.5" Retina 4K Display (2017): paso 3, imagen 3 de 3
    • Use la herramienta parecido a un cortador de pizza: gírelo a lo largo de la abertura para cortar el adhesivo de espuma por el centro.

    • Asegúrese de empujar siempre con la manija detrás de la rueda de corte. Si tira, la rueda podría salirse del mango.

    • Mueva la herramienta hacia arriba a lo largo del lado izquierdo de la pantalla.

    Erreur de traduction: "de bas en haut" et non de" haut en bas" sur le côté gauche de l'écran

    Moreau - Contestar

    If re-opening a screen that was opened and re-attached using iFixit’s adhesive strips, I would strongly recommend heating it first with an iOpener, heat gun or hair dryer. 20 minutes after attaching with the iFixit adhesive I tried to open it again with the pizza slicer to fix something and cracked the screen on the left-hand side.

    plasticpool - Contestar

  4. Reemplazo del CPU del iMac Intel 21.5" Retina 4K Display (2017): paso 4, imagen 1 de 3 Reemplazo del CPU del iMac Intel 21.5" Retina 4K Display (2017): paso 4, imagen 2 de 3 Reemplazo del CPU del iMac Intel 21.5" Retina 4K Display (2017): paso 4, imagen 3 de 3
    • Siga moviendo la herramienta hacia arriba alrededor de la esquina superior izquierda

    Ne pincez pas l’écran avec l’autre main. Vous exercez une pression inutile sur le verre et empêchez la roulette de couper le joint.

    phfoglia - Contestar

  5. Reemplazo del CPU del iMac Intel 21.5" Retina 4K Display (2017): paso 5, imagen 1 de 2 Reemplazo del CPU del iMac Intel 21.5" Retina 4K Display (2017): paso 5, imagen 2 de 2
    • Corte el adhesivo a lo largo de la esquina superior izquierda de la pantalla.

  6. Reemplazo del CPU del iMac Intel 21.5" Retina 4K Display (2017): paso 6, imagen 1 de 2 Reemplazo del CPU del iMac Intel 21.5" Retina 4K Display (2017): paso 6, imagen 2 de 2
    • Continúa por la parte superior de la pantalla.

    • Es posible que desee mover la herramienta hacia adelante y hacia atrás a través de lo que ya ha cortado varias veces, para asegurarse de retirar la mayor cantidad de adhesivo como sea posible.

    In this step can I cut along the display without make any damage to the front camera?

    arisnordico - Contestar

    Hi! Actually - there is no need to cut the tape around the camera area - there is no tape to cut at all! And so, the way go is easy - just pass 10 mm to the left and to the right from camera and start cutting!

    P.S. Just did the whole procedure to replace a RAM and to add SSD on PSIe an hour ago! Seems to be different reading the instructions... you know - 2/10 and so on. But it's really not that hard, trust me. I'll give it 5/10.

    P.P.S. By the way there is one trick to pass the difficult steps. Any action which requires pulling smth (motherboard, speaker, power supply unit) from the narrow crack (or should i say - slit?) at the bottom of your Imac is really not so easy.

    And the trick is to first remove a thin metal stripe with some kind of insulation on it which held by 5 small (very small!!) screws at the bottom of your Imac. After you done it - it's easy to pull everything! Pay attention to the fact that one of this 5 screws at the center are more shortly than others.

    dv1977 - Contestar

    I did all steps like this manuell but now the Display wont work only some colered strips are to see! Whats happend??

    Can anybody help me ? Maybe the connector cable is broken?

    djfanta - Contestar

    Check both connectors, probably one of them not seated well

    pzhivulin -

    You can add a SATA SSD if you already have a PCIe SSD Factory?

    kaserlik - Contestar

    If you're changing cracked EMC 2638 display to new assembly, there's two more steps:

    Step 24: Use the tip of a spudger to flip up the metal retaining bracket on the display data cable.

    Carefully pull the display data cable from its socket on the display assembly.

    Step 25: Use the tip of a spudger to unplug bracket of the thermal sensor small cable near display data cable.

    Carefully remove scotch tape covering thermal sensor. Using iSesamo or flat tip of the spudger carefully peel the thermal sensor away.

    pzhivulin - Contestar

    omg - forgot to switch the termal sensor from the old display...

    now fan runs like crazy...

    Andrei Balotescu -

    The key thing is to never put any force on the opening tool when working through the tape. Just roll it back and forth with ease.

    Ernst - Contestar

  7. Reemplazo del CPU del iMac Intel 21.5" Retina 4K Display (2017): paso 7, imagen 1 de 3 Reemplazo del CPU del iMac Intel 21.5" Retina 4K Display (2017): paso 7, imagen 2 de 3 Reemplazo del CPU del iMac Intel 21.5" Retina 4K Display (2017): paso 7, imagen 3 de 3
    • Empuje la herramienta alrededor de la esquina superior derecha de la pantalla.

  8. Reemplazo del CPU del iMac Intel 21.5" Retina 4K Display (2017): paso 8, imagen 1 de 2 Reemplazo del CPU del iMac Intel 21.5" Retina 4K Display (2017): paso 8, imagen 2 de 2
    • Mueva la herramienta hacia abajo a lo largo del lado derecho de la pantalla.

  9. Reemplazo del CPU del iMac Intel 21.5" Retina 4K Display (2017): paso 9, imagen 1 de 2 Reemplazo del CPU del iMac Intel 21.5" Retina 4K Display (2017): paso 9, imagen 2 de 2
    • Finalice empujando la herramienta de apertura hacia la parte inferior del lado derecho de la pantalla.

    • En este punto, se recomienda volver a pasar la herramienta en toda la pantalla para asegurarse de cortar la mayor cantidad de adhesivo posible.

    Yes, do it many times to loosen the adhesive.

    Noah Ralston - Contestar

    Would be good data to show the 3 areas (wifi antennas where the "tape" is larger and covers them. The rest of the "tape" is 1.4" and easy. Also after removing the display, be sure to remove the old "tape" from both the display and the rubber parts of the case. Use the spudger to start an end and it should pull off easily. Careful on the baackside of the display as you can scratch off the black paint/covering.

    Carl Schultz - Contestar

  10. Reemplazo del CPU del iMac Intel 21.5" Retina 4K Display (2017): paso 10, imagen 1 de 3 Reemplazo del CPU del iMac Intel 21.5" Retina 4K Display (2017): paso 10, imagen 2 de 3 Reemplazo del CPU del iMac Intel 21.5" Retina 4K Display (2017): paso 10, imagen 3 de 3
    • Mientras que la herramienta de apertura corta la mayor parte del adhesivo, la pantalla aún estará ligeramente adherida a la caja. Se necesitará una tarjeta de plástico para liberar el último adhesivo.

    • Coloque el iMac boca arriba en una mesa.

    • Comenzando desde la esquina superior derecha del iMac, coloque una tarjeta de plástico entre la pantalla y el marco.

    • Tenga cuidado de NO insertar la tarjeta de plástico más de 3/8 ", o puede dañar los componentes internos.

    this step is extremely important NOT to stick in the cards too far….. doing so, you risk a 600 euro replacement as I experienced………

    Edgar Broekema - Contestar

    I drew a 3/8” line on my cards with a marker first.

    Max Romano - Contestar

    I’m reading this on the EU store, please change all measurements to cm/mm.

    Morgana Devina - Contestar

    @ifixit The next batch of cards you create should have a line printed on the card 3/8” in from the edges. Would make a nice reference.

    Richard Giratd - Contestar

    Here’s where OWC provides glass removal suction cups, which is a better solution than plastic cards.

    The suction cups help to easily lift the glass panel, without risking the damaging of any internal wiring that the plastic cards could cause.

    Ernst - Contestar

    Better to remove stand wedge at this point? Can’t see from pics

    derekrobinson - Contestar

  11. Reemplazo del CPU del iMac Intel 21.5" Retina 4K Display (2017): paso 11, imagen 1 de 2 Reemplazo del CPU del iMac Intel 21.5" Retina 4K Display (2017): paso 11, imagen 2 de 2
    • Gire suavemente la tarjeta de plástico hacia los lados para crear un espacio entre la pantalla y el marco.

    • Muévase despacio y tenga cuidado de no estresar demasiado el cristal de la pantalla; solo necesita hacer un espacio de aproximadamente 1/4 ".

    This part must be done very carefully or you can damage the flat cable from display, despite it was under a iron cover.

    Cassio Machado - Contestar

  12. Reemplazo del CPU del iMac Intel 21.5" Retina 4K Display (2017): paso 12, imagen 1 de 3 Reemplazo del CPU del iMac Intel 21.5" Retina 4K Display (2017): paso 12, imagen 2 de 3 Reemplazo del CPU del iMac Intel 21.5" Retina 4K Display (2017): paso 12, imagen 3 de 3
    • Deslice la tarjeta hacia el centro de la pantalla para cortar el resto del adhesivo a lo largo de la esquina superior derecha del iMac.

    • Asegúrese de detenerse antes de la cámara iSight, o puede dañarla.

    You don't need to do it like this, simply open the iMac bendidng the LCD completely and use the pizza cutter to remove the adhesive.

    Felix - Contestar

    Using glass removal suction cups will avoid running this risk of damaging the camera (or any wiring).

    Ernst - Contestar

  13. Reemplazo del CPU del iMac Intel 21.5" Retina 4K Display (2017): paso 13, imagen 1 de 2 Reemplazo del CPU del iMac Intel 21.5" Retina 4K Display (2017): paso 13, imagen 2 de 2
    • Vuelva a acuñar la tarjeta de plástico en la esquina superior derecha y déjela allí para evitar que el adhesivo se mueva.

  14. Reemplazo del CPU del iMac Intel 21.5" Retina 4K Display (2017): paso 14, imagen 1 de 3 Reemplazo del CPU del iMac Intel 21.5" Retina 4K Display (2017): paso 14, imagen 2 de 3 Reemplazo del CPU del iMac Intel 21.5" Retina 4K Display (2017): paso 14, imagen 3 de 3
    • Inserta una segunda tarjeta de plástico en el espacio entre la pantalla y el marco cerca de la esquina superior izquierda del iMac.

  15. Reemplazo del CPU del iMac Intel 21.5" Retina 4K Display (2017): paso 15, imagen 1 de 2 Reemplazo del CPU del iMac Intel 21.5" Retina 4K Display (2017): paso 15, imagen 2 de 2
    • Gire suavemente la tarjeta hacia arriba, aumentando ligeramente el espacio entre la pantalla y el marco.

    • Al igual que con el otro lado, gírelo lentamente para permitir que el tiempo del adhesivo se separe, y tenga cuidado de no sobre tensar el vidrio de la pantalla.

  16. Reemplazo del CPU del iMac Intel 21.5" Retina 4K Display (2017): paso 16, imagen 1 de 3 Reemplazo del CPU del iMac Intel 21.5" Retina 4K Display (2017): paso 16, imagen 2 de 3 Reemplazo del CPU del iMac Intel 21.5" Retina 4K Display (2017): paso 16, imagen 3 de 3
    • Deslice la tarjeta de plástico hacia el centro, deteniéndose de nuevo justo antes de la cámara iSight.

  17. Reemplazo del CPU del iMac Intel 21.5" Retina 4K Display (2017): paso 17, imagen 1 de 2 Reemplazo del CPU del iMac Intel 21.5" Retina 4K Display (2017): paso 17, imagen 2 de 2
    • Cuña la tarjeta de plástico en la esquina superior izquierda.

  18. Reemplazo del CPU del iMac Intel 21.5" Retina 4K Display (2017): paso 18, imagen 1 de 3 Reemplazo del CPU del iMac Intel 21.5" Retina 4K Display (2017): paso 18, imagen 2 de 3 Reemplazo del CPU del iMac Intel 21.5" Retina 4K Display (2017): paso 18, imagen 3 de 3
    • Con ambas tarjetas de plástico insertadas como se muestra cerca de las esquinas, gire suavemente las tarjetas hacia los lados para aumentar el espacio entre la pantalla y la carcasa.

    • Si hay secciones que parecen adherirse y no se separan, deje de girar y use una de las tarjetas para cortar el adhesivo restante.

    • Comience a levantar la parte superior de la pantalla desde el marco.

    • Solo levante la pantalla unas pulgadas: los datos de la pantalla y los cables de alimentación todavía están conectados a la placa lógica.

  19. Reemplazo del CPU del iMac Intel 21.5" Retina 4K Display (2017), Cables del módulo de la pantalla: paso 19, imagen 1 de 2 Reemplazo del CPU del iMac Intel 21.5" Retina 4K Display (2017), Cables del módulo de la pantalla: paso 19, imagen 2 de 2
    • Levanta la pantalla lo suficiente para tener un acceso fácil al conector, pero no demasiado, ya que estirarías los cables y forzarías sus conexiones (levántalo menos de 20 cm.)

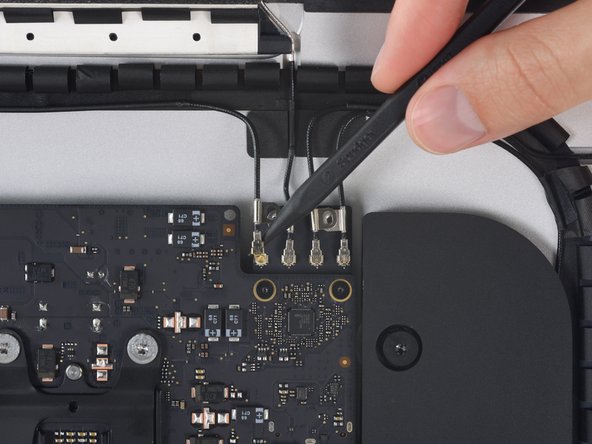
    • Sostén la pantalla con una mano, mientras usas la otra para desconectar el cable de energía de la pantalla.

    It was difficult to remove this connection. I ended up having to gently pull-up vertically a little on the wire side to unsnap it about 1mm and then horizontally wiggle it out.

    delacrj2 - Contestar

    I had a difficult time removing this connection. I had to lift the wire-side about 1mm before it unsnapped and then carefully wiggle it out horizontally.

    delacrj2 - Contestar

    Can this cable be replaced? I am worried mine is damaged. I have no display after the screen fell and stressed the display flex cables following an SSD upgrade.

    Jeremy Brainard - Contestar

    This step should be done with extreme caution and care, as this step 19 is not described in great detail (sorry, author).

    The first (most outward) cable will slide out by gently pulling it by its tabs. The second (inner) cable is more tricky, as the locking lever must be moved backward first, before gently pulling backward on the cable connector. The angled tweezers are useful here, to help lift that locking lever, because fingers are too big for this.

    Ernst - Contestar

    be VERY careful and SLOW...take your time. These displays crack VERY easily when removing and they'll spider web on you. I've done probably 20 or so of these and cracked 3 being super careful.....ugh.

    Faslane - Contestar

    I found the best way to unplug this display power cable was to use my right hand, and the fingernails of my index finger and thumb to grab the ends of the tabs on either side of the connector, squeeze, and pull the connector out gently.

    Phil McInnis - Contestar

    i think the cable nearest the case edge is held in by friction and can be gently pulled, maybe with fingernails or a spudger. The next cable is held by a wire lever clip as described above it unlocks so the cable can be removed. These cables are also fiddly to re-insert, I didn't get one of them home and had no display after power-up, so at the end, don't re-seal the screen until tested.

    Peter Taffs - Contestar

  20. Reemplazo del CPU del iMac Intel 21.5" Retina 4K Display (2017): paso 20, imagen 1 de 3 Reemplazo del CPU del iMac Intel 21.5" Retina 4K Display (2017): paso 20, imagen 2 de 3 Reemplazo del CPU del iMac Intel 21.5" Retina 4K Display (2017): paso 20, imagen 3 de 3
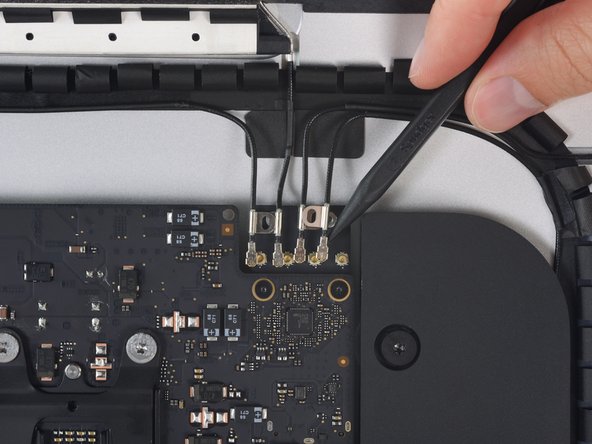
    • Continúa sosteniendo la pantalla con una mano, mientras muevas hacia arriba el soporte de metal en el cable de datos de la pantalla.

    • Con cuidado tira el cable de datos de su zócalo en la placa lógica.

    • Asegúrate de quitar el conector del cable hacia arriba, manteniéndolo paralelo a la placa base, para evitar dañarlo.

    Cannot seem to find a replacement cable for this, as I suspect mine is damaged. Can’t even find a part number. Anyone know what it might be?

    Jeremy Brainard - Contestar

    https://www.amazon.com/gp/product/B08TTL...

    That's the part I ordered for mine and it seems to work ok. I did make a point of contacting the seller and advising them of my requirement and they ensured I got the right part and it matches the description of the link. Bear in mind I bear no responsibility if yours does not work since I am just sharing what I did and what I ordered. Thanks.

    Jim Stanford -

    I also need that cable.

    cameronjpu - Contestar

    It's a little difficult to tell... but looking at the connection to the logic board on the video data cable, are the pins faced up or down?

    On the display, same question since it appears you have to "twist" the cable during the reconnection step.

    Jim Stanford - Contestar

    For this particular cable, take a good look before pulling on anything. Plug is locked on its socket with a bracket. You can lift this bracket by holding the small, flat black plastic handle that is attached to it. If you're struggling to grab it, use the end of the pizza roller handle to lift it, or the tweezers. Cable then comes off by pulling parallel to the main board.

    Froggy Manny - Contestar

    How can I tell if either of this cable is bad? My iMac display won't turn on after reconnecting it. I'm using an external display and everything is working except for the iMac display. If I go to settings - display the built-in display is recognize. But again nothing shows up in the screen - not even the apple logo when turning it on.

    Carlos Sosa - Contestar

  21. Reemplazo del CPU del iMac Intel 21.5" Retina 4K Display (2017), Separación del conjunto de pantalla: paso 21, imagen 1 de 2 Reemplazo del CPU del iMac Intel 21.5" Retina 4K Display (2017), Separación del conjunto de pantalla: paso 21, imagen 2 de 2
    • Levanta la pantalla en una posición casi vertical.

    • En este punto todavía hay una tira adhesiva en la parte inferior de la pantalla que mantendrá la pantalla al marco como una bisagra. Puedes deshacerte de él subiendo y bajando la pantalla varias veces.

    The best way to remove the chin adhesive is to use the tabs at either end (there are two strips that run from each outside corner to near the centre). Carefully pull the tabs up and the strips should peel off.

    Advance Technical Service - Contestar

  22. Reemplazo del CPU del iMac Intel 21.5" Retina 4K Display (2017): paso 22, imagen 1 de 3 Reemplazo del CPU del iMac Intel 21.5" Retina 4K Display (2017): paso 22, imagen 2 de 3 Reemplazo del CPU del iMac Intel 21.5" Retina 4K Display (2017): paso 22, imagen 3 de 3
    • Tenga cuidado y no toque ningun capacitor o alguna soldadura expuesta en la parte trasera de la fuente de energía (caja roja)

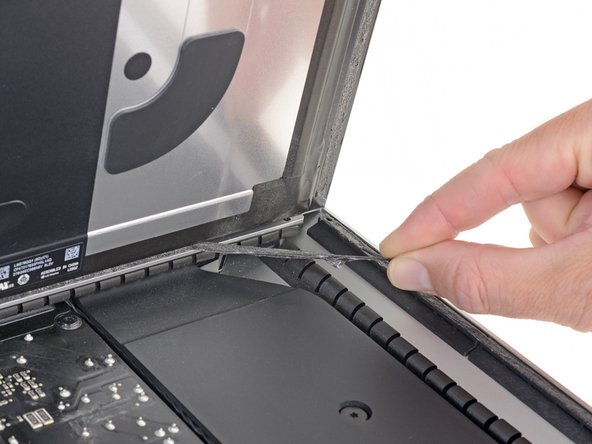
    • Agarre la pequeña pestaña en el final de uno de las tiras adhesivas de la pantalla del abajo y tire el adhesivo hacia el tope de la iMac para quitarlo

    • Repita este paso con la otra tira adhesiva y retirelo.

    • Si tanto la tira adhesiva se rompe antes de se quite, use una tarjeta plástica para cortar el adhesivo restante.

    At step 21-22, releasing the adhesive strips from the bottom of the display, I noticed a tab on the outer end of each strip. Pull the tab to remove the whole strip, no need to mess around with the plastic cards!

    roberttrevellyan - Contestar

    Instead of the plastic cards, use the flat end of a spudger. Use it as scraper. Be careful as there are antennas mounted on the inside edge of the frame on the right side (facing you), and the top right (facing you). The original adhesive strips are on those as well. - ECJ

    ECJohansen - Contestar

    A little bit of hot air (eg. hair dryer) will help soften the adhesive. Use a piece of cardboard or equivalent if you want to avoid blowing hot air towards the electronics.

    Be careful to remove absolutely everything - any remainder will create a bump and prevent your screen from sticking back to the frame when reassembling.

    Froggy Manny - Contestar

  23. Reemplazo del CPU del iMac Intel 21.5" Retina 4K Display (2017): paso 23, imagen 1 de 3 Reemplazo del CPU del iMac Intel 21.5" Retina 4K Display (2017): paso 23, imagen 2 de 3 Reemplazo del CPU del iMac Intel 21.5" Retina 4K Display (2017): paso 23, imagen 3 de 3
    • Levanta la pantalla hacia arriba del marco y quítala del iMac.

    • Podría ser necesario levantarla lentamente de un lado para pelar el adhesivo restante.

    • Ten cuidado manejando la pantalla; es grande, pesada, y está hecha de vidrio.

    • Después de que el pegamento es cortado, no se puede volver a usar para colocar la pantalla en su lugar. Sigue esta guía para reemplazar las tiras adhesivas que aseguran la pantalla al marco.

    Après l'étape 23, j'ai suivi les instructions de la vidéo intitulée: Upgrade RAM in a mid-2017 21-inch iMac without complete disassembly.

    Lien: https://www.youtube.com/watch?v=_k9I7N9B...

    J'ai pu upgrader la RAM en enlevant juste le ventilateur.

    Koala - Contestar

  24. Reemplazo del CPU del iMac Intel 21.5" Retina 4K Display (2017), Ménsula de soporte inferior: paso 24, imagen 1 de 2 Reemplazo del CPU del iMac Intel 21.5" Retina 4K Display (2017), Ménsula de soporte inferior: paso 24, imagen 2 de 2
    • Retira los siguientes cinco tornillos Phillips que sujetan el soporte de soporte inferior en su lugar:

    • Cuatro tornillos de 3.2 mm

    • Un tornillo de 1.7 mm

    • Es posible que debas despegar el adhesivo de la pantalla que recubre el borde inferior de la carcasa del iMac para acceder a los tornillos.

    I would recommend that those trying this have the project tray to contain all of the screws.

    Mikkif - Contestar

    2 notes for reassembly, carful with screws not to strip the heads as they are really really small, make note to cut a gap in the the adhesive over the whole for the microphone.

    I managed to strip the head of one of the screws when putting it back in. So be carful with them when putting in / taking out. If you strip it on the way out you will need to take a fine drill and rill it out. Going back in, well as long as you never need to strip it down again not a problem.

    The second problem is a real pain, you need to make sure to cut a gap in the adhesive just to the right of Center at the button to allow for the microphone opening. If you don’t, the adhesive tape will stop any real pick up on the Mic, so you just need to cut a small gap in it before putting on the screen. Unfortunately I didn’t find this out (or do my checked before sticking it all back down, so have to pull screen back off and reapply new adhesive with a cut out in it at an other time.

    Andrew Taylor - Contestar

  25. Reemplazo del CPU del iMac Intel 21.5" Retina 4K Display (2017): paso 25, imagen 1 de 1
    • Retira el soporte de soporte inferior (también conocido como "correa para la barbilla") de la carcasa del iMac.

    Keep this long, aluminium part very straight when pulling it away or you might bend it

    Froggy Manny - Contestar

    que pasa si no coloca esta pieza?

    CARLOS - Contestar

  26. Reemplazo del CPU del iMac Intel 21.5" Retina 4K Display (2017), Soportes del disco duro: paso 26, imagen 1 de 1
    • Retira los siguientes tornillos Torx T10 que aseguran los soportes del disco duro al iMac:

    • Dos tornillos de 21 mm.

    • Un tornillo de 9 mm.

    • Un tornillo de 27 mm.

    At step 26, when reassembling, it's super easy to over-tighten the 9mm screw and strip the brass ferrule out of its hole in the plastic bracket (%#*@).

    roberttrevellyan - Contestar

    Mine has 4 different length screws, the two red colored 21mm screws in this guide are actually two differ lengths

    anonymous 523 - Contestar

    Mi imac does not have a HDrive whats the steps to follow?

    Charlie - Contestar

    buongiorno, l'imac del 2019, non monta alcuna ssd, ma monta una m2 direttamente sulla scheda madre!

    pertanto nella guida andrebbe aggiunto il cavo sata con sensore temperatura da aggiungere sulla scheda madre, per poter collegare un nuovo hd ssd altrimenti rimarrete come me bloccati con un imac aperto e non assemblato, in attesa di ricevere il cavo acquistato su internet da amazon o terze parti.

    vi consiglio inoltre di aggiungere una foto reale del ò'imac 2019 nella guida in cui manca l'ssd, renderà subito la problematica che avranno in molti!

    Donato Altomare - Contestar

    Hi, mine doesn’t HAVE an HD/SSD to remove, the bay is empty (yes it was fully working yesterday. So what do we do ? I see someone else with the sane issue above….

    Jeroen Speak - Contestar

  27. Reemplazo del CPU del iMac Intel 21.5" Retina 4K Display (2017): paso 27, imagen 1 de 2 Reemplazo del CPU del iMac Intel 21.5" Retina 4K Display (2017): paso 27, imagen 2 de 2
    • Retira los soportes izquierdo y derecho del disco duro del iMac.

  28. Reemplazo del CPU del iMac Intel 21.5" Retina 4K Display (2017), Fuente de energía: paso 28, imagen 1 de 3 Reemplazo del CPU del iMac Intel 21.5" Retina 4K Display (2017), Fuente de energía: paso 28, imagen 2 de 3 Reemplazo del CPU del iMac Intel 21.5" Retina 4K Display (2017), Fuente de energía: paso 28, imagen 3 de 3
    • Los siguientes pasos llevan tus manos cerca de la cara expuesta de la fuente de energía. No toques la cara de la fuente de energía o alguna de las soldaduras expuestas. Tocarlas supone el riesgo de recibir una descarga de alto voltaje de alguno de los capacitores de gran tamaño soldados a la placa.

    • Usa la punta de un spudger para presionar cada lado del conector del cable del botón de encendido para que camine lentamente fuera de su zócalo.

  29. Reemplazo del CPU del iMac Intel 21.5" Retina 4K Display (2017): paso 29, imagen 1 de 2 Reemplazo del CPU del iMac Intel 21.5" Retina 4K Display (2017): paso 29, imagen 2 de 2
    • Usa la punta de un spudger para presionar cada lado del conector del cable de control de la fuente de energía y que camine fuera de su zócalo.

  30. Reemplazo del CPU del iMac Intel 21.5" Retina 4K Display (2017): paso 30, imagen 1 de 1
    • Remueve los dos tornillos Torx T8 de 7.2 mm que aseguran la fuente de energía a la carcasa posterior.

  31. Reemplazo del CPU del iMac Intel 21.5" Retina 4K Display (2017): paso 31, imagen 1 de 2 Reemplazo del CPU del iMac Intel 21.5" Retina 4K Display (2017): paso 31, imagen 2 de 2
    • Cuando trabajes en la fuente de energía, ten mucho cuidado de no tocar los pines del capacitor o cualquier soldadura expuesta en la parte trasera de la fuente de energía. Sólo maneja la placa por los bordes.

    • Inclina la fuente de energía hacia adelante.

  32. Reemplazo del CPU del iMac Intel 21.5" Retina 4K Display (2017): paso 32, imagen 1 de 3 Reemplazo del CPU del iMac Intel 21.5" Retina 4K Display (2017): paso 32, imagen 2 de 3 Reemplazo del CPU del iMac Intel 21.5" Retina 4K Display (2017): paso 32, imagen 3 de 3
    • Tira de la fuente de energía ligeramente hacia arriba y fuera de la carcasa posterior.

    • Rota la fuente de energía en sentido contrario a las agujas del reloj, levantando el lado derecho aproximadamente una pulgada (2.5 cm) más alto que el izquierdo.

  33. Reemplazo del CPU del iMac Intel 21.5" Retina 4K Display (2017): paso 33, imagen 1 de 2 Reemplazo del CPU del iMac Intel 21.5" Retina 4K Display (2017): paso 33, imagen 2 de 2
    • Desliza la fuente de energía a la derecha para liberar los postes de los tornillos en la carcasa posterior.

  34. Reemplazo del CPU del iMac Intel 21.5" Retina 4K Display (2017): paso 34, imagen 1 de 3 Reemplazo del CPU del iMac Intel 21.5" Retina 4K Display (2017): paso 34, imagen 2 de 3 Reemplazo del CPU del iMac Intel 21.5" Retina 4K Display (2017): paso 34, imagen 3 de 3
    • Mece la fuente de energía hacia adelante y quítala de su hueco en la carcasa posterior.

    • No intentes remover completamente la fuente de energía del iMac aún; sigue conectada a la placa lógica.

  35. Reemplazo del CPU del iMac Intel 21.5" Retina 4K Display (2017): paso 35, imagen 1 de 3 Reemplazo del CPU del iMac Intel 21.5" Retina 4K Display (2017): paso 35, imagen 2 de 3 Reemplazo del CPU del iMac Intel 21.5" Retina 4K Display (2017): paso 35, imagen 3 de 3
    • Ten mucho cuidado de no tocar los pines de los capacitores o cualquier soldadura expuesta en la parte trasera de la fuente de energía. Sólo maneja la placa por los bordes.

    • No dejes que ninguna de las soldaduras expuestas entren en contacto con una superficie metálica, pueden causar un cortocircuito.

    • Voltea la fuente de energía para acceder a la conexión del cable de corriente directa (CD) detrás de la placa lógica.

    • Para desconectar el cable, presiona el clip de liberación en el lado trasero del conector, detrás de la placa lógica, y tira del conector hacia afuera.

  36. Reemplazo del CPU del iMac Intel 21.5" Retina 4K Display (2017): paso 36, imagen 1 de 3 Reemplazo del CPU del iMac Intel 21.5" Retina 4K Display (2017): paso 36, imagen 2 de 3 Reemplazo del CPU del iMac Intel 21.5" Retina 4K Display (2017): paso 36, imagen 3 de 3
    • Puede que encuentres de ayuda apoyar el iMac sobre su parte trasera para el siguiente par de pasos.

    • Usa la punta plana de un spudger para presionar el clip de liberación en el lado del conector del cable de entrada de corriente alterna (CA) hacia adentro.

    • Mientras presionas el clip de liberación con el spudger, agarra el cable de entrada de CA, y tira el conector fuera de su zócalo.

    I didn't bother to remover the power supply lead in this stage but simply flippedthe circuit board over onto the lower body of the iMac (NOT placing it directly onto the metal but onto a sheet of plastic)

    Fettler - Contestar

  37. Reemplazo del CPU del iMac Intel 21.5" Retina 4K Display (2017): paso 37, imagen 1 de 1
    • Remueve la fuente de energía del iMac.

  38. Reemplazo del CPU del iMac Intel 21.5" Retina 4K Display (2017), Ventilador: paso 38, imagen 1 de 2 Reemplazo del CPU del iMac Intel 21.5" Retina 4K Display (2017), Ventilador: paso 38, imagen 2 de 2
    • Con delicadeza tira del conector del cable del ventilador fuera de su zócalo en la placa lógica.

  39. Reemplazo del CPU del iMac Intel 21.5" Retina 4K Display (2017): paso 39, imagen 1 de 1
    • Remueve los tres tornillos Torx T10 de 10 mm que aseguran el ventilador a la carcasa posterior.

    • El tornillo que está arriba tiene un soporte de goma adherido a su cabeza para apoyar la pantalla; déjalo en su lugar.

  40. Reemplazo del CPU del iMac Intel 21.5" Retina 4K Display (2017): paso 40, imagen 1 de 2 Reemplazo del CPU del iMac Intel 21.5" Retina 4K Display (2017): paso 40, imagen 2 de 2
    • Remueve el ventilador del iMac.

  41. Reemplazo del CPU del iMac Intel 21.5" Retina 4K Display (2017), Conjunto del Disco duro: paso 41, imagen 1 de 3 Reemplazo del CPU del iMac Intel 21.5" Retina 4K Display (2017), Conjunto del Disco duro: paso 41, imagen 2 de 3 Reemplazo del CPU del iMac Intel 21.5" Retina 4K Display (2017), Conjunto del Disco duro: paso 41, imagen 3 de 3
    • Levanta el disco duro desde el borde más cercano a la placa lógica y extraelo un poco del hueco.

    • El disco duro está conectado por un solo cable de alimentación / datos SATA; no intentes extraerlo completamente del iMac todavía.

    The newer drives have rubber ends and an adhesive side, be careful removing them if replacing the drive and be sure they are securely pushed back into the holder

    Carl Schultz - Contestar

  42. Reemplazo del CPU del iMac Intel 21.5" Retina 4K Display (2017): paso 42, imagen 1 de 2 Reemplazo del CPU del iMac Intel 21.5" Retina 4K Display (2017): paso 42, imagen 2 de 2
    • Usa un spudger para desconectar el único cable combinado de alimentación y datos SATA separando suavemente su gran conector de plástico del disco duro.

    When reconnecting the SATA cable, there is nothing to make the connector hold still, and it is hard to reach, so it took several tries. I ended up taking off the rubber baby buggy bumpers to get more room, and then jamming them back on after getting the SATA connector snugged up.

    bstaud - Contestar

    If by rubber baby buggy bumper, you mean left speaker, then yes, I agree. Reinstall the hard drive before the left speaker.

    jerrid_foiles -

    Kudo to @jerrid_foiles! I was going crazy trying to attach the SATA cable until I took the two screws out of the left speaker and slid the top end of it aside by about 3/4 inch. Make the whole process SO MUCH easier!!

    jiclark - Contestar

    We solved this by removing the hard drive tray screw, then inserting the cable into the SATA hard drive. Then hold the hard drive a bit out of the way to insert the 7.3mm hard drive tray screw.

    Marjie - Contestar

    Agree with this method, found it an impossible task to reconnect the SATA connector until removed the tray screw, then it was relatively easy to reconnect and then replace the tray screw.

    daveedwards -

    Also agree with this method!

    jmorphett5 -

  43. Reemplazo del CPU del iMac Intel 21.5" Retina 4K Display (2017): paso 43, imagen 1 de 1
    • Retira el conjunto del disco duro del iMac.

    When reassembling, I found it easier to loosen the HD tray screw from Step 48 and pull the tray outwards from the left side in order to plug the SATA cable in more easily.

    Cool_Breeze - Contestar

    Thanks! I, too, had a hard time reconnecting the SATA cable.

    boboswell -

    I found this helpful too!

    Anwar -

    And DON’T do what I did, which is to remove the left speaker - which can easily lead to breaking the cable between the power on button and the power supply. The cable is routed through a hidden slot at the very bottom of the left speaker

    bsmith1 - Contestar

    I did loosen the speaker so I could get a tool behind the SATA cable to push it on to the SSD drive. Otherwise hard to align cable.

    Noah Ralston - Contestar

    I found the easiest way to connect the SATA cable was to not screw the plastic hard drive tray down until you plug the drive in. That way you can easily push the connector in and due to the cable you’ve got some wiggle room. You can position the tray then just lift one end of the drive up and secure the screw. Then just push the drive down.

    Chris Caldwell - Contestar

    This was the step that I had the most trouble with. I’m used to replacing a hard drive in a MacBook Pro, where the “plug” that you plug the drive into is a rigid thing that you can firmly press the hard drive into.

    With the iMac, the plug is situated on the end of a non-rigid cord, so the plug moves back when you try to snap a drive into it. Also, those two rubber gasket things that you adhere to the side of the drive really make it difficult to maneuver the now-overly-chubby drive towards the plug.

    After must frustration/concern, what I ended up doing was temporarily removing the rubber gasket things, using the “spudger” as kind of a lever behind the “plug on a cord” so that it didn’t move as much, and then pushed the gasket-less SSD into the plug.

    Once I got it connected, I put the rubber gaskets back on the sides of the SSD and kind of coaxed it down into place, using the pointy end of the spudger to get the chubby corner pieces to “sit” correctly in the rigid plastic tray that the SSD kind of rests in.

    Jack OnFlickr - Contestar

    From another comment elsewhere on this repair, I *highly* recommend removing the two screws holding the left speaker in place, then sliding it just a tad out of the way to be able to easily attach the SATA cable. You don’t have to move it much to make the whole process so much easier!

    jiclark - Contestar

  44. Reemplazo del CPU del iMac Intel 21.5" Retina 4K Display (2017), Bandeja del disco duro: paso 44, imagen 1 de 1
    • Retira el tornillo Torx T8 de 7.3 mm que fija la bandeja del disco duro al gabinete trasero.

    I found it easier to connect SATA cable before fixing tray.

    Mārtiņš Jansons - Contestar

  45. Reemplazo del CPU del iMac Intel 21.5" Retina 4K Display (2017): paso 45, imagen 1 de 1
    • Retira la bandeja del disco duro.

    I am following these procedures for the following: iMac Retina 4K - 21.5" - 3GHz Quad Core - Radeon Pro 555 2GB - 4GB/4GB (8GB total - 2 slots) 2400MHz DDR4 SO-DIMM - Mid 2017 - Model: MNDY2LL/A - iMac18,2 - A1418 - 3069. In my case, the SATA cable is clipped into the bottom of the hard drive tray. Pull the hard drive tray up slightly and angle to reveal clips. SATA cable pops out from the side of each clip.

    iannai29 - Contestar

    Better yet, after reading Step 49 - no need to remove SATA cable from the bottom of the hard drive tray.

    iannai29 - Contestar

  46. Reemplazo del CPU del iMac Intel 21.5" Retina 4K Display (2017), Conjunto de placa lógica: paso 46, imagen 1 de 2 Reemplazo del CPU del iMac Intel 21.5" Retina 4K Display (2017), Conjunto de placa lógica: paso 46, imagen 2 de 2
    • Con delicadeza tira del cable del altavoz izquierdo fuera de su zócalo en la placa lógica.

  47. Reemplazo del CPU del iMac Intel 21.5" Retina 4K Display (2017): paso 47, imagen 1 de 1
    • Desvía el cable del altavoz izquierdo tirando de él hacia arriba fuera del clip de retención en la parte trasera de la carcasa posterior.

  48. Reemplazo del CPU del iMac Intel 21.5" Retina 4K Display (2017): paso 48, imagen 1 de 2 Reemplazo del CPU del iMac Intel 21.5" Retina 4K Display (2017): paso 48, imagen 2 de 2
    • De manera similar al paso anterior, desvía los cables SATA y de energía tirando el trenzado hacia afuera del clip de retención.

  49. Reemplazo del CPU del iMac Intel 21.5" Retina 4K Display (2017): paso 49, imagen 1 de 2 Reemplazo del CPU del iMac Intel 21.5" Retina 4K Display (2017): paso 49, imagen 2 de 2
    • Despega el pedazo de cinta que conecta el cable del altavoz izquierdo con los cables SATA de energía y datos.

  50. Reemplazo del CPU del iMac Intel 21.5" Retina 4K Display (2017): paso 50, imagen 1 de 3 Reemplazo del CPU del iMac Intel 21.5" Retina 4K Display (2017): paso 50, imagen 2 de 3 Reemplazo del CPU del iMac Intel 21.5" Retina 4K Display (2017): paso 50, imagen 3 de 3
    • Voltea hacia arriba el soporte de retención metálico en el conector de la cámara FaceTime.

    • Tira del cable de la cámara FaceTime fuera de su zócalo en la placa lógica.

    • Este es un conector delicado que puede ser fácilmente dañado.

  51. Reemplazo del CPU del iMac Intel 21.5" Retina 4K Display (2017): paso 51, imagen 1 de 1
    • Remueve los dos tornillos Torx T5 de 4.0 mm que aseguran los cuatro conectores de la antena a la tarjeta AirPort/Bluetooth.

  52. Reemplazo del CPU del iMac Intel 21.5" Retina 4K Display (2017): paso 52, imagen 1 de 3 Reemplazo del CPU del iMac Intel 21.5" Retina 4K Display (2017): paso 52, imagen 2 de 3 Reemplazo del CPU del iMac Intel 21.5" Retina 4K Display (2017): paso 52, imagen 3 de 3
    • Desconecta los cuatro conectores de la antena levantándolos hacia arriba de sus zócalos en la tarjeta AirPort/Bluetooth.

  53. Reemplazo del CPU del iMac Intel 21.5" Retina 4K Display (2017): paso 53, imagen 1 de 2 Reemplazo del CPU del iMac Intel 21.5" Retina 4K Display (2017): paso 53, imagen 2 de 2
    • Con delicadeza tira el conector del altavoz derecho hacia abajo y fuera de su zócalo en la placa lógica.

  54. Reemplazo del CPU del iMac Intel 21.5" Retina 4K Display (2017): paso 54, imagen 1 de 3 Reemplazo del CPU del iMac Intel 21.5" Retina 4K Display (2017): paso 54, imagen 2 de 3 Reemplazo del CPU del iMac Intel 21.5" Retina 4K Display (2017): paso 54, imagen 3 de 3
    • Usa la punta plana de un spudger para levantar el conector del cable del jack de auriculares de su zócalo en la placa lógica.

    • Empuja el cable ligeramente a la derecha.

  55. Reemplazo del CPU del iMac Intel 21.5" Retina 4K Display (2017): paso 55, imagen 1 de 1
    • Despega la cinta que cubre el ducto de ventilación.

  56. Reemplazo del CPU del iMac Intel 21.5" Retina 4K Display (2017): paso 56, imagen 1 de 1
    • Remueve los siguientes tornillos Torx T8 que aseguran el ducto de ventilación a la carcasa posterior:

    • Dos tornillos de 6.2 mm

    • Dos tornillos de 4.7 mm

  57. Reemplazo del CPU del iMac Intel 21.5" Retina 4K Display (2017): paso 57, imagen 1 de 3 Reemplazo del CPU del iMac Intel 21.5" Retina 4K Display (2017): paso 57, imagen 2 de 3 Reemplazo del CPU del iMac Intel 21.5" Retina 4K Display (2017): paso 57, imagen 3 de 3
    • Usa la punta de un spudger para voltear la solapa restante en el zócalo ZIF del cable cinta del micrófono.

    • Asegúrate de que estás levantando la solapa restante, no el zócalo en sí.

    • Con cuidado tira el cable cinta del micrófono fuera de su zócalo.

  58. Reemplazo del CPU del iMac Intel 21.5" Retina 4K Display (2017): paso 58, imagen 1 de 1
    • Remueve los cuatro tornillos Torx T8 de 7.3 mm que aseguran la placa lógica a la carcasa posterior.

  59. Reemplazo del CPU del iMac Intel 21.5" Retina 4K Display (2017): paso 59, imagen 1 de 3 Reemplazo del CPU del iMac Intel 21.5" Retina 4K Display (2017): paso 59, imagen 2 de 3 Reemplazo del CPU del iMac Intel 21.5" Retina 4K Display (2017): paso 59, imagen 3 de 3
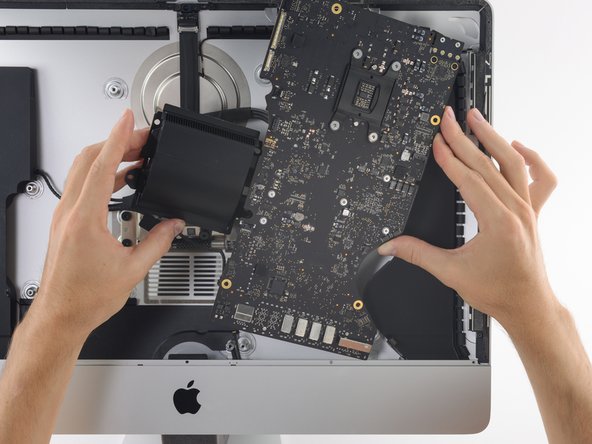
    • Inclina la parte superior de la placa lógica fuera de la carcasa posterior.

    • Mientras inclinas la placa lógica, tira del conector del altavoz derecho a la derecha y fuera del camino de la placa.

    • Levanta la placa lógica hacia arriba y fuera del iMac.

    • Ten cuidado de no raspar la placa en cualquiera de los postes de tornillo de la carcasa posterior.

    When repairing, I accidentally broke a small piece of what it seems to be a resistor. Mac still works fine and diagnostics reports no errors. Be careful when removing the mother carefully so it doesn’t hit the aluminium cover.

    Andres Urena - Contestar

  60. Reemplazo del CPU del iMac Intel 21.5" Retina 4K Display (2017): paso 60, imagen 1 de 2 Reemplazo del CPU del iMac Intel 21.5" Retina 4K Display (2017): paso 60, imagen 2 de 2
    • Cuando vuelvas a armar tu iMac, ten cuidado para alinear los puertos exteriores de E/S correctamente. La placa lógica puede estar torcida incluso cuando está asegurada con todos sus tornillos.

    • Usa una unidad flash USB y/o un cable Ethernet para mantener la placa lógica en su lugar correctamente mientras aprietas los tornillos.

  61. Reemplazo del CPU del iMac Intel 21.5" Retina 4K Display (2017), Cables SATA de Energía y Datos: paso 61, imagen 1 de 3 Reemplazo del CPU del iMac Intel 21.5" Retina 4K Display (2017), Cables SATA de Energía y Datos: paso 61, imagen 2 de 3 Reemplazo del CPU del iMac Intel 21.5" Retina 4K Display (2017), Cables SATA de Energía y Datos: paso 61, imagen 3 de 3
    • El conector de datos SATA tiene un clip que debe ser presionado para permitir su desconexión.

    • Mientras presionas el clip con tu pulgar, levanta y desconecta el conector de datos SATA de su zócalo en la placa lógica.

  62. Reemplazo del CPU del iMac Intel 21.5" Retina 4K Display (2017): paso 62, imagen 1 de 2 Reemplazo del CPU del iMac Intel 21.5" Retina 4K Display (2017): paso 62, imagen 2 de 2
    • Agarra el conector de energía del disco duro y con delicadeza tira fuera de su zócalo en la placa lógica.

  63. Reemplazo del CPU del iMac Intel 21.5" Retina 4K Display (2017), Conjunto de Disipador de Calor: paso 63, imagen 1 de 2 Reemplazo del CPU del iMac Intel 21.5" Retina 4K Display (2017), Conjunto de Disipador de Calor: paso 63, imagen 2 de 2
    • Despega los cuatro stickers negros de evidencia de manipulación que cubren los tornillos del disipador.

    • Remueve los cuatro tornillos T10 que aseguran el disipador a la placa lógica.

    • Durante el rearmado, aprieta estos tornillos una vuelta a la vez, alternando en un patrón cruzado. Esto incrementará gradualmente la presión de sujeción a lo largo de la superficie de la CPU. Continúa gradualmente apretando los tornillos hasta que hagan tope y que la placa entera apoye completamente plana sobre la placa lógica.

  64. Reemplazo del CPU del iMac Intel 21.5" Retina 4K Display (2017): paso 64, imagen 1 de 2 Reemplazo del CPU del iMac Intel 21.5" Retina 4K Display (2017): paso 64, imagen 2 de 2
    • Levanta la placa restante del disipador y su soporte fuera de la placa lógica.

  65. Reemplazo del CPU del iMac Intel 21.5" Retina 4K Display (2017): paso 65, imagen 1 de 1
    • Afloja completamente los tres tornillos cautivos T8 que aseguran el disipador sobre la GPU.

    • Remueve los dos tornillos T8 de 5.4 mm que aseguran el tubo de calor a la placa lógica.

  66. Reemplazo del CPU del iMac Intel 21.5" Retina 4K Display (2017): paso 66, imagen 1 de 2 Reemplazo del CPU del iMac Intel 21.5" Retina 4K Display (2017): paso 66, imagen 2 de 2
    • Nota que la CPU puede quedar pegada debajo del disipador de calor cuando lo levantas. Ten cuidado de no dañarla.

    • Levanta y remueve el conjunto del disipador de calor de la placa lógica.

  67. Reemplazo del CPU del iMac Intel 21.5" Retina 4K Display (2017), CPU: paso 67, imagen 1 de 1
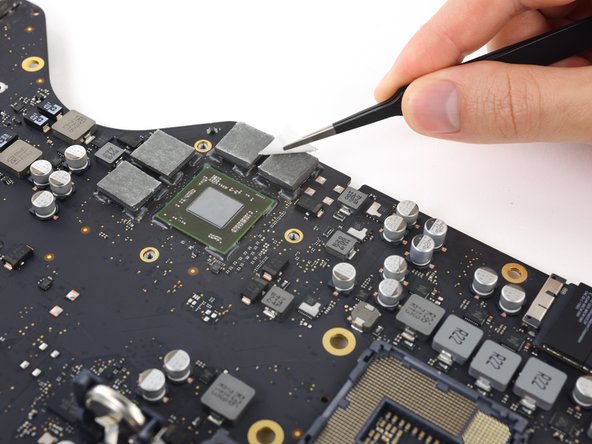
    • Voltea el disipador de calor y usa tu spudger para despegar la CPU, teniendo cuidado de no dejarla caer.

    • Una capa gruesa de pasta térmica mantiene la CPU en su lugar.

  68. Reemplazo del CPU del iMac Intel 21.5" Retina 4K Display (2017): paso 68, imagen 1 de 1
    • Levanta y quita la CPU del disipador de calor.

  69. Reemplazo del CPU del iMac Intel 21.5" Retina 4K Display (2017): paso 69, imagen 1 de 2 Reemplazo del CPU del iMac Intel 21.5" Retina 4K Display (2017): paso 69, imagen 2 de 2
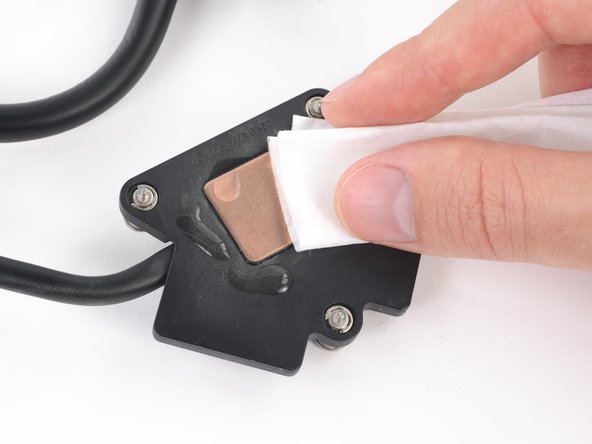
    • Usa un paño libre de pelusa (o un filtro de café) con alcohol isopropílico o el Removedor de Material Térmico de ArctiClean para limpiar completamente los residuos de pasta térmica en ambos brazos para la CPU y la GPU del disipador de calor.

    • Cuando las superficies del disipador estén completamente limpias, usa un paño libre de pelusa limpio o un filtro de café para aplicar un poco del Purificador de Superficies Térmicas de ArctiClean para remover cualquier aceite y preparar las superficies de cobre del disipador.

    • No toques las superficies de cobre con tus dedos desnudos, o dejes que cualquier basura o escombro se quede allí. Incluso una huella digital puede ser un obstáculo mayúsculo para la transferencia de calor. Si lo tocas por accidente, vuelve a limpiar y aplica de nuevo el purificador de superficies.

    • Deja que el disipador se seque completamente mientras continúas trabajando.

  70. Reemplazo del CPU del iMac Intel 21.5" Retina 4K Display (2017): paso 70, imagen 1 de 2 Reemplazo del CPU del iMac Intel 21.5" Retina 4K Display (2017): paso 70, imagen 2 de 2
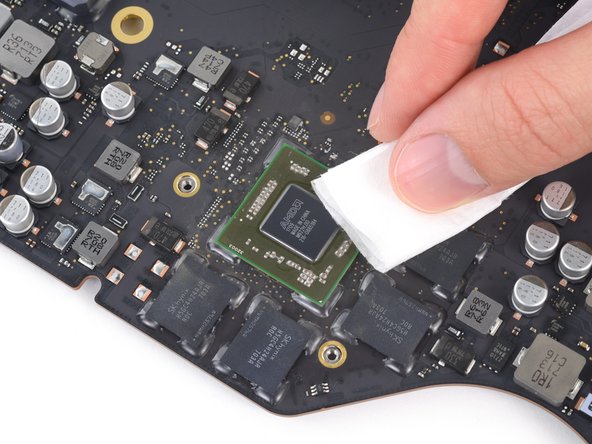
    • Usa un spudger para levantar el exceso de residuos de pasta térmica fuera de la GPU.

    • Como antes, usa un paño libre de pelusa o un filtro de café y los fluidos apropiados para limpiar y preparar la superficie de la GPU.

    • Limpia también la pasta térmica de los cuatro chips de VRAM alrededor de la GPU.

  71. Reemplazo del CPU del iMac Intel 21.5" Retina 4K Display (2017): paso 71, imagen 1 de 2 Reemplazo del CPU del iMac Intel 21.5" Retina 4K Display (2017): paso 71, imagen 2 de 2
    • Aplica almohadillas térmicas a los cuatro módulos de VRAM alrededor de la GPU.

    • Alternativamente, puedes usar una pasta térmica gruesa, como la K5–PRO.

    • Usa un par de pinzas para despegar los stickers de la parte superior de las almohadillas térmicas.

    Gibt es dafür passende Leitpads ?

    Paul - Contestar

  72. Reemplazo del CPU del iMac Intel 21.5" Retina 4K Display (2017): paso 72, imagen 1 de 2 Reemplazo del CPU del iMac Intel 21.5" Retina 4K Display (2017): paso 72, imagen 2 de 2
    • Revisa la orientación de tu CPU antes de instalarla.

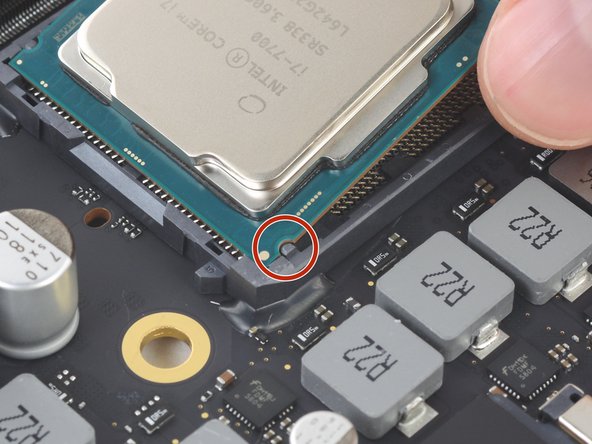
    • Los recortes pequeños en los bordes de la CPU se alinean con las muescas en los costados del zócalo.

    • Con cuidado alinea tu nueva CPU en su zócalo en la placa base, y ponla en su posición.

    Is it possible for the 21.5, 4K model to support/handle the i7-7700k processor?

    Danilo Jiménez - Contestar

  73. Reemplazo del CPU del iMac Intel 21.5" Retina 4K Display (2017): paso 73, imagen 1 de 1
  74. Reemplazo del CPU del iMac Intel 21.5" Retina 4K Display (2017): paso 74, imagen 1 de 1
    • Aplica una gota fina de pasta térmica a la GPU.

    • No necesitas aplicar pasta térmica al disipador de calor, aunque Artic Silver sugiere "teñir" la superficie del disipador. Para más información sobre esto y la aplicación de pasta térmica en general, mira las instrucciones de Artic Silver.

    • Ya puedes reinstalar el disipador sobre la CPU y la GPU.

Conclusión

Para volver a armar tu dispositivo, sigue estas instrucciones en orden inverso.

19 personas más completaron esta guía.

Un agradecimiento especial a estos traductores:

en es

100%

¡ Gianfranco Sergi nos está ayudando a reparar el mundo! ¿Quieres contribuir?
Empezar a traducir ›

Adam O'Camb

Miembro Desde 04/11/15

196,299 Reputación

416 Guías creadas

36 comentarios

Can I upgrade to i7 7700K on iMac 2017 21.5inch ?

Imperius lu - Contestar

looking at the compare on intel’s website:

https://ark.intel.com/compare/97128,9712...

the 7700k being a 130w vs any Apple installed CPU being 65W, I’d think the the likelihood to overheat or draw too much power would be high but I don’t have enough experience to know for certain.

Benjamin -

Can I upgrade to Intel Core i7 8700K?? It’s LGA 1151… so? iMac 2017, 21,5inch

Mikkser - Contestar

Hey Mikkser, 8-series (Coffee Lake) CPUs require the Z370 chipset, which to my knowledge isn’t on the 2017 iMac logic boards. The socket is the same as the last generation so you’d be able to plug an 8700K in, but it wouldn’t work.

Adam O'Camb -

Intel Core i7-8700K Desktop Processor 6 Cores up to 4.7GHz Turbo Unlocked LGA1151 300 Series 95W BX80684i78700K would that work with it

johnm - Contestar

8th Gen isn’t compatible with chipset. see previous comments.

Benjamin -

The Intel Core i7 8700K is an eighth generation Intel CPU.  8th gen Intel CPU’s aren’t compatible with Socket LGA 1151 revision 1 which is what iMac’s use.  6th and 7th gen Intel Core i3/i5/i7 are compatible, but again not 8th gen.

robert_perdue -

What are the maximum specs for cpu, gpu and ram available for this device_ thank you

what I mean is: can install a i9? which is the most powerful gpu the computer will hold? is it possible to install ddr4 ram and still dont create a bottleneck in the motherboard? thanks

ivan diaz - Contestar

There are no i9 CPUs on a FCLGA1151 Socket which this iMac model uses.

Benjamin -

The Intel Core i9 uses socket LGA2066 and not 1151 revision 1.   Also the GPU is not replaceable in the iMac as replacement GPU’s aren’t available and even if they were I don’t think you can remove the GPU anyway.

robert_perdue -

hi, can i use the Intel Core i7-7700K 4.2Ghz my iMac 21.5 4k 2017 instead of the 3.6ghz version? thanks a lot.

vicky - Contestar

Hey Vicky, you CANNOT use the i7-7700k for this model as the logic board doesn’t recongize it. I tried it myself and found out the the non k version (i7-7700) does work with it. It would be nice if someone could update this guide for future people trying to upgrade the cpu!

William Randolph -

@willran Thanks for this. I had incorrectly stated that we tested the unlocked version—we didn’t. Like you, we used the vanilla i7-7700 and it’s still working great. I’ve removed the 7700k from the parts list. Good catch!

Jeff Suovanen -

Purchased the kit, maxed to 32GB and i7-7700 (non k version), this thing SCREAMS now with the upgrade! (I do code and a lot of Sketch work…) The whole thing took me 3 hours.. the most time was spent on removing the *!&*^#% adhesive from the screen back panel and the frame. THANK YOU for the guide, the instructions were 100% correct, cheers

Philippe Léger - Contestar

Just upgraded from i5-7500 to i7-7700 (also did SSD and RAM). Anyone experiences higher temps or random temp spikes/increase in fan activity?

jesse.johnston - Contestar

I have 7700K and I have not seen any issues.

ua2599 -

did you add enough thermal paste? Also @ua2599 do you really have the 7700k working properly on this model imac? Can you tell me about it?

Frank Mendoza -

@frankomendozer yes it working for me and been working for a while now. i had to troubleshoot multiple times to get it to work. my Thunderbolt was not working after the install so I had to do installation of the OS multiple times. I changed my HDD to SSD. I had to break the fusion dive and remake the fusion drive and reinstall. It was time consuming.

ua2599 -

I have had no issues with 7700K @4.2 GHz . No heat up issues as its a 91W TDP. Been using to edit in FCP . @frankdoof

ua2599 - Contestar

iMac Intel 21.5 "Retina 4K Display (2017) Replaced the processor with i7 7700 computer like booting, but no image, the screen does not light up. If you put the i5 processor back, it 's OK. What's the reason?

sherlok74 - Contestar

I have the same issue upgrading to a i7-7700, got the boot chime but the monitor is blank, it will eventually boot into MacOS (the reason I know this is because I can hit the volume level keys and I can hear the feedback when the volume is changed.) but again, no display. Yes, I double-checked the screen connectors to ensure they are firmly installed. Tried nvram & SMC reset. still no display.

Animefuntv -

UPDATE! So I took a chance and removed the mainboard from the iMac again, removed the coin battery from the mainboard, took a screwdriver, and touched the positive and negative of the battery holder for several seconds (in theory this should hard reset the smc/pram). reinstalled everything and BAM! I got my screen back! and it booted right into MacOS! Checked the system info and it shows an i7 CPU installed!

Animefuntv -

Процессор Intel Core i7-7700 для настольных ПК 4 ядра с частотой до 4,2 ГГц LGA 1151 серии 100/200, 65 Вт

sherlok74 - Contestar

So this is the processor to buy right guys http://www.tigerdirect.com/applications/... ???????????????

Darrell - Contestar

Hello I have done the manipulation of replacing the i5 by i7 7700 k or not k and it does not work I only had a black screen...I had no luck

lionel.porrelli - Contestar

Hello, I have installed 7700K and its been working for past few years. I had issues as well but my issue was the USB-C ports were not working. I tested different cables, different devices but nothing would connect but mac would start and run smoothly. I had to reinstall OS multiple times and i think that made the ports work. No issues ever since. Goodluck

ua2599 -

I am thinking it will work but I will wait for others to respond.

Cameron E -

yes it will work. I have 7700K working.

ua2599 -

@ua2599 Awesome thank you! it not being a 65w TDP wont matter? i think i read earlier that you had issues. Would i run into these USB issues with the K vs the non K version?

also, whats the drawbacks or benefits of running a 65w TDP vs 95w TDP

Cameron E - Contestar

I have not seen any issues with 95w TDP. You gain little speed but 95w will produce more heat so if we keep it in cool environment then you should be okya. Mine is working smoothly, initially i had issues with USB but after redoing it multiple times ( as in putting it back to original setting and then doing the mod) it got fixed…. Not sure how but it was fixed and its been working ever since. Good luck…

ua2599 -

Will it still work if I have an iMac 21.5 2017 but non 4k?

Aug Litv - Contestar

Can the power supply cable going from the psu to the logic board

https://guide-images.cdn.ifixit.com/igi/...

be replaced (bought separately)?

On my iMac EMC 3069 it is different (no connector/adapter as shown on the image) and it is cut (damaged). The leads coming through insulation.

Do they have problems/troubles with this cable when manufacturing/assembling?

AW_itfixi - Contestar

Hallo an Alle, ich habe da ein Problem. Mir ist das Flexkabel am Mikrofon durchgebrochen. Nun ist es nicht mehr zu gebrauchen. Habe schon drei Tage danach im Internet gesucht, aber ich finde nichts. Hat jemand von Euch eine Bezugsadresse oder noch ein herumliegen? Besten Dank im Voraus und viele Grüße

Dusch Hahn - Contestar

Will a Intel Core i7-8700 Desktop Processor 6 Cores up to 4.6 GHz LGA 1151 300 Series 65W work in a 2017 iMac 4k currently 8gb ram, 3.4ghz quad core.

Mark - Contestar

Agregar Comentario

Ver Estadísticas:

Ultimas 24 horas: 10

Ultimos 7 días: 115

Ultimos 30 días: 486

Todo El Tiempo: 33,299