Introducción
Si la pantalla de tu iPhone XS Max está resquebrajada, no responde al tacto o no muestra una imagen cuando tu teléfono está encendido, usa esta guía para restaurar tu iPhone a un estado de funcionamiento con una nueva pantalla, o conocido también como ensamblaje de pantalla.
El ensamblaje combinado de altavoz auricular y sensor colocado en la parte posterior de la pantalla está emparejado con tu iPhone individual de fábrica''', por lo que debes transferirlo de tu pantalla antigua a la nueva durante cualquier reemplazo de pantalla. Contiene el iluminador de inundación, que forma parte de la característica de seguridad biométrica Face ID. Si se daña o se reemplaza, el Face ID dejará de funcionar, así que ten mucho cuidado de no dañar ninguno de estos componentes durante este procedimiento. Si está dañado, solo Apple puede restaurar la función de Face ID.
Nota: La funcionalidad del True Tone está desactivada luego de un reemplazo de pantalla, aún cuando utilizas una pantalla Apple original.
Qué necesitas
Resumen del Video
-
-
Apaga tu iPhone antes de comenzar a desmontar.
-
Remueve los dos tornillos pentalobe de 6.9 mm en el borde inferior del iPhone.
-
Abrir la pantalla del iPhone comprometerá los sellos impermeables. Ten sellos de repuesto listos antes de proceder con este paso o ten cuidado y evita la exposición a líquido si vuelves a ensamblar tu iPhone sin reemplazar los sellos.
-
-
-
Si tu iPhone tiene la pantalla rota, mantén la rotura contenida y evita lastimarte durante la reparación colocando una cinta sobre el vidrio.
-
Coloca tiras superpuestas de cinta de embalaje sobre la pantalla del iPhone hasta cubrir toda la cara.
-
Si los vidrios rotos dificultan que una ventosa se pegue en los siguientes pasos, intenta doblar un trozo de cinta resistente (como una cinta adhesiva) en un asa y levanta la pantalla con eso.
-
-
-
Coloca tiras superpuestas de cinta de embalaje transparente sobre la pantalla del iPhone hasta cubrir toda la cara.
-
Si no puedes hacer que la ventosa se adhiera en los próximos pasos, dobla un trozo de cinta resistente (como cinta adhesiva) en un asa y levanta la pantalla con eso.
-
-
-
Tira de la manija azul hacia atrás para desbloquear los brazos del Anti-Clamp.
-
Desliza los brazos sobre el borde izquierdo o derecho de tu iPhone.
-
Coloca las ventosas cerca del borde inferior de la pantalla, una en el frente y otra en la parte posterior.
-
Aprieta las copas para aplicar succión en el área deseada.
-
-
-
Tira de la manija azul hacia adelante para bloquear los brazos.
-
Gira el mango en el sentido de las agujas del reloj 360 grados o hasta que las copas comiencen a estirarse.
-
Asegúrate de que las ventosas permanezcan alineadas entre sí. Si comienzan a salirse de la alineación, afloja ligeramente las ventosas y vuelve a alinear los brazos.
-
-
-
Calienta un iOpener y pásalo por los brazos del Anti-Clamp.
-
Dobla el iOpener de forma que quede sobre el borde inferior del iPhone.
-
Espera un minuto para que el adhesivo se despegue y se abra el hueco.
-
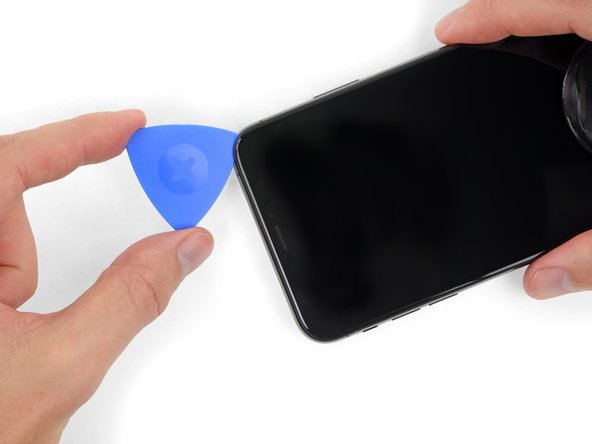
Inserta una púa de apertura en el hueco que hay debajo de la pantalla y el bisel de plástico, no en la propia pantalla.
-
Omite los siguientes tres pasos.
-
-
-
Usa un secador de pelo o pistola de calor, o prepara un iOpener y aplícalo en el borde inferior del iPhone durante un minuto para ablandar el adhesivo.
besteht da die Gefahr das sich das Displayglas vom lcd löst?
Besteht da die Gefahr das sich der Kleber vom Displayglas löst?
-
-
-
Tira hacia arriba de la ventosa con una presión firme y constante para crear un ligero espacio entre el panel frontal y la caja posterior.
-
Inserta una púa de apertura en el espacio debajo de la pantalla y el bisel de plástico, no en la pantalla en sí.
-
-
-
-
Remueve los cuatro tornillos Y000 que sujetan el soporte de la cubierta de la placa lógica:
-
Dos tornillos de 1.1 mm
-
Un tornillo de 1.5 mm
-
Un tornillo de 3.7 mm
-
-
-
Remueve los tres tornillos Y000 que sujetan el soporte de conector de pantalla:
-
Dos tornillos de 1,1 mm
-
Un tornillo de 1,5 mm
I am replacing the screen for the 2nd time - the first repair was done by someone else, and the first 2 screws are 1.5mm and the last screw is 1.1mm… If I put the screw back in am I risking Long Screw Damage?
Thanks for all your comments! I'll amend this step.
Hi, I just changed the screen on my XS Max and for this bracket I used 2 x 1.1 mm and 1 x 1.5 mm.
Starting from left to right:
- left 1.1 mm (I tried with 1.5 mm like in the above picture but I felt that it didn't wanted to go deeper so I didn't forced and I tried it in the middle and it fit perfectly)
- middle 1.5 mm
- right 1.1 mm
For the two brackets I had 7 screws, I aligned them on the desk by length and I had 2 x 1.5 mm, 4 x 1.1 mm and 1 x 3.7 mm.
Good luck and I hope it will help someone!
-
-
-
Con cuidado levanta el cable hasta que el adhesivo se separe.
-
-
-
Remueve los tres tornillos Y000 que sujetan el ensamblaje de sensor/altavoz:
-
Un tornillo de 1.4 mm
-
Dos tornillos de 1.5 mm
Ciao @max94949 Quale lunghezza stai cercando? Il passo menziona che si tratta di una vite Y000 da 1,4 mm e di due vite Y000 da 1,5 mm.
-
-
-
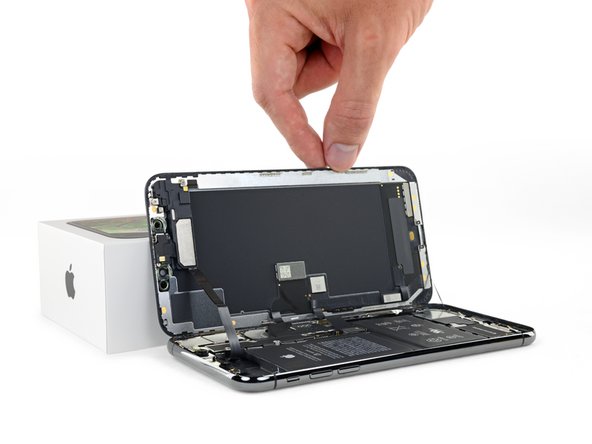
Con un spudger, haz palanca suavemente debajo del borde superior del ensamblaje del altavoz y dale la vuelta hacia arriba y hacia abajo, alejándolo del borde superior de la pantalla.
If you are using a refurbished display, check for dirt in the earpiece speaker cutout.
If you have poor quality or low sound after changing the display, use a cotton bud and isopropyl alcohol to clean the earpiece cutout.
-
-
-
Usa un secador de pelo o una pistola de calor o prepara un iOpener y aplícalo en la parte frontal superior de la pantalla durante 1-2 minutos, para suavizar el adhesivo que sujeta los sensores.
-
-
-
Desliza con cuidado el borde de tu púa de apertura debajo del cable flexible debajo del micrófono.
-
Gíralo suavemente para separar el micrófono, teniendo cuidado de no forzar o dañar el cable flexible.
-
Si es necesario, usa la punta del spudger para terminar de separar el micrófono de su muesca en el panel frontal.
-
-
-
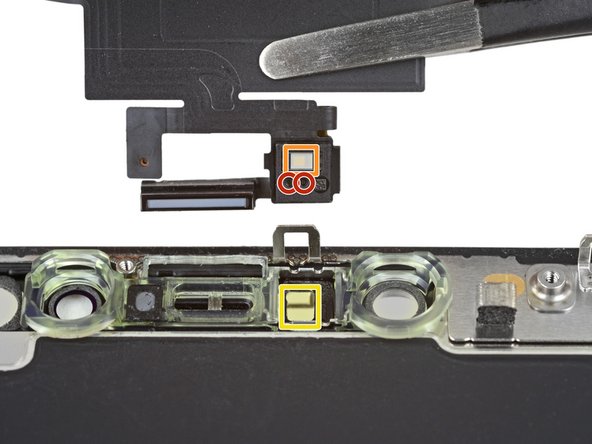
Usa pinzas para mover el sensor de luz ambiental y levántalo de su muesca en la pantalla.
This was the most difficult part for me so i erred on the side of caution. I reheated the display in the oven at 85 degrees celsius. Like in the third picture in the next step, i got a razor into the slot below, to get the diffuser a little loose before wiggling the sensor out. I didn't understand the wiggling until i simply rocked it like a boat would side to side like to the top of the display to the bottom on the display, and voila, all came out easy and in one piece with the diffuser still attached.
-
-
-
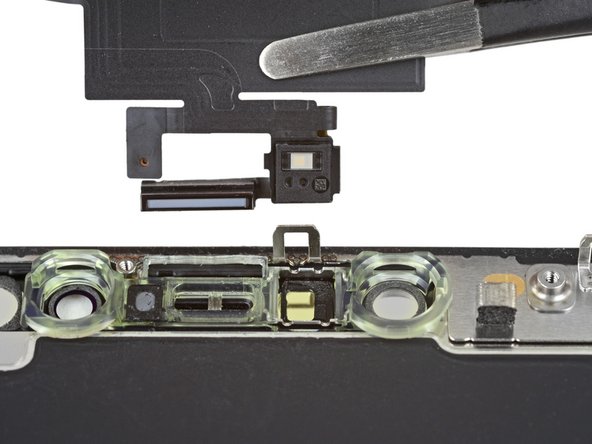
Si has extraído con éxito todo el sensor de luz ambiental, como se muestra en la primera foto, continúa con el paso siguiente.
-
Si la tira difusora blanca se desprende y permanece incrustada en la pantalla, como se muestra en la segunda foto, deberás sacarla con cuidado a lo largo del borde superior con una herramienta de cuchilla o palanca. Volver a aplicar calor primero puede hacer esta tarea un poco más fácil.
I have accidentally damaged flood illuminator will it affect the face id also or if I just replace the Earpiece Speaker and Sensor Assembly it will get fixed.
-
-
-
Remueve el altavoz auricular y ensamblaje de sensor frontal.
-
Sensor de proximidad
-
Iluminador de inundación
-
El módulo debe colocarse de manera que estos componentes no queden obstruidos por ningún adhesivo.
Do you have to remove the earpiece speaker and front sensor assembly. If you are taking a screen from another Xs max with it already attached?
The front sensor assembly is part of Face ID, so you must transfer the original assembly to the replacement screen in order to maintain Face ID functionality.
No, you just take the whole unit. Warm it up and remove the glued sensors like described. Handle it carefully, the speaker cable is quite thin. If damaged, you might loose your face-ID functionality.
Does the screen need a reprogamation onto the new screen?
if the pentalope screws are rusted and the driver can’t fit in it to remove them is there any other way to remove them to replace screen?
-


Compara tu parte nueva de reemplazo con la parte original. Podrías tener que transferir los componentes restantes o remover los respaldos adhesivos de la nueva parte antes de instalarla.
Para volver a ensamblar tu dispositivo, sigue estos pasos en orden inverso.'''
Lleva tus residuos electrónicos a un centro de reciclaje certificado.
¿La reparación no salió como planificaste? Fíjate en nuestra comunidad de respuestas para ayuda en resolución de problemas.
Cancelar: No complete esta guía.
175 personas más completaron esta guía.
Un agradecimiento especial a estos traductores:
100%


Estos traductores nos están ayudando a reparar el mundo! ¿Quieres contribuir?
Empezar a traducir ›


37 comentarios
Nice guide. I could be wrong but for the first time in a while, changing a display on an Apple phone looks like it’s not anymore difficult than previous models.
John K
the-screen-savers.com
If you remove the screen but then apply the same screen back on the phone, will True Tone still be disabled?
@onslivion Nope! It'll continue to work fine, so long as you didn’t damage anything.
Hi i broke the Flex cable of the Part.
what i can do now.
is their some Parts for sale?
I just switched the screens from 2 phones and both are unresponsive, if put them back to its original logic board the work again, any idea why they dont work? both are original.
Why is True Tone disabled afterwards? Even with an Original Screen how is that possible?
That's normal. There's a chip in the screen that has info that is specific to the original logic board so unless you have a special machine to read/write to that chip, truetone will not work.
This was perfect. It definitely helped me replace the screen on a friend IPhone XS Max!
Every authoritative source (such as Apple Support, Wikipedia) that I read about the iPhone XS Max display states that it has an OLED display - not an AMOLED display, and not an LCD display (such as on the XR model). Yet the parts associated with this guide are LCD (website quirk?) and the written text for XS Max mention AMOLED. Isn’t this important to get right when replacing? The model I have is A1921.
Hi Mark,
The iPhone XS Max uses an AMOLED display. Active Matrix OLED (AMOLED) is a subcategory of the general OLED tech—AMOLED displays contain circuitry which allows them to switch each OLED pixel on or off. Compared to Passive Matrix OLED, AMOLED displays have a higher refresh rate and are more energy efficient . However AMOLED displays are complex, difficult to source, and very expensive to replace (think $200-400 for the part!) Hardware manufacturers sought to resolve this problem by producing LCD replacement screens. These screens are made to be completely compatible with the iPhone XS Max, but are significantly cheaper to replace. They do look slightly different compared to the original screen. Check this link out for a more in-depth review of the differences.
Where is the INSTALL GUIDE this is just removal? And don’t tell me it’s the reverse. I have a small gasket that’s not mentioned in this and it doesn’t explain how to remove the main old gasket or install the new gasket
Where is the installation guide? This is just a removal guide. Don’t tell me that it’s the opposite of removal to install because I have a small gasket that is not mentioned in the YouTube video or on this site in my package
I would like to echo this comment. It is extremely disappointing to see a guide this comprehensive and detailed stop short of reassembly. Especially because some parts need to be transferred from the original display to the replacement one.
Completed the Repair with the more Expensive alternative - the OLED display.
The guide is very comprehensive and covered all the points including looking out for bits left behind!
- I noticed a tiny piece of conductive foam on the old display which i moved to the new one.
The OLED display is top quality, but a little darker due to losing the “True Tone” no doubt.
The Adhesive kit is very good, but separating the two films was a little difficult and messed up the alignment slightly, however I managed to recover!
One more addition I had to make after undertaking this repair.
I had noted that after swapping the display the earpiece was very quiet. I thought that I had missed a gasket, misaligned the earpiece speaker or not plugged in the leads correctly.
Nope. Much simpler than that. CLEAN THE EAR PIECE CUTOUT! *Eeeewwww* After putting up with this for about 4 weeks, I happened to get out the Cotton Buds. A quick wipe revealed someone elses EAR GUNK was clogging up the ear piece cutout !
Disgusted, I got out the Isopropyl and cleaned it (carefully) about 10 times, the audio is now crystal clear.
@ifixit - Please ensure your “Refurbished displays” have a clean earhole. It was pretty gross that it was clogged to the point that I could not HEAR!
Great guide, completely worked for me!
This guide worked perfectly for my iPhone Max XS screen replacement. This is only my second “project” from iFixit (the first was a replacement display screen for my Canon 6D) and both times, miraculously, everything worked. I’m really not sure if it is my skills or the details in the guides (it’s definitely the latter and a tiny bit of the former). The replacement parts are reasonably priced and the toolkits are VERY GOOD in quality.
For this iPhone screen fix, I used a previously purchased toolkit and “borrowed” suction handles (yes, definitely makes a difference and better than the tape alternative—I tried both) from a bathroom rack.
It took me about 3 hours to get this done. I rushed on step one and stripped the first pentalobe screw. Luckily, one stripped pentalobe screw is still OK. I managed to pull it apart by wiggling the screen around (without too much force). I used a hair dryer to heat the frame/adhesive.
Follow the instructions closely and don’t lose the tiny screws. A magnetic screwdriver helped.
I have accidentally damaged flood illuminator will it affect the face id also or if I just replace the Earpiece Speaker and Sensor Assembly it will get fixed.
Step 1: Remove pentalobe screws…is very careful to NOT STRIP THE SCREW…tools provided/metal is not hard enough and is unable to take out the screw in Step 1 and am now currently going out to buy better pentalobe screw driver. THANKS. Why don’t you just provide better tools and increase the cost……………………………………………
for me at least once you get use to repairing this it can take around 30 min too an hour but i also repair all devices even phones for living so i do have experience with repairing these
Changing just the glass screen on my iphone xs max and the black part behind the screen is cracked what do I do ?
Executed this repair almost flawlessly. The FaceID flex cable is very fragile and glued down very well. I advise you be careful when removing is as not much pressure at all can cause it to break (Speaking from experience). Other than that the guide was very easy to follow.
This was an incredible guide! With the video, it was the perfect guide and I managed to complete the fix in less than 2 hours.
Can water damaged iphone be restored by replacing screen?
Hey Team iFixit, vielen dank für diese ausführliche Anleitung. Einfach richtig lesen dann macht man auch keine Fehler haha
Last month I ordered and received a new screen/digitizer for my iPhone XS max. Installation was easy and the phone was back on-line in half ah hour. Not for long unfortunately. A week after the replacement, the digitizer became irresponsive. I had to let the battery die and subsequently reboot my phone.
It fixed the problem for one day. Then the digitizer froze up again. I decided I was going to open the phone to check the ribbon cables for faulty connection. Alas, when opening the iPhone,one of the cables between the screen and the main board tore.
I resorted to re-installing my old cracked screen that now has been working flawlessly for one week.
Is there a fix for the broken ribbon cable, or can I return the screen for credit or repair?
Hey, I'm thinking on fixing up my Iphone Xsmax screen will the Face Id still function after replacement
Hello oguntayo tosin, as mentioned in the introduction, for Face ID to work you have to transfer the earpiece speaker + sensor assembly as they are paired to your individual iPhone.
I cant put the display on the iPhone and I dont know why.It just doesn't fit right and rises about 2mm higher than it should.What can I do?
Hello Robin, did you already go through the recommended troubleshooting steps? It sounds like it could be a bracket or elements of the earpiece speaker and front sensor assembly that are not seated correctly or that there is some issue with the clips holding the display. You could also try checking whether your replacement part deviates from the original screen as discussed here. Hope this helps!
If purchasing the OLED option from here, would I be able to use a programmer to enable back True Tone?
There's a couple extra chips near the bottom of the original screen that aren't on the replacement. Are they surplus to requirement?
after re assembly the screen is loose I attempted to open it and re sitting but still loose!!! why???
PLEASE HELP! I have an IPhone XS Max with a cracked screen. It has loads of irreplaceable information on it. I can’t afford to buy a screen right now but I have a brand new screen for a IPhone 6 Plus, I don’t want to install it onto the XS but I was wondering if it could be hooked up long enough to type the passcode and trust a computer so I can download the phone’s contents? Pretty much I just need to know if the cables for the display are compatible.
This is the only thing I could think of that might possibly work and not cost me a bunch of money. I was recently attacked, robbed and assaulted. The IPhone XS Max was recording during the assault but couldn’t back up because I didn’t have any Icloud storage available. If anyone has any other suggestions please help me out. P.s. I have went to the police and they couldn’t care less, I live in a small town and my abuser is a prominent member of the community so I am on my own.