Introducción
Usa esta guía para remover o reemplazar la tapa trasera de cristal en un Samsung Galaxy S10e.
Qué necesitas
-
-
Apaga tu teléfono por completo antes de comenzar esta reparación.
-
Prepara un iOpener y calienta la parte trasera del teléfono a lo largo del borde derecho durante aproximadamente dos minutos. Esto ayudará a ablandar el adhesivo que sujeta la tapa trasera.
-
-
-
En los siguientes pasos irás cortando el adhesivo alrededor del borde del cristal de la tapa trasera.
-
Como se ve desde el exterior del teléfono, estarás cortando el adhesivo en las áreas resaltadas.
-
El adhesivo es más delgado en el lado derecho del teléfono justo debajo del botón Bixby.
My S10e was two years old so the adhesive was really weak, and it was really simple to open. Still, this guide was totally useful.
That's encouraging, hopefully the older-than-2 years S10e I'm looking to do proves as easy to open-
Gee Foe -
-
-
-
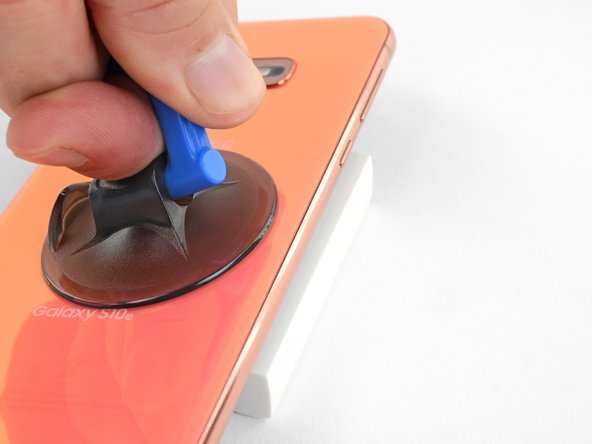
Aplica una ventosa en la tapa trasera del teléfono, lo más cerca posible del borde calentado, justo debajo del botón Bixby, donde el adhesivo es más delgado.
La ventouse n'adhérera pas correctement sur la partie incurvée de la vitre ,
Sur la partie incurvée de la coque.
-
-
-
Apoya el borde calentado del teléfono sobre algo que tenga un grosor de aproximadamente 13 mm. Esto angula el teléfono para que sea más fácil ingresar la herramienta de apertura.
-
Levanta el borde derecho de la tapa trasera con tu ventosa y abre una pequeña grieta entre la tapa trasera y el marco.
-
Esto podría requerir bastante fuerza. Si tienes problemas, aplica más calor para ablandar más el adhesivo e intenta de nuevo. El adhesivo se enfría muy rápido así que puede ser que tengas que calentarla repetidamente.
-
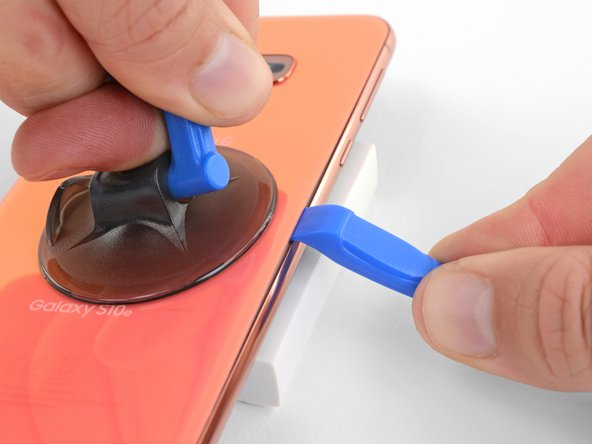
Presiona el borde de una herramienta de apertura en la grieta.
-
-
-
Desliza la herramienta de apertura a lo largo del borde derecho del teléfono para cortar el adhesivo que sujeta la tapa trasera.
I found that using opening picks for the entire repair was much easier then the pry tool, but that could just be me
You are criminals! This "tutorial" is full of destructive instructions. And whenever trying to make a comment, iFixid admin hides behind the bot personality telling: "Your comment was marked as spam"
People, do not trust them! They tell you everything to break your phone so you will need to bring it to service!You are criminals! No one ever should use the triangular "mediator" pick for iPhones, or planar connector picks! The back cover is NOT gorilla-glass, and it will crack in multiple places immediately! Only very thin "watchmaker" opening plates(initial pickup) and 0.1mm rigid PP stripes (cut from cheap tool packages, or 7-eleven food packs) may be used there. Before that the side rim - not the cover itself should be heated to boiling point and constantly re-heated while tearing the two-sided scotch. The opening strip may be replaced 2-3 times while reaching the opposite side, because it collects the torn glue. This instruction from iFixit is a pure sabotage for tricking non-expecting users to repair-shops.
The same goes to battery, if you don't risk using solvents, which may damage the screen and the circuit. Only rounded PP strips may tear off the battery scotch. It should be preheated from the screen side, until the battery becomes hot.The commenter who keeps saying "you are criminals" over and over may have been using this guide to repair a different phone, so he or she is confused. On the Galaxy S10e, I had no trouble heating and lifting the cover as described (though I had to reheat the iOpener several times). If you heat it gently with the iOpener and long enough, you're not stressing the back cover because the glue will come loose almost immediately. (I could have almost lifted it with a fingernail).
-
-
-
-
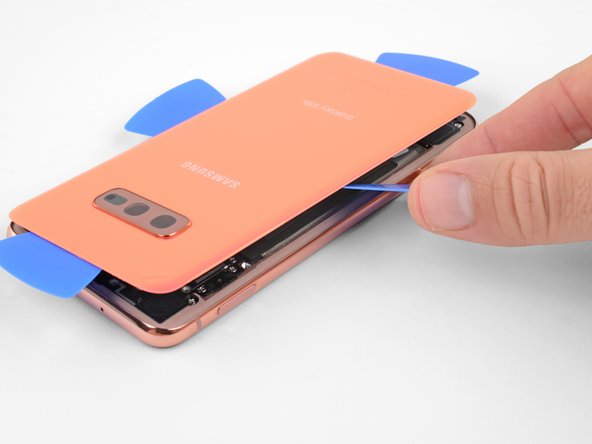
Inserta una púa de apertura cerca de la esquina derecha superior del teléfono y deslízala alrededor de la esquina y por el borde superior del teléfono.
-
Deja la púa de apertura en el lugar para prevenir que el adhesivo se vuelva a adherir.
-
-
-
Aplica un iOpener caliente al borde izquierdo del teléfono durante dos minutos.
-
-
-
Usa las púas de apertura para levantar con mucho cuidado la tapa trasera.
-
Si encuentras cualquier resistencia, deja de hacer palanca y usa una púa de apertura para cortar cualquier resto de adhesivo.
-
Remueve la tapa trasera.
-
-
This should be the very last step in the guide, but the edit button seems to only allow editing the content, not the positioning in the guide. Not sure how to fix this.
The photo seems to show someone lifting the old glue off with tweezers. That certainly wasn't true for my glue! I scrubbed it off with isopropyl alcohol and fabric. (Don't use a paper towel or Kleenex because they fall apart. I used a postage-stamp-size square cut from an old athletic sock. With this and the alcohol I was able to get the cover and the phone as clean as they were at the factory.
When doing this, hold the phone at an angle in your other hand so any alcohol dribble to the outside and not to anywhere important.


Para volver a ensamblar tu dispositivo, sigue estas instrucciones en orden inverso.
Lleva tus desechos electrónicos a un centro de reciclaje certificado.
Una vez que hayas completado la reparación, sigue esta guía para probar tu reparación.
¿La reparación no salió como la planificaste? Consulta nuestra comunidad de respuestas para ayuda en la resolución de problemas.
Cancelar: No complete esta guía.
9 personas más completaron esta guía.
Un agradecimiento especial a estos traductores:
100%


Estos traductores nos están ayudando a reparar el mundo! ¿Quieres contribuir?
Empezar a traducir ›

5 comentarios
I just replaced the lens today. I discovered you actually don't even have to remove the back of the phone IF all you're doing is replacing the glass.
L'écran OLED et la la batterie
Isidore LECHAT - Contestar
My s10e is 4 years old now and I found glue had weakend and heating was uneccissary.
ervan.hady - Contestar
I purchased my S10e refurbished, so the exact age and prior repairs are unknown. I believe it had ~200 charge cycles. After 2.5 years, the side adhesive started to fail and there was a noticeable slit under the rear cover. It was unclear if the lithium battery was starting to swell, which would have been a more dangerous thing. As such, 3 out of the 4 sides were easy to open just with sliding the pick.
I heated the iOpeners for 30s in my 1000W microwave and it reached a temp of 180oF. I placed this on the final corner and it released fairly easily.
WL1 - Contestar
Is 180 degrees a good temperature to set the air temperature to if a heat gun is used?
Gee Foe -
Mine released without heat, just caught the edge with a fingernail and was able to work it free without any tools.
Gee Foe - Contestar
I would definitely NOT use a heat gun; the iOpener is the right thing to use. I've repaired many devices and I have lots of heat guns, but a heat gun puts out a tremendous amount of heat, and spreads it everywhere instead of in a controlled manner. The iOpener is about 150 F -- just getting uncomfortable to touch -- and the heat is all in a thin strip. You want to gently heat the edges of the cover, not cook the battery and electronics. Smart phones are expensive and the iFixit tools are cheap. Don't risk your phone to save a few bucks.
MikeT-NYC - Contestar