Introducción
Utiliza esta guía para reemplazar la pantalla rota o rasgada en tu Samsung Galaxy Note8.
Antes de desarmar tu teléfono, descarga la batería por debajo del 25%. La batería podría incendiarse y/o explotar si es perforada accidentalmente, pero las posibilidades de que esto ocurra soy mucho más bajas si se encuentra descargada.
Note: Esta guía te indica que reemplaces solo la pantalla mientras dejas el marco original, la placa lógica y la batería en su lugar. Sin embargo, algunas pantallas de reemplazo para este teléfono vienen preinstaladas en un nuevo bastidor (o conocido también como chasis), que requiere un procedimiento muy diferente: trasplantar las partes internas de tu teléfono e instalar una batería nueva. Asegúrate de tener la pieza correcta antes de comenzar esta guía.
Esta guía involucra quitar la tapa trasera de vidrio, necesitarás reemplazar el adhesivo para colocar nuevamente la tapa trasera al teléfono.Abrir el Samsung Galaxy Note8 dañará el sello resistente al agua en el dispositivo. Si no reemplazas los sellos adhesivos, tu teléfono funcionará normalmente, pero perderá toda protección contra agua.
Si el marco está dañado o doblado, es importante reemplazarlo o la pantalla nueva podría no montarse correctamente y puede sufrir daño por la presión despareja.
Esta guía te indica que reemplaces solo la pantalla
El proceso de separar la pantalla del marco generalmente destruye la pantalla, así que no sigas esta guía a menos que tengas la intención de reemplazar la pantalla.
Qué necesitas
-
-
Apaga tu teléfono.
-
Prepara un iOpener para suavizar el adhesivo en la parte trasera de la Note8.
-
Aplica el iOpener atrás de la Note8 a lo largo del lado con el botón de encendido.
-
-
-
Usa una ventosa de succión para levantar la cubierta trasera y un lengüeta o punzón plástico para entrar en la abertura.
-
Empieza en la parte media de lado y corte el adhesivo mientras levanta la cubierta con la ventosa de succión.
-
Mueve la lengüeta o punzón hacia la esquina inferior y déjela allí para evitar que el adhesivo vuelva a sellarse en la carcasa.
-
Utiliza otra lengüeta o punzón y deslízalo hacia la esquina superior.
I used an X-acto knife with the flat blade to get it started. I tried using the suction cup - but it’s difficult to get good leverage. Once I got the cover started - I used the metal pry tool (sharpened with a dremel file) and a business card to work it open.
This is definitely the hardest part.
Once off I see all the glue on the curved part of the chassis NOTON THE BACK. Apply heat to curved edges.
-
-
-
Cuando el adhesivo ha sido separado apropiadamente en tres lados podrás levantar lentamente la cubierta trasera.
-
Presta atención al conector del sensor de la huella dactilar al abrir la cubierta trasera. Necesitarás desconectarlo como se describe en el siguiente paso.
I broke the back camera cover for the NUT 8 and then I bought a commercial cover and installed it but the quality of the picture became very bad and my question is, do you know where to get the original cover at a reasonable price?
-
-
-
Utiliza un par de pinzas para desconectar el sensor de la huella dactilar.
don't skip disconnecting the sensor, even if isn't still glued to the case. it has to move away from the NFC/charging coil assembly in order to free the latter so it can be lifted away from the battery.
-
-
-
Remueve la tapa trasera.
How do you swap the fingerprint sensor
You can use a tweezer to swap the fingerprint sensor, you might be careful when doing the step 6, additionally, a tweezer will be helpful when reassemble the fingerprint sensor. please note that your new back cover needs to have the fingerprint adhesive on. most of the product did not have. i have get a LUVSS brand from amazon which came with all OEM adhesive and full set tools, even a B6000 glue, best option to go for replacing the note 8 back glass
-
-
-
-
Ingresa una púa de apertura en el borde superior entre el ensamblaje de la bobina de carga y la antena NFC y la caja.
-
Levanta la parte superior del ensamblaje de la caja.
-
-
-
Usa el extremo plano de un spudger para desconectar el conector de la batería.
-
-
-
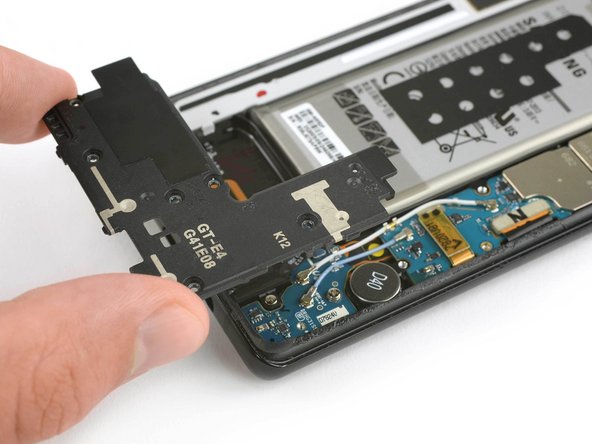
Remueve los seis tornillos Phillips #00 en el ensamblaje de altavoz en la parte inferior del teléfono.
-
-
-
Prepara un iOpener y aplícalo en la pantalla durante al menos dos minutos para aflojar el adhesivo que se encuentra debajo.
-
Coloca tiras superpuestas de cinta de embalaje transparente sobre la pantalla hasta que se cubra toda la cara.
-
Esto mantendrá los fragmentos de vidrio contenidos y proporcionará integridad estructural al levantar y levantar la pantalla.
I'm assuming you flip the phone over so the screen is facing up before step 15 correct?
Yes, that’s correct.
OK thanks Tobias! I figured so but it doesn't hurt to check!
KDJ -
-
-
-
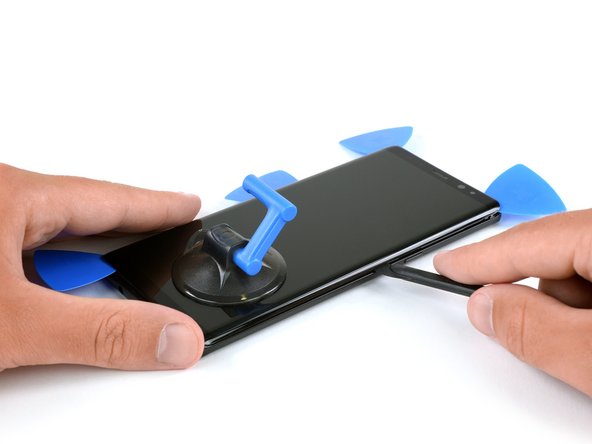
Una vez que la pantalla esté caliente al tacto, coloca una ventosa en el borde superior del teléfono.
-
Si la pantalla del teléfono está agrietada, la ventosa podría no pegarse.Intenta levantarla con cinta resistente o pega la ventosa con pegamento instantáneo y permite que se endurezca.
-
Levanta en la ventosa e inserta un halberd spudger o una púa de apertura debajo del ensamblaje de la pantalla.
-
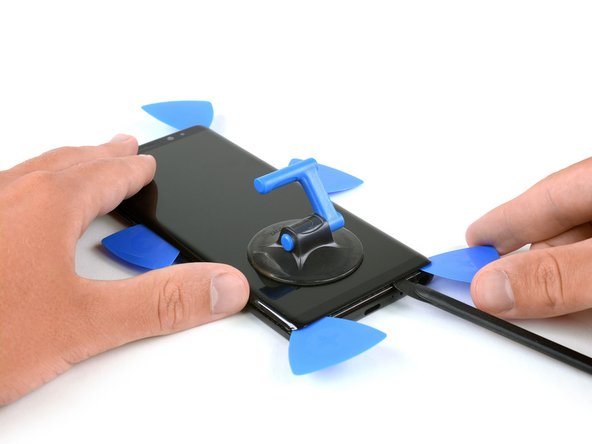
Comienza a deslizar el haldberd spudger/púa de apertura a lo lardo del borde inferior del teléfono para cortar el adhesivo. Deja una púa de apertura en la esquina para prevenir que el adhesivo se vuelva a sellar.
-
Continúa deslizando el halberd spudger/púa de apertura a lo largo del lateral del teléfono e inserta otra púa de apertura.
-
-
-
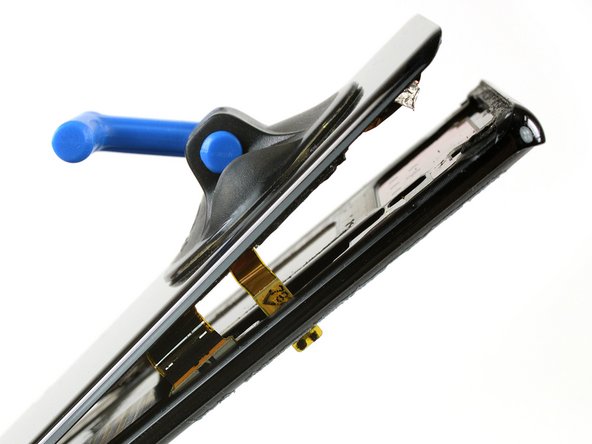
Desliza el halberd spudger/púa de apertura hacia la esquina superior del teléfono para cortar el adhesivo e inserta una púa de apertura para prevenir que el adhesivo se pegue a la pantalla.
-
Repita el procedimiento de calentamiento y corte para los lados restantes del teléfono. Inserta una púa de apertura en cada esquina y en ambos lados del Note8.
-


Si es posible, enciende tu teléfono y prueba tu reparación antes de instalar un nuevo adhesivo y volver a sellar el teléfono.
Después de volver a aplicar el adhesivo, sigue estas instrucciones en orden inverso para volver a montar su dispositivo.
La mejor manera de asegurar la nueva pantalla es con una hoja de cinta de doble cara cortada a medida. Aplica la cinta en la parte posterior de la pantalla, luego alimenta con cuidado el cable de la pantalla a través del marco intermedio. Alinea la pantalla y presiona en su lugar.
Cancelar: No complete esta guía.
99 personas más completaron esta guía.
Un agradecimiento especial a estos traductores:
100%

¡ Mariana Roca nos está ayudando a reparar el mundo! ¿Quieres contribuir?
Empezar a traducir ›


21 comentarios
I’m sorry, but this is just a preview question. When the guide says display, does it mean only the glass screen or the LCD and digetizer as well?
Hello Adrian Gomez. Here “display” refers to the glass, digitizer and LCD combo—those are fused together.
For this repair, do I need to buy the 230 dollar screen part as well?
This guide here is for replacing only the screen without the frame (which we currently don’t have in store). The 230 dollar part includes the frame and the according guide can be found here: Reemplazo del ensamblaje de pantalla con marco en el Galaxy Note8
Hi
I replace the new disply the camera ( front is working ) is not working I tried many things such as factory settings put it didn’t work
now I orderd a new camera hope it works or there is another way to solve it
nasser
I replaced my first cracked display screen today. Everything went quit smoothly thanks to Dominik . Thanks for the guide.
Can I purchase just a replacement front screen and digitiser (easily available on fleabay) to replace a cracked front Note8 screen?
Turns out that the screen+ digitiser are widely available without the LCF fused into them.
Thank you.
Hi ILM, separating the actual display from the front glass/digitizer is a cumbersome procedure that requires special tools. Same goes for fusing them together again. This could be done in well-equipped repair shops. Going for a combined display+digitizer assembly replacement is mostly the way to go for a “regular user” repair.
On part 19 the gold foil what is that and why have non of the parts ive bough come w it
Hi there,
Thank you for the guide and What is your opinion and recommendation on non-original (but fairly looking good)displays that we can buy online? Should we adhere to replace with original parts? What are the most possible consequences that can occur in such non-original replacements? Please share your ideas.
Hi uchira subhashana,
aftermarket screens can work well for repairs and often they are unbranded original parts. So there is nothing wrong with that. However you can’t say this in general because at the end of the day it always depends on where you buy the screen. Not all retailers are evenly reliable and you should always try to find a safe source like iFixit is. Worst that can happen with an aftermarket screen is that the new screen is not working but usually this wont harm your phone and you can send it back. This can happen with original frames as well.
will be awesome if you leave a links with all things we have to buy to do this.
Is there a safe reliable source for just the lcd/screen without the frame? A $200+ repair with 2+ hours of labor makes a hard sell.
I'm none to sanguine on the available options on amazon.
Thankyou again for the amazing guide.
Anyone have any recommendations?
Sorry for the delay, its awesome that you want to get into phone repair as it helps the environment and saves money!
https://www.megafixit.com/products/samsu...
I am repairing a note 8 myself, and will use this display totalling ~$180
Hop efully you guys can help me out, I did this procedure but when turning on the phone with the new display speaker, audio jack not working and Sim not recognized and everything was working properly before with the old screen.
Does iFixit sell display adhesive? if not where can i find some
You can use this double sided adhesive or pre-cut adhesive like this one (select different widths and pre-cut with the dropdown menu).
Is it good to use a glue or a double sided tesa tape to assemble everything back?
You might want to follow the link from two comment above for suitable adhesive :)
I used a heat gun to soften the glue - worked it around the edges, moving the heat gun quickly. As this is my first attempt, I’m still calibrating on this - but other guides mention getting the back cover hot enough so as it’s just too hot to touch. I also have a temp probe on my multi-meter, and I measured appx. 75 deg. C.
One of the other guides showed using a electronics hot plate set to 105 deg C for 60 sec.
Phil Brooks - Contestar