Esta traducción podría no reflejar los cambios más recientes añadidos a la guía de referencia. Ayúdanos a actualizar la traducción o revisa la guía original.
Introducción
Sigue esta guía para quitar y reemplazar una pantalla rota o agrietada en el Pixel 3. Este procedimiento es para reemplazar las pantallas que no están premontadas en un marco. Debido al diseño del Pixel, esto requiere remover la placa madre para acceder a los conectores de la pantalla.
Este procedimiento eliminará destructivamente la pantalla del Pixel 3. Los OLEDs dejan de funcionar cuando se exponen al oxígeno o a la humedad, y por lo tanto se sellan en una encapsulación hermética (esta es también la razón por la que los paneles OLED se vuelven negros debajo de una grieta en la pantalla). Es muy difícil reemplazar el vidrio frontal solo - las capas OLED del Pixel están laminadas al vidrio.
Qué necesitas
-
-
Calienta un iOpener y aplícalo a la parte inferior del teléfono durante un minuto.
-
-
-
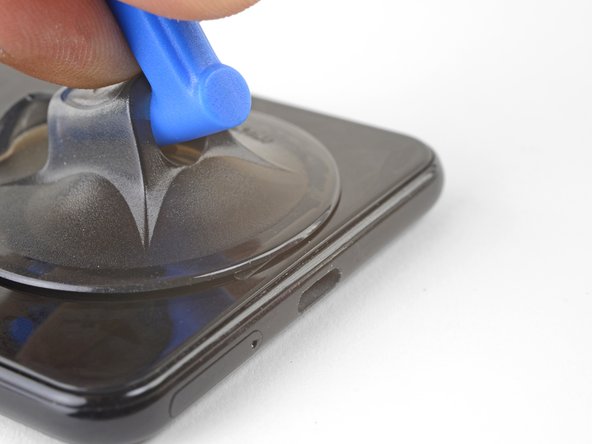
Aplica una ventosa en el borde inferior caliente de la cubierta trasera.
-
Levanta la ventosa con una fuerza fuerte y constante para crear un espacio.
-
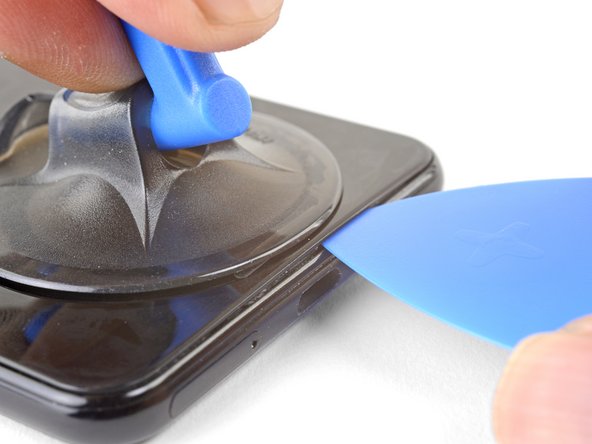
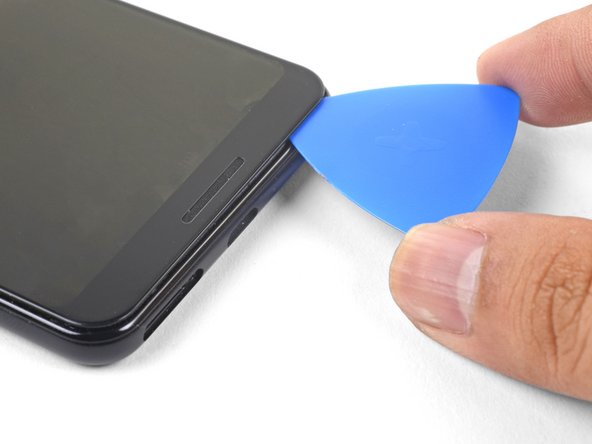
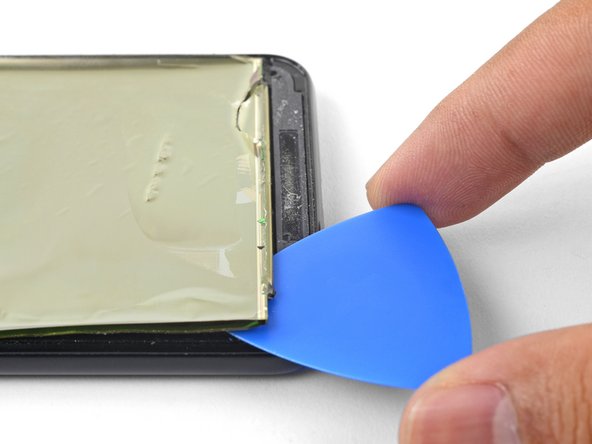
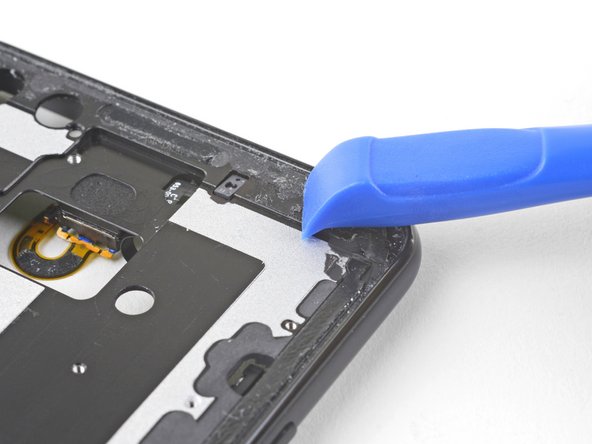
Inserta una púa de apertura en la grieta.
The initial opening/insert is the hardest part of this repair, and if you end up having to use a flat-head screwdriver (etc) to get the first gap opened, you’ll scratch the phone. But it works.
I don’t recommend using a screwdriver. I tried this and it shattered the glass in that area. I replaced the battery on my Pixel 1 recently and noted that heating the FRONT glass on that phone enough to get a gap for one of the pics takes a considerable amount of time AND patience. I was one of the few who didn’t break or otherwise damage the glass in that process. I would say the same rule applies here. Allow for significant time and patiences to heat the old adhesive enough to get a pick inside the cover.
Definitely, this opening/insert is the hardest part of the procedure. I was unable to open even a slight separation with a suction cup and even with tons of heat from a hair dryer. What worked really well, and what I would highly recommend to others who experience really strong adhesive, is to use a small X-acto knife with a #16 blade. Make sure it’s a #16 (find on Amazon) because it differs greatly in angle and rigidity from the usual #11 blade. The sharpness of the blade makes it really easy to find the crack and open a gap, where you can then insert a pick with no problem.
I used a typical razor blade (like Matt and Rick and Greg) pressing the whole of the blade against the edge (blade parallel and flush against the back cover). The razor slipped under enough that I could get a pick in. (No damage, but when I first tried the corner of the razor, a small cut was immediately evident. Only use the whole blade.) Then, I used blue picks exclusively.
I'm very curious about the dental floss method. I'll try that if I need to get back inside.
I really wanted to level off the back of the phone when pulling on the suction cup in this step, but found it was actually pretty easy once I used the opening tool to push down on the edge of the bezel, at the crack, barely putting any force on the back of the phone at all (just to keep it steady).
I have about a 2 year old Pixel 3. iOpener didn’t work at all on this step, but once I broke out the hair dryer, I was able to get the phone hot enough to insert the pick (no screwdriver or xacto knife needed)
I’m having trouble with the iOpener too. It is frustrating because I practiced on a bricked iPhone earlier this week and it was effortless. My Pixel 3 is also about 2 years old. Out of curiosity, were you replacing the charging assembly because of the charging cables fitting too loosely on the phone or for some other reason?
Edwin -
I used a stanley knive to get started and then a combo of opener and plektrums.
All went well till I used to much force on the camera corner and broke the back into lots of small pieces. Be careful on that corner, people.
But the new camera does focus, so for a first attempt at fixing a phone I am happy.
I heated the bottom up with the Iopener and then used a rectangular razor blade and the suction cup to lift the bottom. Place the entire blade edge into the crack and push/pry while lifting with the suction cup. As soon as you have a gap start to open, have a second person insert a pick into the corner. It was actually really easy. I had given up after a couple of tries without a blade. My Pixel 3 is 2 years old.
Agreed with many other comments here. My Pixel 3 is two years old and neither the iopener nor a blow dryer were capable of loosening it enough. I ended up using a VERY hot iopener for a couple of minutes, the suction cup, and then a wide-bladed razer blade (about 80% width of bottom edge to spread out the stress and prevent risk of fracturing the rear glass panel). Once adding the razer blade I was able to get the pick in and follow the rest of the instructions as written.
I also had to follow this process but resorted to a heat gun on its lowest setting as I couldn’t get the iOpener hot enough (I was afraid of overheating and bursting it). Other how-to videos also show using a thin piece of plastic or metal to slide into the corner, saving substantial time.
Helped me to notice that the focus here is to lift in the center (like right over the USB C connector). Was able to get it with just the iOpener and pushing down on the rest of the phone with the pry tool. My phone is over 2 years old though and it took about 50 minutes of working / reheating / repeating
Destroyed the glass back trying to take it off. This is not an easy phone to take apart.
It would be nice if there was a heads up that the rear of the phone is glass….. Phone piping hot glass shattered and splintered
Hi John!
Good suggestion! I'll add that into the step.
The Jimmy tool from the iFixit toolkit worked like a freakin’ charm. Took me 10 mins to open the phone and it came out unscathed.
I used dental floss to cut the adhesive and slide it open. Just wiggle it back and forth from the corners until you cut enough that you can switch to a pick. Helps to have a extra hand to hold the phone.
Brother, dental floss was an absolute godsend!!! After 4 hours with the IOpener and attempting to use a heat gun which I balked from out of fear I came across this comment. Teased it around a corner and was then able to saw away at the adhesive. A lot of patience but no heat or potentially damaging tools needed. Thanks!
With the floss, I wasn't getting enough "sawing" motion as it just slipped through my fingers too easily (my phone is about 4-5 years old I think, I bought it used). So I tied a few knots around a pen (the kind with a gripper, so the floss won't slide off) and it was a lifesaver. After about 3 hours trying other ways, the floss/pen saw got it open enough to stick the picks in and eventually open it up!! Thank you to everyone who commented these tips!!
I have a 2-3 year old phone. The “heating pad” and blue picks did not work. I tried for two hours. Two weeks later I tried again using a hair dryer on high heat and low fan, and a rectangular utility razor blade. Start at the bottom of the phone, heat, and insert the razor blade into the gap and use it to cut the adhesive back a little at a time. Do not insert it more than about a 1/4 to 3/8 of an inch. Once you start getting a separation, use the blue picks to hold it open. Go up both sides an inch or two on both sides at a time. Do not pry the back open more than an 1/8 of an inch or so until you get it separated all the way around. Be patient. Work slowly. This took about 30 minutes once I got the hang of it. Do NOT pull the cover away from the phone after you separate it all the way around!! Read the instructions several times. There is a cable to the finger print sensor attached to the cover!
Re-read these entire set of instructions and ALL of the comments TWICE before you start.
I used and iOpener and the iFixit tool (the one with the metal spatula). Ended up inserting about 10 picks, but it worked.
I couldn’t get the pick in so I tried the sharper pry tool. Got it in and slid it sideways towards the corner —- BLAM, the back shattered. Not a good home repair experience.
Similar experience with others, iOpener would not heat up the phone enough to separate the adhesive. Had to use a hair dryer to finally insert the blue pick. After sliding the pick past the corner, the back glass scattered… Time to get a new phone and give up on this battery replacement i guess.
On a 3 years old Pixel 3 phone, after unsuccessfully trying iOpener and the suction cup, I used a piece of dental floss, and it worked perfectly.
To make the process easier - tie little loops on both ends of the floss, put a finger or a screwdriver through the loop to help pulling the floss. Pull it through to one side and then to another, continue until you’re 1/2 inch in. At this point it should be possible to insert a pick
This was the hardest step. I could not get the pick in at all. I tried dental floss and it slid in no problem. I eventually stuck the very tip of a razor blade in which allowed me to slide in a pick. Also be very careful when sliding the picks around as my wife broke the back glass of her phone, try to keep pressure as even as possible without bending the glass much.
I like the dental floss idea. I set edges of the phone-back and also the blunt metal tool on an electric cooktop on low heat, and the adhesive softened enough to be workable. SAFETY TIP: the tool and phone were hot to touch, I wore cotton gloves throughout this task.
Can confirm, with a 4-year-old Pixel 3, it was not possible to get the back cover off with any amount of force, heat, and the blue picks. I managed to get started by using single-edge box cutter razor blades and a hair dryer on high--got in just a bit under the left corner, then added a second blade along the bottom edge, and a third near the right corner, and that gave me enough space to get a blue pick in and start replacing the razors with blue picks one by one, and then proceeded as per the instructions. Dental floss is a neat idea; I wish I'd tried that--the razors didn't do any damage, but I was worried about the possibility.
Agreed; a 4cm section of utility knife was required along with heat/alcohol/patience to break the initial seal.
Managed to do it without cracking anything, but sweated through this step quite prolifically.
Mike -
3.5 year old phone. Just wanted to confirm that dental floss, combined with the iOpener, does the trick to get the first pick in.
I was able to slide the floss under the bottom right corner if you are looking at the phone. I alternated between sawing with the floss and applying heat with the iOpener. Eventually I was able to get a pick in that corner and was able to remove the rest of the adhesive by applying heat with the iOpener and sawing with additional picks around the perimeter of the phone.
My Pixel 3 is 4 years old. I tried using the iOpener heat pad for 2 minutes. Didn't work. Then I tried using a heat gun on low for about 30 seconds. Didn't work. Then I used the heat gun on high for about a minute, then the suction pulled it off. I used the picks to peel the rest off. I thought about using the floss which would have work well. I also though about letting the phone sit in the car when it's hot outside. The key is to be patient and try not to use something besides the plastic tools. If I can do it then anyone can. Heat guns are very cheap and a good tool to have.
After unsuccessfully trying all prying tools including metal ones - I finally hit the motherlode with the most inane thing possible-a stiff plastic collarbone-it has a slight angle at one end that gives it the required amount of rigidity and prying power.
Yes, a heat gun is an absolute must!
I've ordered the battery replacement kit, it will arrive next week. I keep my house cool in fall/winter, so I'm a bit concerned about how well I'll be able to heat the adhesive. I'm considering heating the whole phone in my convection oven's "warm" function. Its thermostat compares well with a meat thermometer, I might try my lab grade thermometer too.
I see "The phone is designed to work best in ambient temperatures between 32° and 95° F (0° and 35° C), and should be stored between ambient temperatures of -4° and 113° F (-20° and 45° C)." 113° F seems pretty low, perhaps that's when the adhesive begins to soften appreciably. I was considering starting at 120F. (And trying "toast" if it defeats me.)
Experience, suggestions, good luck wishes welcome.Hi reg!
The temperatures you listed are operating temperatures—once the Pixel exceeds those temperatures, it will shut down and show a heat warning symbol. Ideally, you want to heat just the adhesive perimeter. The back cover should be slightly too hot to the touch—aim for about 80°C.
3.5 year old phone. Thank the gods you guys recommended floss. I broke 2 nails trying the picks. Unfortunately I used extra slippy floss so I couldn't even tie it into loops to help. Even with the floss I couldn't saw my way through or get a pick in so I ended up just adding more and more floss (and more and more hairdryer) until I could get the pick in. After that it was just careful muscle.
Despite several frustrating tries across several days, I had zero success creating a molecule of seam gap to begin to remove back cover without breaking it! Suction cup ineffective (needs 3rd? hand to pull-and-insert pick); heated iOpener doesn't U-fold to cover perimeter (soon cools off in 63F room); hair dryer likewise too-brief heat; Exacto or utility knife blades useless. Dental floss no luck. But only! once I tried keeping the Px3 on my electric 1980s food warming tray (Lo heat ..hands resting on insulating hot pads ..it also! keeps iOpener hot) ..would dental floss fit into corners (No chance midpoint at charge port per foto); then blue pick. But! floss was too slippery to pull/grip strongly ..one must tie loops at each end, then use old-style 'peg' clothespins (or pen with clip) to roll-up floss length to enable pulling right at insertion point. With fingers/hands preoccupied manipulating floss, it was awkward to simultaneously tug suction cup upward effectively at all. Didn't break rear cover ;-)
I had no luck with just a suction cup and heat. Heat and a razor blade as others commented worked well; HOWEVER, while working the blue opening picks around the bottom I cracked the glass. The back glass is more delicate than I anticipated. :-( Be very careful/gentle with the back glass! If I attempt this with another glass-backed phone I will plan to work on an actively heated pad for this step.
The plastic opening pick was to thick to get into the (almost nonexisting) crack. I had to use a thin sharp metal knife, which scratched the paint a little bit but finally made the crack wide enough for the plastic pic to fit in and finish the job. Perhaps one thin metal pick would be helpfull in the kit for this first step.
As others have said, this step was by far the most difficult and time consuming. DO NOT RUSH THIS STEP THOUGH. Take it slow and do NOT bend the back glass to try and speed things up. Keep slicing your way though, patiently being aware of the fingerprint sensor cable. On my phone it required a lot of force and im not even sure the puller was able to make a gap.. I found that the plastic picks were too thick to get a crack started. I ended up using a piece of plastic from a clamshell plastic container to finally make it through the crack and through the adhesive. I tried the plastic backing of one of the adhesives but that wasn't rigid enough. Once though I made my way about half way through; and in haste I made the fatal mistake of bending the back glass to much and shattered it. Yes it is in fact made of glass! It will NOT BEND. I ended up getting a replacement back glass kit on Amazon for $16 which had a new sensor and the adhesive pre-installed which was very nice.
-
-
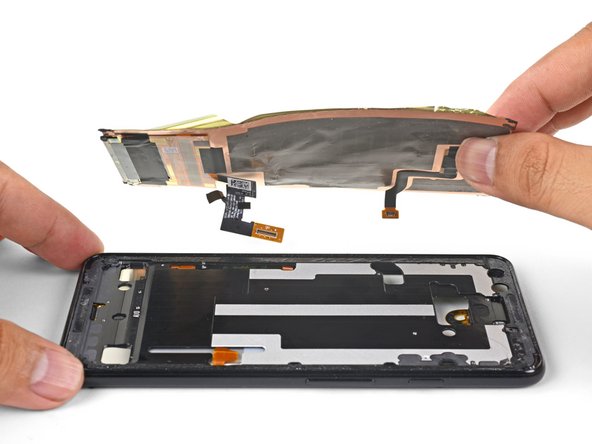
While the text is accurate, I found this image to be misleading - it appears as if the finger print cable is attached to the right side (from a back-of-phone reference). Only upon close image inspection is it clear that the cable has already been disconnected from the connector that is positioned just inside and above the power button.
-
-
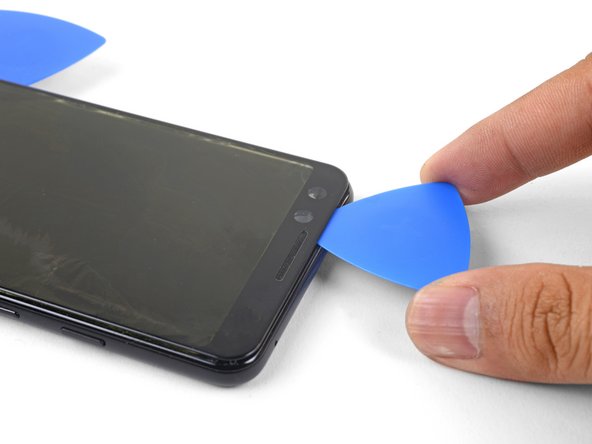
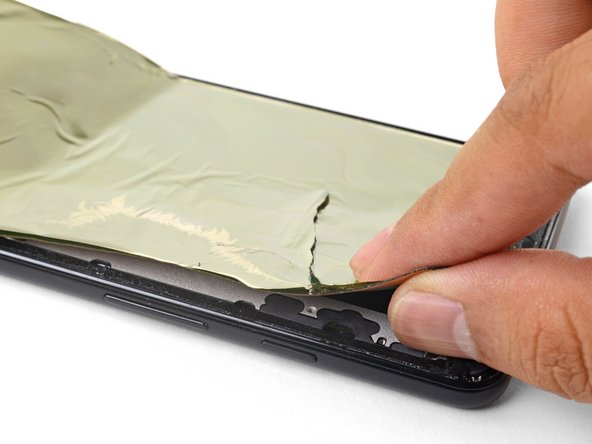
Desliza el adhesivo a lo largo del borde inferior del teléfono y alrededor de la esquina derecha.
-
Mantén la púa en el borde inferior para prevenir que el adhesivo se vuelva a adherir.
The back cover is glass! I was sure it was some kind of nice plastic. It's probably obvious to a lot of people, and it's very obvious in hindsight, after shattering it. But I'm writing this in case anyone else is oblivious to the last decade of smartphone design. I got impatient and flexed it out as I cut the glue. Don't do that. Carefully work your way around and avoid applying any significany bending forces to the cover.
Yup, shattered the back of my phone while trying to follow these instructions. You can’t flex the back cover much at all or it is toast.
Someone else had said to use floss to start the cutting I found this to be the most useful. After I heated the phone with a hairdryer I would cut some of the adhesive at the bottom corner after sawing away for a bit I was able to move it enough to fit one of these picks in then I slowly reheated around the edge as I slowly moved more picks and slowly cut away at the adhesive .
Didn't have guitar picks. I grabbed some plastic packaging from my recycle bin and cut it into a bunch of triangles to hold the gap open as I worked my way around.
Leaving the pick in the bottom as described while using another to slide up for the next steps shattered the back cover - these instructions should be clear to only leave the pick in the bottom with as little inserted into the phone as possible as it does not take much flex at all to shatter. Also beware that there are no replacement back covers available from iFixit either :(
-
-
-
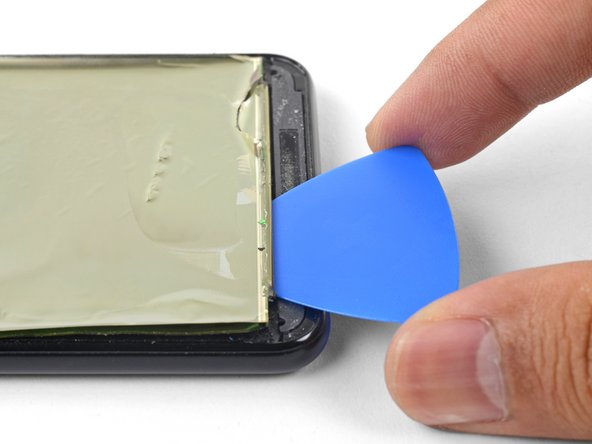
Calienta el borde derecho con un iOpener y continua cortando el adhesivo con una púa de apertura.
What is the required temperature to soften the glue? Can I just use a small bag filled with boiling water or a heat gun.
The iOpener is a plastic bag filled with what appears to be water so probably, yes.
-
-
-
Continúa calentando y cortando a través del resto del perímetro del teléfono. Deja una púa en cada borde para prevenir que el adhesivo se vuelva a sellar.
-
Al cortar por encima del botón de encendido, no insertes la púa más de la mitad para evitar dañar el cable del sensor de huellas dactilares.
-
-
-
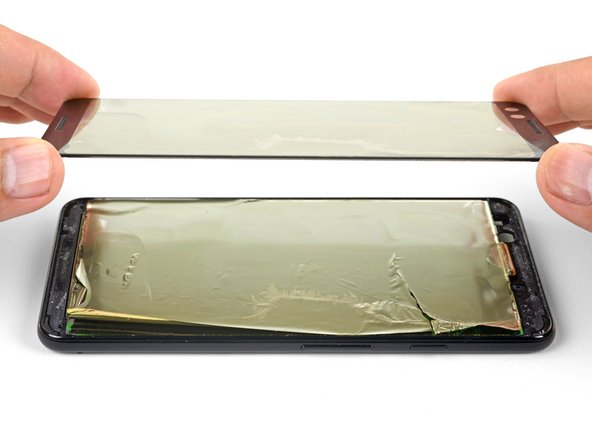
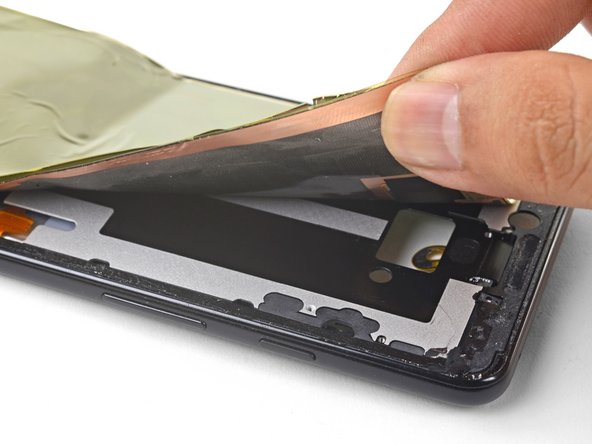
Una vez que cortes alrededor del perímetro del teléfono, con cuidado levanta el borde izquierdo de la tapa trasera.
-
Desliza la cubierta posterior a lo largo de su eje largo y apóyala de forma que el cable del sensor de huellas digitales no esté tirante.
Yes, per Step 7 foto, lift rear cover to vertical only! along the left edge (camera, power/volume) ..while also keeping the opposite long edge down (almost touching wireless coil) ..as left/camera edge rises (and right/lower edge slides leftward), take care to keep lower/right edge no further rightward than midway across coil (foto) ..then gently rotate now-lower right edge leftward 'clockwise', lay it flat without straining cable. [When my rear cover eventually suddenly released from the perimeter adhesive while still pulling on it, the upward force almost yanked the cover off cable; got lucky]
[this updates my minutes-ago post ..apparently one can't edit after 5min? ..or delete/replace with this?]
-
-
-
Retira los dos tornillos Phillips de 4,1 mm de largo que sujetan el soporte del conector de huellas dactilares.
-
Durante el reensamblaje, ten cuidado de no apretar demasiado estos tornillos o podrías dañar la pantalla.
A magnetic screwdriver tip helped here.
If you purchase iFixit’s kit for this replacement, their included driver is magnetic. Helped immensely!
after replacing my camera, my screen had a big green/white vertical stripe. I didn’t see the disclaimer about overtightening these screws. I think it may be related.
-
-
-
Usa la punta de un spudger para sacar el soporte del conector de huella digital que se encuentra debajo de la bobina NFC.
-
Remueve el soporte del conector de huella digital.
Re-inserting this is tricky and requires pretty good dexterity. The shiny metal frame of the wireless charger is also not held down, so you may wish to gently apply pressure to it as you try to re-position the connector bracket.
I could use a whole tutorial on how to reinstall this
-
-
-
Usa la punta de un spudger para hacer palanca y desconectar el conector de huellas digitales de su zócalo.
-
-
-
Remueve la tapa trasera.
When reassembling is it better to first attach the new adhesive back gasket to the phone back or the phone chassis frame?
Hi Tom!
It depends on the adhesive. Carefully align the adhesive to the phone by matching the contours. Note which adhesive side is backed by a clear liner, and which side is backed by a colored liner. The clear liner should be removed first. Whichever component the exposed adhesive faces should be the first surface to apply to.
Hope that helps!
Two things:
1) I recommend attaching the adhesive to the Phone frame and not the back panel. As you attach, you can more easily see the gaps and guide the adhesive along the groove, leaving equal space all around.
2) To transfer the fingerprint sensor, you will need double-sticky tape to make a new gasket. Put the tape on the back from the inside, and trim with a blade to make the sensor hole. To attach the sensor, place it on something small to raise it off your working surface, then lower the back over it. You’ll be able to see the sensor alignment as you lower the back, which helps get a good position.
Oh, and be prepared: Removing the old adhesive is teeeeedious!! It will take you some time. :-b Alcohol is not a strong solvent, so don’t expect it to remove much; it is mostly for cleaning afterward. In the end, I used one of iFixit’s flat metal tools from the big toolkit to remove the final remains. Its was blunt enough to not cut metal shavings as I cleaned.
I used “medicinal” 91% Isopropyl Alcohol and about 30 Qtips to do the final cleaning of the adhesive, that is, after using a razor blade and the supplied tweezers to remove most of the tape. Patience and many Qtips soaked in IPA removed most of the remaining glue and film.
Greg B -
I ended up reusing the original adhesive as it was in pretty good shape. So far, no problems.
Does your IF356-119-1, Google Pixel 3 Rear Cover Adhesive, template use 2 sided pressure sensitive tape? Do I simply align it on the back cover and then press it to the device to reassemble the unit? If so, how long til the back cover is “glued” to the unit?
Hi Martin,
The rear cover adhesive is indeed two-sided PSA (pressure sensitive adhesive). Apply firm even pressure for a minute to bond the adhesive to the unit.
When scraping the adhesive off the back cover be careful and don’t apply too much pressure (and/or position the cover against the surface so that it’s supported against the tool used), especially in the corners, or the glass cover rounded edges could break.
Agree. BEWARE of SCRATCHING off the PAINT from the BACK COVER when cleaning !
The back cover is painted glass it seems - using a razor blade to scrape off adhesive also scratches off the paint on the inside of the back cover, under the adhesive, and the clear lines it creates are visible from the outside of the back case. If you are using a phone case, this won’t matter.
Greg B -
My battery swelled and did all the hard work getting started popping the back open so I didn’t need the iOpener to get the back off, but now the iOpener is handy to heat up the sticky foamy factory original adhesive.
I found isopropanol ineffective. I found heat softens it considerably. Just very warm, like hot water warm, is effective. Use tweezers or a plastic blade to help pull it off. Metal blades will either gouge the plastic or, worse, create metal shavings that will wreak havoc.
Are there any solvents other than isopropanol that work and won’t harm the plastic? How do pros speed up this step?
I think pros often use heating pads or special jigs. They’d set the temperature, set the phone on the pad, and let the phone heat up for a few minutes. Heat guns are also a popular choice.
I found that an opening pick worked well to scrape the glue off the inside of the curved edges of the back cover
The adhesive on mine took some effort to clean off all the way. During reassembly I did notice that my replacement back panel adhesive was larger than I expected and based off of product photos it looks like I received the 3 XL adhesive instead of the 3. That ended up having me fiddle with the adhesive to try and get it to fit right and unfortunately the camera side now has a bit of a gap that I can still press down on without having it stick. I’ll see how it stays but I fear I might have to get another adhesive. The guide was very helpful though!
The actual back glass cover part is missing from the parts list and it appears iFixit doesn't sell it anymore.
It used to be there, and I ordered one months ago and used this guide successfully then. I broke it again and the part is no more.
-
-
-
Remueve los cinco tornillos tipo Phillips que sujetan la bobina de carga inalámbrica:
-
Dos tornillos de 1.9 mm
-
Dos tornillos de 4.2 mm
-
Un tornillo de 4.3 mm
-
Remueve la bobina de carga inalámbrica.
The top 1.9 mm screw can’t be totally removed — it comes out with the coil once loosened
This was not true for me.
Can I leave the wireless charging coil out?
This may also allow a bigger battery!
You may be able to! Note that this is not only the wireless charging coil, but also the NFC antenna (the upper loop).
The 1.9 mm screws are actually screwed into the head of another screw beneath them. Sometimes the lower screw unscrews instead of the upper. That leaves both screws attached to the coil. If possible you should separate the two screws and screw the lower one back in first using a small flat blade screwdriver.
If you decide to clean the wireless coil assembly, be aware that IPA will completely remove the printed 2-D barcode on the lower right. (Hopefully that's not important.)
There were 7 screws!!! The last two were both near the power button.
Yes, I have that to, and a little black plastic part covering I port.
l won’t mother board google pixel3 contact on WhatsApp +250783996430
-
-
-
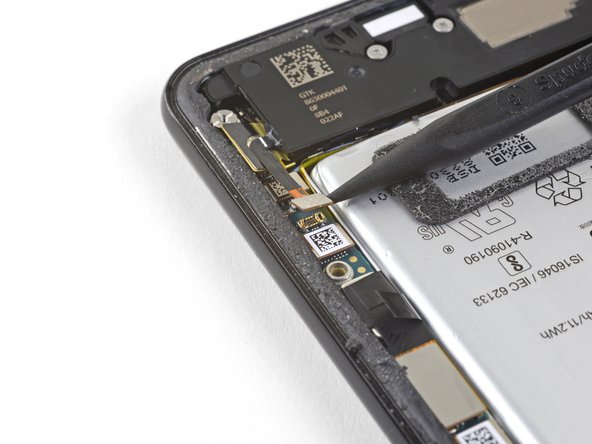
Usa la punta de un spudger para levantar y desconectar el conector de batería de su zócalo cerca del borde derecho del teléfono.
The connecton board is quete flexible … be careful otherwise other connectors may get looze.
This is also valid when re-assemble … pusing battery conector may cause other conectors to “pop“.
The square connector directly below the battery connector came undone and will not pop back into place.
-
-
-
Remueve los dos tornillos que sujetan el soporte de cámara:
-
Un tornillo Phillips de 4.1 mm
-
Un tornillo separador de 4 mm
-
Remueve el soporte de cámara.
-
-
-
Cámara de visión normal
-
Cámara gran angular
Make sure that the cameras each go in exactly the same spots or not the phone will boot loop forever. The connectors on both of these cameras are the same, so they will easily connect on both sides. So be careful.
-
-
-
-
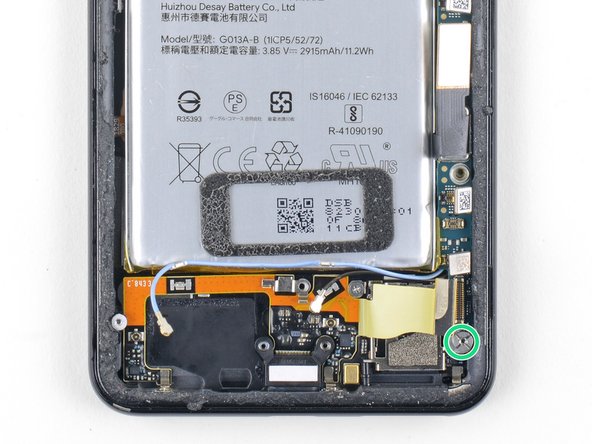
Usa la punta de un spudger para levantar y desconectar el conector de altavoz del zócalo de la placa madre cerca del borde derecho del teléfono.
-
-
-
Remueve los siguientes cuatro tornillos tipo Phillips:
-
Un tornillo de 1.9 mm
-
Un tornillo de 4.3 mm
-
Dos tornillos de 4.3 mm con vástagos delgados
-
Retira el pequeño clip de conexión a tierra del orificio izquierdo. Ten cuidado de no extraviarlo
-
Retira el pequeño inserto de plástico del lado derecho del puerto USB-C.
The three 4.3 mm screws highlighted in Orange are not all the same. The one closest to the battery is slightly different, a larger diameter. It would be good to note this for reassembly.
Thank you! I will adjust the guide to reflect this!
Ah, all great and everything but this should be in big bold red letters: “Be sure to reinstall this insert before you screw down the daughterboard.“
Screwed 4.3 thin screw without that small insert and penetrated new screen module behind…
Noted and changed!
-
-
-
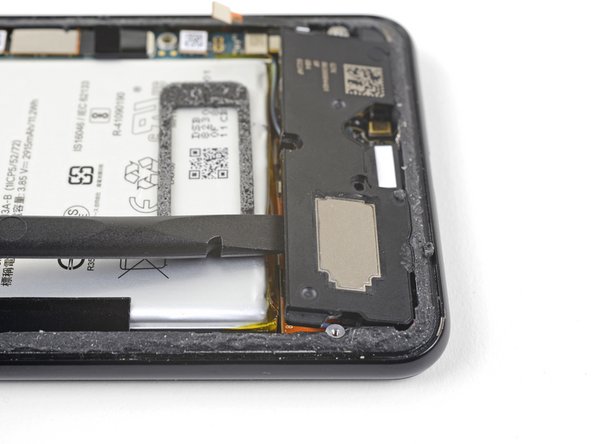
Remueve el altavoz.
-
Si está en buenas condiciones, puedes reutilizarla. Asegúrate de que la junta no cubra el orificio de salida.
-
Si la junta está fuera de lugar, remuévela y reemplaza el adhesivo con una tira pre-cortada o cinta Tesa.
tesa tape seems hard to come by in my town. Is there anything else I could use?
Never mind. A bunch of tesa tape came with the kit
Adhesive is VERY strong. Used the Ifixit opening tool on the uppder edge between battery and speaker to get better leverage without risking cable / board underneath or the battery.
-
-
-
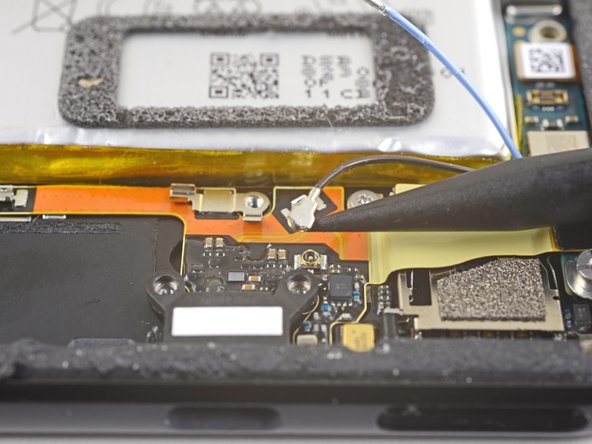
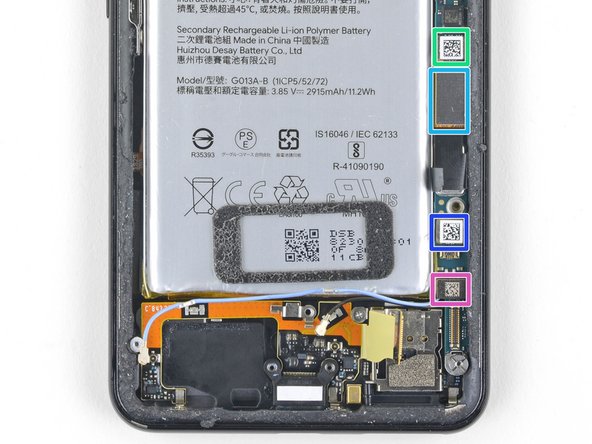
Usa la punta de un spudger para levantar y desconectar el cable azul de antena de su zócalo en el ensamblaje de carga.
-
-
-
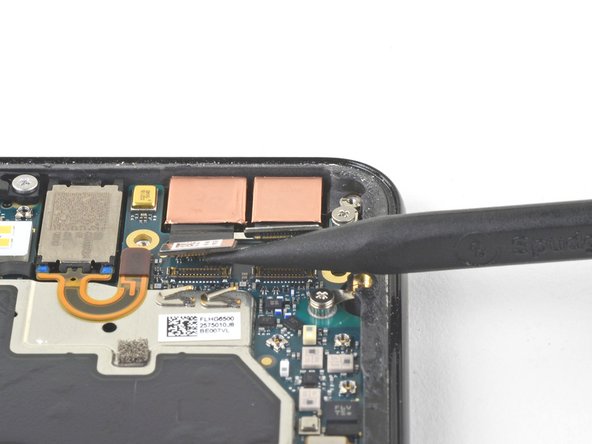
Usa el extremo plano de un spudger para levantar con cuidado la cinta negra que mantiene el cable flexible de la pantalla en su lugar, cerca del borde derecho del teléfono.
-
-
-
Usa un spudger para hacer palanca y desconectar los siguientes siete conectores press-fit de sus zócalos de la placa madre:
-
Conector de botones externos
-
Conector superior de micrófono
-
Conector de auricular
-
Conector del sensor de presión a la izquierda
-
Conector de pantalla
-
Conector de sensor de presión a la derecha
-
Conector de bandeja SIM
Note the "screen connector" mentioned here SHOULD refer to the smaller, upper screen connector. The one indicated here was already disconnected in step 31.
-
-
-
Usa la parte plana de un spudger para doblar cuidadosamente el cable flexible del altavoz del auricular hacia arriba, fuera del camino de la placa madre.
I STRONGLY recommend simply REMOVING the phone speaker at this step. It is VERY easy to damage the flex cable when removing the motherboard if the speaker is left in place. Removing the speaker entirely takes only a few seconds. Just be sure to replace the adhesive when re-installing. TESA tape works fine here.
When re-installing, make sure you remember this part when putting the motherboard back in. I followed the steps in reverse order, as suggested, and almost damaged the orange flex cable when I pushed it down.
-
-
-
Remueve los seis tornillos que sujetan la placa madre en su lugar:
-
Un tornillo Phillips de 4.2 mm
-
Tres tornillos Phillips de 1.9 mm
-
Un tornillo Phillips de 1.9 mm
-
Un tornillo separador de 3.83 mm
-
Remueve y retiene los pequeños clips de metal de conexión a tierra.
During reassembly, don’t forget to replace the plastic piece before placing the 4.3mm screw.
-
-
-
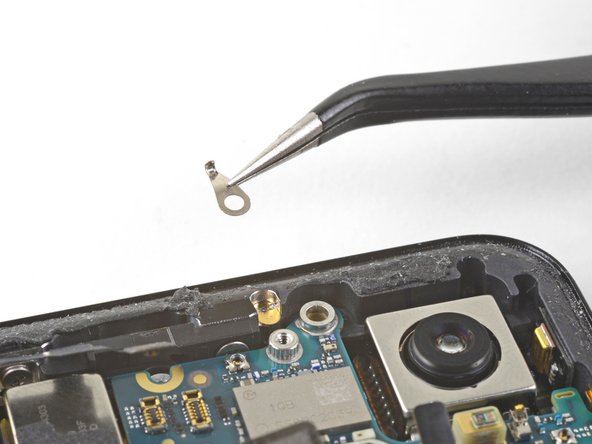
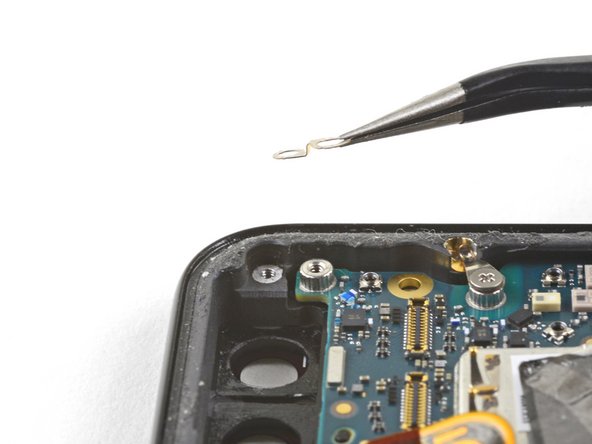
Con cuidado remueve el soporte de antena del borde superior izquierdo del teléfono.
-
Orienta los clips de forma tal que el lado plateado esté mirando hacia arriba.
-
Los clips con forma de lágrima deben tener sus puntos hacia el borde del teléfono.
-
Los clips con doble orificio se hunden hacia el orificio derecho superior del tornillo del marco.
-
-
-
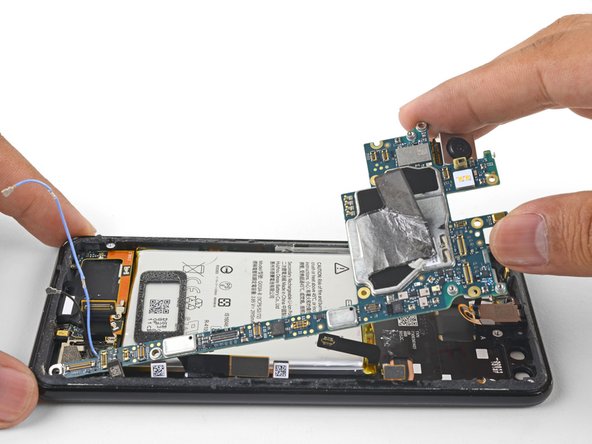
Inserta la punta de un spudger cerca de la esquina superior izquierda de la placa madre, justo debajo de la cámara trasera.
-
Presiona suavemente hacia arriba para aflojar la placa madre, doblando todos los cables flexibles para acomodarlos al movimiento.
-
Si la placa madre se siente firmemente asentada, comprueba si hay cables flexibles o tornillos que aún puedan estar conectados.
-
-
-
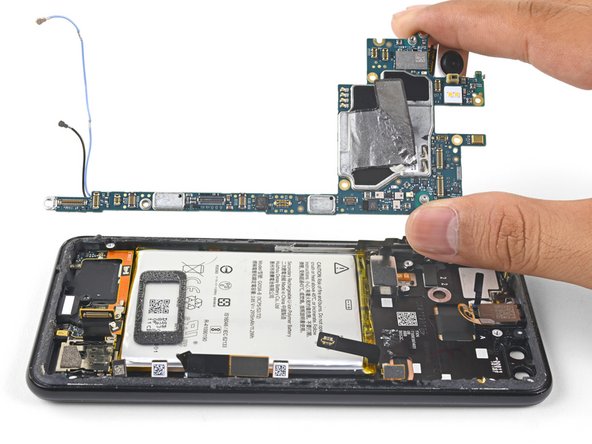
Inserta el spudger debajo del borde superior de la placa madre y haz palanca con cuidado para aflojar la placa madre.
-
-
-
Aplica un iOpener caliente al borde inferior de la pantalla durante un minuto.
-
Coloca una ventosa cerca del borde inferior de la pantalla, próxima al puerto USB-C.
-
Levanta la ventosa con fuerza constante para crear una grieta.
-
Según cuán gastado esté tu teléfono, esto podría requerir bastante fuerza. Si estás teniendo problemas, aplica más calor e intenta de nuevo.
-
También puedes intentar calentar y tirar del borde largo del teléfono para poder acceder.
-
Inserta una púa de apertura en la grieta.
-
-
-
Saca el cable de pantalla y el cable del digitalizador de sus recortes.
-
Remueve la pantalla.
-
Limpia todos los residuos de adhesivo del marco del teléfono. El adhesivo que se deja atrás puede aplicar una presión desigual contra la pantalla de reemplazo y dañarla potencialmente.
-
Aplica adhesivo precortado o cinta de doble cara al perímetro del marco del teléfono.
-
Pela todos los revestimientos de plástico de la parte posterior de la pantalla de reemplazo para exponer el adhesivo.
-
Pasa con cuidado el cable de la pantalla y el cable del digitalizador a través de los recortes del marco del teléfono.
-
Coloca la pantalla en el marco y coloca algunos libros en la parte superior durante una hora para ayudar a que el adhesivo de la pantalla se adhiera al marco.
-


Para volver a ensamblar tu dispositivo, sigue estas instrucciones en orden inverso.
Lleva tus desechos electrónicos a un centro de reciclaje certificado.
¿La reparación no salió planificaste? Consulta nuestra comunidad de respuestas del Google Pixel 3para ayuda en la resolución de problemas.
Para volver a ensamblar tu dispositivo, sigue estas instrucciones en orden inverso.
Lleva tus desechos electrónicos a un centro de reciclaje certificado.
¿La reparación no salió planificaste? Consulta nuestra comunidad de respuestas del Google Pixel 3para ayuda en la resolución de problemas.
Cancelar: No complete esta guía.
26 personas más completaron esta guía.
Un agradecimiento especial a estos traductores:
35%


Estos traductores nos están ayudando a reparar el mundo! ¿Quieres contribuir?
Empezar a traducir ›


29 comentarios
To change only the screen glass… Do you have to disassemble the whole phone or just steps 39 to 42?
Thanks
Hi Adrián,
The OLED is bonded to the screen glass. Unlike LCDs, trying to remove the glass only will most likely destroy the OLED screen.
How to differentiate between a pre-mounted and a non pre-mounted display? I don’t want to order the wrong part, hence the question.
The pre-mounted part will come with the frame, which is the majority of the phone body. The screen is already stuck affixed to the frame, but you would have to transfer everything else onto it. The display only part looks like a thin panel with adhesive on the back. It would look like this part.
When buying a replacement screen do I need to buy it with a frame?
This guide is meant to be used with replacement screens without frames. If you buy a screen with a frame, you will have to transfer many components from your existing frame onto the new one.
My Pixel 3 has a broken screen and also the touchscreen is not working (well, only for half the screen; the top half works just fine, the bottom half does not). Will this guide and replacement parts also fix the touchscreen functionality?
This guide should resolve any issues with the screen, which includes touch functionality.
Also, only because the part in iFixit is out of stock, is this the same part?
Unfortunately, this is not the same part we sell. Like many aftermarket screens for the Pixel, the linked part uses a cheaper LCD panel, while the original Pixel has an OLED. The part may install properly, but the image quality will be different.
Hi again @arthurshi . Following up on my comment from Dec 2. I bought the tools and replacement screen, and performed the repair yesterday. Thanks for the guide!
Everything seemed to go alright… but sadly, the touchscreen functionality remains broken. I installed the new screen. The phone turns on and the screen turns on just fine, but it does not respond to my touch :(
Do you think then that the motherboard’s circuitry for the touchscreen is broken? Or is it more likely that I didn’t connect one of the two screen connectors (I believe the large one is for the display, and the small one for the touch)? Anything I can do to debug/test where the problem is?
Any help is much appreciated. And thanks again for the very useful guide! Even if things don’t end up working, I still learned a lot!
Hey @balldude,
You are right in that one connector is for the screen, and one is for the touch (digitizer). Both must be connected in order for both screen and digitizer to function. The press-fit connectors contain very small contacts. Any small amount of dirt/finger oils on the contacts may cause issues. You can clean them by wiping with lint-free cloth and isopropyl alcohol.
If the screen still won’t respond to touch after that, it may be that the circuitry responsible for the digitizer is broken on the logic board.
Hey, did you try what arthurshi advise and if so did it work. I am also having the same issue and I would hate to buy a new motherboard. Thank in advance.
Hi Jose.
I tried reattaching the connectors a few times and testing it out. I couldn’t get it to work, unfortunately. I ended up buying a new Pixel 4 and sending in the Pixel 3 to Google as a trade-in, for which I received $105.
Hope that helps, and good luck!
Hi to be more in depth the problem I been having is that when I took the screen of my pixel 3 there was a piece of flashing(not sure the proper turn that came off with screen it was glued down to mid frame and the screen is supposed to sit in it. Can you buy this part or do you have to buy a whole new mid frame ? Thank you for your time and all your guides they have been very helpful to me.
Hi S Lee,
Are you speaking of the part shown in step 44? If so, that is part of the display panel. It should be fully removed before you install a replacement screen.
Do NOT follow the author's advice to just “bend up the earpiece speaker flex”. This might work fine enough for board removal, but going backwards, you will likely rip the flex trying to jimmy it back in place. The flex is like plasticated paper ribbon. Just remove the earpiece speaker before you reassemble, and place it in its spot after you put the board back in.
Ps. The plastic insert in step 19 should be given a bit more attention. If you forget to reinstall this plastic insert, the screw that you replace in that spot will instatly ruin your lcd - no matter how gently you screw it in. You'll be left with a green or pink line through your lcd. It seems worth mentioning, as I have seen this before.
Hi Sarah!
Thanks for the suggestions! I will make a note of that and your comment above in the relevant steps.
Followed the guide and was able to install the display in my Pixel 3. Adhesive removal is super frustrating though. But I have a current issue, the rear camera is vibrating like crazy. You could actually hear the camera move around (autofocus) when you open the app. Any ideas?
Hi Levi,
It sounds like the adhesive holding the rear camera is not holding the modules in place. If possible, open the phone, pry the rear cameras up, and install some replacement adhesive.
Hi Arthur, thanks for replying. I feel like I wasn't able to word my problem properly so I made this short video https://youtu.be/cnym7ROK6eU
Seems like an issue in OIS or focusing. Do I need to replace my camera module?
I had major difficulty removing the back panel.
I’m unsure if there was a crack prior to removal of the back panel as the attempt to use the suction and pry tool had catastrophically failed. Huge cracks sprawled as the pry tool was inserted, quite a bit of force was necessary to have the pry tool inserted whilst awkwardly positioning my hands to hold the phone down whilst pulling up on the suction tool. I had used heat tools to ease the adhesive behind the panel but may have lost patience as the heat bags provided does not seem to have the same effect as a heat gun would. That being said, the heat bags, while they heat up I’m unsure if they heat up to the critical temperature of the adhesive for it to weaken.
further instruction for the temperature of the bags would help; what is the max temperature I can warm the bag up before it fails (explodes in the microwave) while meeting minimum temperature required to ease the adhesive. currently it said to warm it up for 30sec, 1 every 10 mins, doesn’t cut it.
as the guide said, “The remaining part of the screen is affixed to the phone frame”. why we need to remove the motherboard?
You unfortunately can't release/reconnect the display flex cable and the digitizer cable without removing the motherboard. There isn't enough of a gap to thread the cable through the side.
Need a big update. I order a new screen and it's not only the screen but the whole case. So, I have to transfer all the components to the new case. It is not explained here.
Just pay close attention when you take it apart.......... take pictures.
keep screws in order so they go back in the same place...
and im sure there are videos on youtube showing screen replacement in-frame
Sorry about that! We accidentally linked that part to this guide. We are in the process of writing a guide specifically for the screen and frame assembly replacement part.
Older devices may require 2 or more minutes with a very hot iOpener. Also note, the photo shows the opener on the FRONT of the phone. The heat needs to be applied to the back of the device!
Rick Johnson - Contestar
I just realized that I was trying to pry apart the front of my Pixel 3… and have separated the class from the display. ??♂️ Even though the rest of the directions show the back, it would be nice for the first picture to also show the back, just to be safe.
JR Raith -
Agreed, I’ve done exactly the same and completely broken my display. I probably should’ve paid more attention to the initial steps before diving in but the step could do with a new picture for sure.
Daniel Fryer -
Thanks for the comments! I’ll add a note in the step warning people to make sure to pry the back cover, not the screen.
Arthur Shi -
I prefer my favorite opening method with something like this. Dental floss. So thin it can slide in the gap. A little sawing to get it far enough past the edge to lift and get the first pick in.
John Hoffstetter - Contestar
I found another wonderful tool. I used something like medicine packaging which is aluminum foil with plastic. It’s thin and strong enough!
Christie Lin - Contestar
I also went for the hairdryer, dental floss, and then the provided picks and this worked. Not easy to get that initial seal broken but once that's done the rest is pretty easy.
James - Contestar
I needed 20 nerve wracking minutes with a hairdryer
Amy schneider - Contestar
My battery had bulged and opened the case for me!
Warmed it up a bit with hairdryer
Floss helped also.
David Lincer - Contestar
I found I wasn't able to get the edges hot enough. I ended up using my heat gun (for shrink tubing) instead.
Kurt Nowak - Contestar