Introducción
Las baterías del iPhone están preparadas para mantener el 80% de su capacidad durante un máximo de 500 ciclos de carga, lo que dura aproximadamente entre 18 y 24 meses para la mayoría de los usuarios. Después de eso, es posible que tu iPhone tenga que cargarse con mucha más frecuencia y que iOS te avise de que el rendimiento se ve afectado (en otras palabras, tu teléfono funcionará más lento). Utiliza esta guía para reemplazar la batería y restaurar el rendimiento de tu iPhone como si fuera nuevo.
Si tu batería está hinchada, toma precauciones apropiadas.
Nota: Después de la reparación, tu iPhone puede mostrar una advertencia sobre la "autenticidad" de la batería, incluso cuando se utilizan piezas originales de Apple. Si tu iPhone funciona con normalidad, puedes ignorar la advertencia.
Qué necesitas
-
-
Apaga el iPhone antes de empezar a desmontarlo.
-
Retira los dos tornillos pentalobe de 6.7 mm de longitud situados en el borde inferior del iPhone.
-
-
-
Coloca tiras superpuestas de cinta de embalaje transparente sobre la pantalla del iPhone hasta cubrir toda la cara.
-
Si no puedes hacer que la ventosa se adhiera en los próximos pasos, dobla un trozo de cinta resistente (como cinta adhesiva) en un asa y levanta la pantalla con eso.
-
-
-
Tira de la manija azul hacia atrás para desbloquear los brazos del Anti-Clamp.
-
Desliza los brazos sobre el borde izquierdo o derecho de tu iPhone.
-
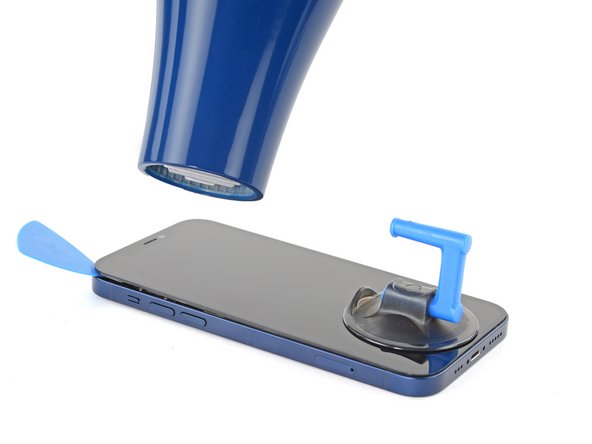
Coloca las ventosas cerca del borde inferior del iPhone, una en el frente y otra en la parte posterior.
-
Aprieta las ventosas para aplicar succión en el área deseada.
-
-
-
Empuja la manija azul lejos de la bisagra para activar el modo de apertura.
-
Gira el mango en el sentido de las agujas del reloj hasta que vea que las copas comienzan a estirarse.
-
Asegúrate de que las ventosas permanezcan alineadas entre sí. Si comienzan a salirse de la alineación, afloja ligeramente las ventosas y vuelve a alinear los brazos.
-
-
-
Apoya tu iPhone sobre algo resistente, como un libro de tapa dura, para que descanse con las manos libres y paralelo al suelo; así te resultará más fácil trabajar con él en los pasos siguientes.
-
Usa un secador de cabello para calentar a lo largo del borde inferior del iPhone. El cristal debe sentirse ligeramente muy caliente para tocar.
-
Espera un minuto para dar al adhesivo la oportunidad de soltarse y crear una apertura.
-
Inserta una púa de apertura bajo el cristal trasero cuando el Anti-Clamp cree un hueco lo suficientemente grande.
-
Salta los siguientes tres pasos.
-
-
-
Utiliza un secador de peloo una pistola de calor o prepara un iOpener y aplícalo en el borde inferior del iPhone durante unos 90 segundos para ablandar el adhesivo que hay debajo.
you need to clarify that you're heating the metal frame, not the glass. I gently heated the glass front with a heat gun and proceeded to pull the display apart, destroying it. :-(
-
-
-
Si utilizas una sola ventosa, aplícala en el borde inferior del teléfono, lo más cerca posible del borde.
-
Si tu pantalla está muy agrietada, cubrirla con una capa de cinta de embalar transparente puede permitir que la ventosa se adhiera. También se puede utilizar cinta adhesiva muy resistente en lugar de la ventosa. Si todo lo demás falla, puedes pegar la ventosa a la pantalla rota.
-
-
-
Tira de la ventosa hacia arriba con una presión firme y constante para crear un ligero hueco entre la pantalla y el marco.
-
Inserta una púa de apertura en el hueco situado bajo el bisel de plástico de la pantalla.
I ended up separating my screen rather than getting under the scren casing.. BE CAREFUL TO MAKE SURE YOU ARE UNDER THE PLASTIC PART - otherwise you just ruin your screen... No mention of this precaution here and as a result, my phone is more broken than when I started
-
-
-
Usa un secador de pelo para calentar el borde derecho del iPhone (el borde con el botón de encendido) durante 90 segundos o hasta que la pantalla esté demasiado caliente para tocarla.
The pictures show the left side. I know that the left side is the correct one to heat, but for others it might be confusing. 😊
@dviosz You mean the right edge! The picture shows the left edge but the right edge is the correct one to heat. As described in the text next to it. Opening the phone from the left will damage it!
Yeah, sorry, you are right! (tried to make something less confusing and created more confusion by accident… 😃 )
-
-
-
Desliza la púa de apertura alrededor de la esquina inferior derecha y a lo largo del borde derecho del iPhone, cortando el adhesivo que sujeta la pantalla.
Be very careful your tool does NOT go in between the screen and the screen frame but rather in between the screen frame and the phone frame. If not you will damage the screen and need a new one. This has happened to MANY people. The screen is attached to the screen frame with an adhesive that can also be accidentally pried apart if not done carefully. This is probably more likely if your tool is too thin, if you dont heat enough, or dont suction and pull enough to create a big enough separation between the screen frame and the phone frame.
-
-
-
Usa un secador de pelo para calentar el borde superior del iPhone durante 90 segundos o hasta que la pantalla esté un poco demasiado caliente para tocarla.
-
-
-
-
Inserta la púa por debajo de la esquina superior derecha del panel de la pantalla.
-
Desliza la púa alrededor de la esquina superior derecha. Debido a los clips, es posible que encuentre cierta resistencia.
-
Desliza la púa por el borde superior y corta los restos de adhesivo que sujetan la pantalla.
-
-
-
Utiliza un secador de pelo para calentar el borde izquierdo del iPhone durante 90 segundos o hasta que la pantalla esté demasiado caliente para tocarla.
-
-
-
Inserta una segunda púa de apertura en la esquina inferior izquierda del iPhone.
-
Gira ambas púas simultáneamente hasta que se suelten los clips del borde izquierdo.
Don't go from just one corner (like on the right side). I've done that (forgot this step) and broke my screen.
-
-
-
Gira el iPhone de modo que el borde derecho quede mirando hacia ti.
-
Abre el iPhone abriendo la pantalla desde el lado derecho, como la tapa de un libro.
-
Apoya la pantalla contra algo para mantenerla apoyada mientras trabajas en el teléfono.
-
-
-
Retira el tornillo Y000 de 1.25 mm de longitud que sujeta el soporte de la cubierta del conector de la batería y la pantalla.
-
-
-
Usa un par de pinzas para quitar el soporte del conector de la batería y la pantalla.
-
-
-
Utiliza un spudger o una uña limpia para levantar el conector de la batería de su zócalo en la placa lógica.
-
Dobla el conector ligeramente para alejarlo de la placa lógica y evita que entre en contacto accidentalmente con el zócalo y proporcione energía al teléfono durante la reparación.
-
-
-
Utiliza una spudger o una uña limpia para levantar el conector del cable del panel OLED de su zócalo en la placa lógica.
-
-
-
Retira los cinco tornillos Y000 de 1 mm de longitud que sujetan el soporte de la cubierta del conjunto del sensor frontal.
what 3 are the small ones? I don't know anymore
in case anyone else reads this, the 3 small ones screw directly onto the board. the two longer ones screw into standoffs (the two top screws, based on the picture above)
Skyejobs -
-
-
-
Utiliza un spudger o una uña limpia para desconectar el conector del cable del conjunto del sensor frontal.
-
-
-
Retira los cuatro tornillos Phillips #000 de 1.5 mm de longitud que sujetan el altavoz.
-
-
-
Despega la primera lengüeta adhesiva de la batería para despegarla del borde inferior de la misma.
-
-
-
Agarra la tira con los dedos y tira lentamente de ella alejándola de la batería, hacia la parte inferior del iPhone.
-
Tira con la suficiente fuerza para mantener la tensión en la tira, pero no la fuerces. Dale tiempo para que se estire y se despegue de la batería.
-
No presiones la batería. Sujeta el iPhone firmemente por los lados.
-
Mantén la tira plana y sin arrugas. Intenta tirar uniformemente de toda la tira, en lugar de tirar principalmente del centro o de un lado.
-
Tira en un ángulo bajo para que la tira no se enganche en el borde de la batería.
-
Si la tira adhesiva se rompe, intenta recuperarla con los dedos o con unas pinzas sin punta y sigue tirando, pero no hagas palanca debajo de la batería..
-
-
-
Agarra la lengüeta con los dedos y tira lentamente de ella para separarla de la batería, hacia la parte inferior del iPhone.
-
Repite el procedimiento anterior en las dos lengüetas restantes.
-
Espera aproximadamente un minuto para que la solución de alcohol debilite el adhesivo.
-
Usa el extremo plano de un spudger para levantar suavemente la batería.
-
-
-
Remueve la batería.
-
Si queda alguna solución alcohólica en el teléfono, límpiala cuidadosamente o deja que se seque al aire antes de instalar la nueva batería.
I just buy this phone 5 months ago..and the battery health is 90%, why? I need to change the battery or not?
-


Si es posible, enciende el dispositivo y prueba la reparación antes de instalar el nuevo adhesivo y volver a sellar.
Asegura la batería nueva con adhesivo precortadoo con cinta adhesiva de doble cara. Para colocarla correctamente, aplica el nuevo adhesivo en el dispositivo en los lugares donde se encontraba el adhesivo antiguo, no directamente sobre la batería. Presiona la nueva batería firmemente en su lugar.
Para volver a montar el dispositivo, sigue los pasos anteriores en orden inverso. Aplica el nuevo adhesivo donde sea necesario después de limpiar las zonas pertinentes con alcohol isopropílico (>90%).
Para un rendimiento óptimo, después de completar esta guía, calibra tu batería recién instalada.
Lleva tus residuos electrónicos a un R2 o e-Stewards certified recycler.
¿La reparación no ha ido como estaba previsto? Intenta solucionar algunas soluciones básicas de problemas, o pide ayuda a nuestra comunidad de problemas de iPhone 12 mini.
Cancelar: No complete esta guía.
46 personas más completaron esta guía.
Un agradecimiento especial a estos traductores:
100%


Estos traductores nos están ayudando a reparar el mundo! ¿Quieres contribuir?
Empezar a traducir ›


12 comentarios
I don't think it's stated clearly enough that the display adhesive is VERY strong and you might think you've gotton a big enough gap when sticking in a pick will actually separate the layers of the screen and break it (defintely not speaking from experience). Make sure the phone is totally, thoroughly heated and be very, very careful.
+1
Tried it without the clamp for two hours and couldn‘t get it open. With clamp, it was opened within 30 minutes.
Overall battery replacement worked well, the instructions were clear enough to follow along. Would do this again… but with the clamp. ;)
same pried in between layer and then realized after after i separated the bottom corners that needed to go deeper
Hi karim,
the batteries that you can buy for iPhones in our shop are not OEM.
you should always ask the shop where you go if you will receive a warning message saying the battery was not changed by apple. unless the shop knows how to properly install the right batteries, you will get that message.
I have a problem every time I soldered the cell to the new battery it no longer works could you help me with a tip!!! I've been watching the video more than 100 times I'm interested in learning, but even so the original flex burns
Ich habe bereits einige Akkus getauscht. Aber das Display vom 12 mini ist wirklich heftig verklebt. Ich habe kaputt gemacht.. keine Chance. Durch das erwärmen hat sich das Glas von der Platine gelöst oder ich habe es durchs hebeln getrennt.. Jedenfalls zeigt das Display nichts mehr an. Also nochmal der Hinweis. Überlegt es euch gut! evtl sind 99€ für einen Akkutausch bei Apple besser investiert.
Don't do this repair, just don't. The battery adhesive is very strong, but that's not the problem. When you finally get the battery replaced, you will have a permanent badge notification on your settings app that indicates that you are not using an OEM battery. But that's not even the problem. When I did this repair, I was connecting the new battery and sparks and smoke came out, and now my screen has a line across it. Obviously this is user error to an extent, but I have replaced iphone batteries around 15 times, no exageration, and I've been WAY rougher than I was in this case and nothing bad happened. I still have no idea what I did to make this happen, I can guarantee the battery connector only touched the area on the board where it was supposed to connect. I couldn't tell you if this is because it's not an OEM battery, or if Apple is making these phones more fragile on the inside (though I suspect it's a bit of both), but ultimately it's just not worth it do attempt this repair, go to an Apple store.
This is a solid guide. I was able to replace my battery with the fix kit and these instructions. Unfortunately, I destroyed my display in the process. Probably the same issue that Wesley pointed out here.
I'm guessing I didn't have the adhesive loosened enough along the right-hand side. I was sliding the pick up along that edge, apparently hulked out on it, and a crack shot across the screen. I applied more heat and carried on from there. Once everything was reconnected, I hit the power button and could feel the haptic feedback from the phone booting up, but there was nothing on the display.
Learn from my mistake and be absolutely sure the adhesive is softened enough that you don't have to apply much force to separate the screen from the body (and maybe pick up the Anti-Clamp, I think I would have had a better time with that thing).
is it oem apple battery, because at some photo shows(Ifixit) and another shows (apple) ... wait your answer?
karim - Contestar
BEWARE! This screen isn’t the same as older iPhone models’ screens. The iPhone mini 12-screen comes with a thin plastic frame around the screen on its back. Thus, make sure you don’t insert the pick in between the screen and its plastic frame, as you’ll seperate the screen and leave the plastic frame still sitting in the phone’s metal housing (this cost me 100 dollars…). Carefully heat the sides of the metal housing and do not heat directly on the glass, as doing so will potentially loosen the glue from the plastic frame stuck to the screen. My suggestion is that you watch a video of this repair as this step-by-step-guide is undercooked.
Dan - Contestar
This is an excellent comment. Following this step-by-step guide to the letter will break your screen; it's by far the worst iFixit guide I've seen to date.
Dormouse -